This post may contain affiliate links. Please read our disclosure policy.
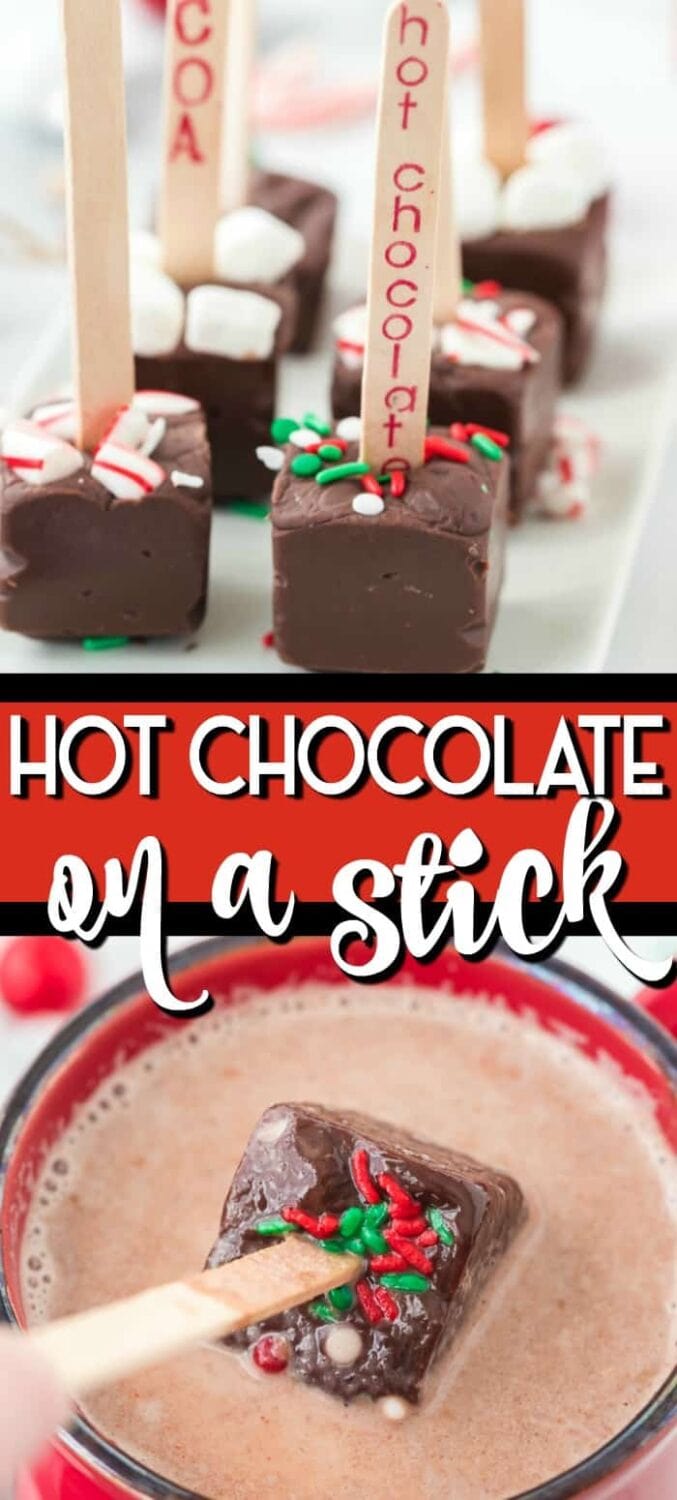
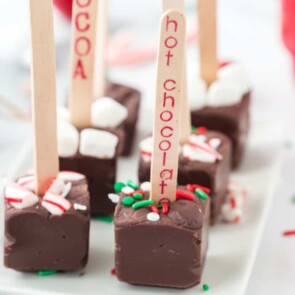
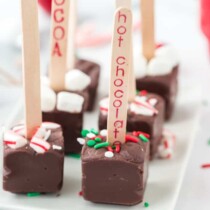
Our Hot Chocolate on a Stick recipe not only makes a delicious and creamy cup of homemade hot chocolate but also makes a super cute DIY holiday gift for friends and family!
DIY Hot Chocolate on a Stick
Whether it is the holiday season or not hot chocolate is always a great way to warm the hearts and bellies of loved ones! This Hot Chocolate on a Stick adds a whole new level of delight to that delicious cup of hot cocoa.
The decadent blocks of chocolate dissolve into a warm cup of milk and create a rich and creamy cup of hot chocolate that your kids will beg for!
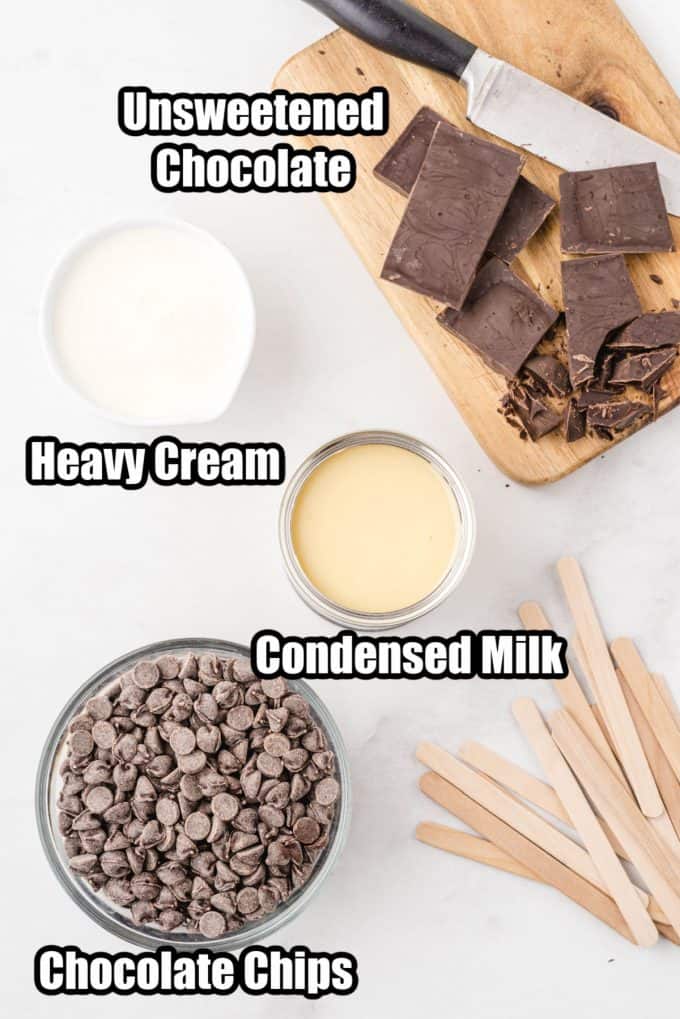
Hot Chocolate on a Stick Ingredients
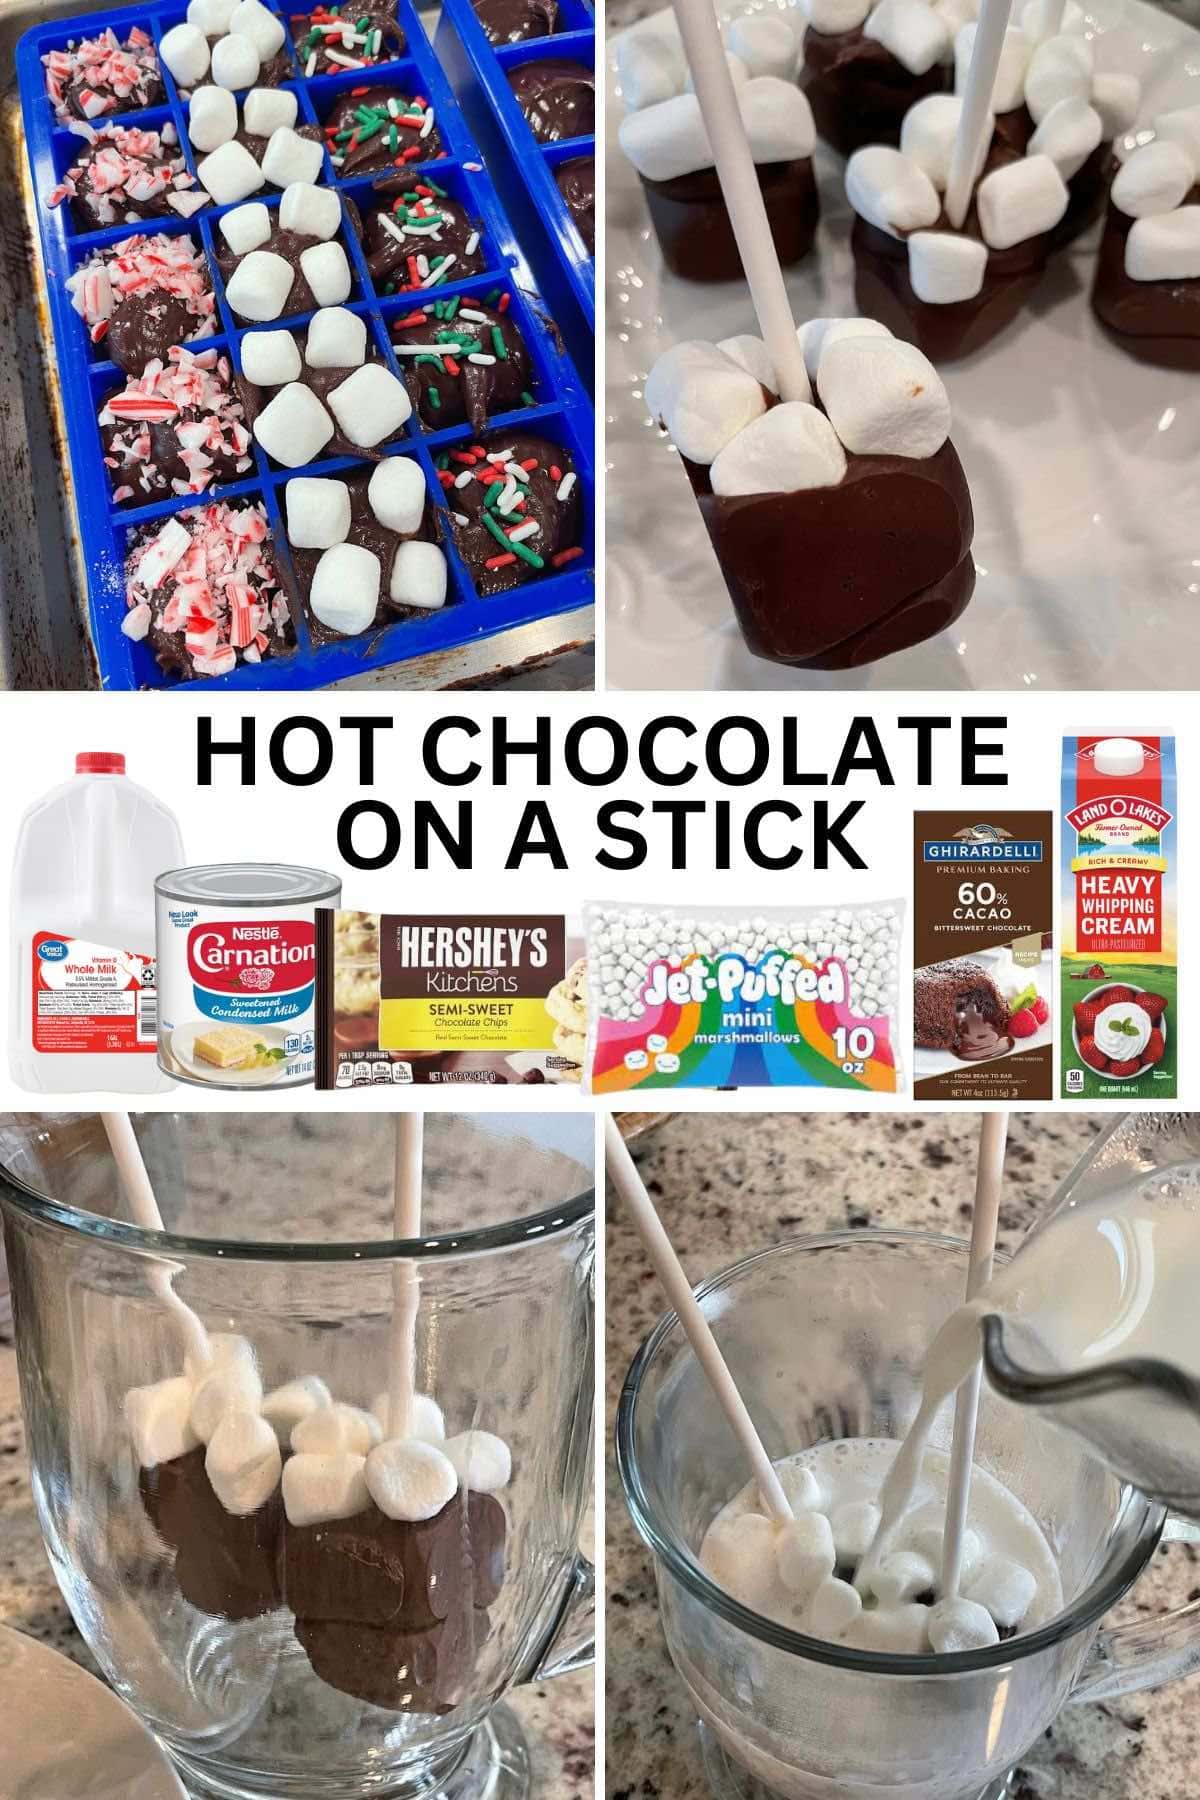
- 3 cups semi-sweet chocolate chips: I used Nestle Toll House chips
- 4 ounces bittersweet (60% cacao) baking bar: I used Ghirardelli brand
- 14 oz. can sweetened condensed milk
- ½ cup heavy cream
- 28-30 lollipop sticks
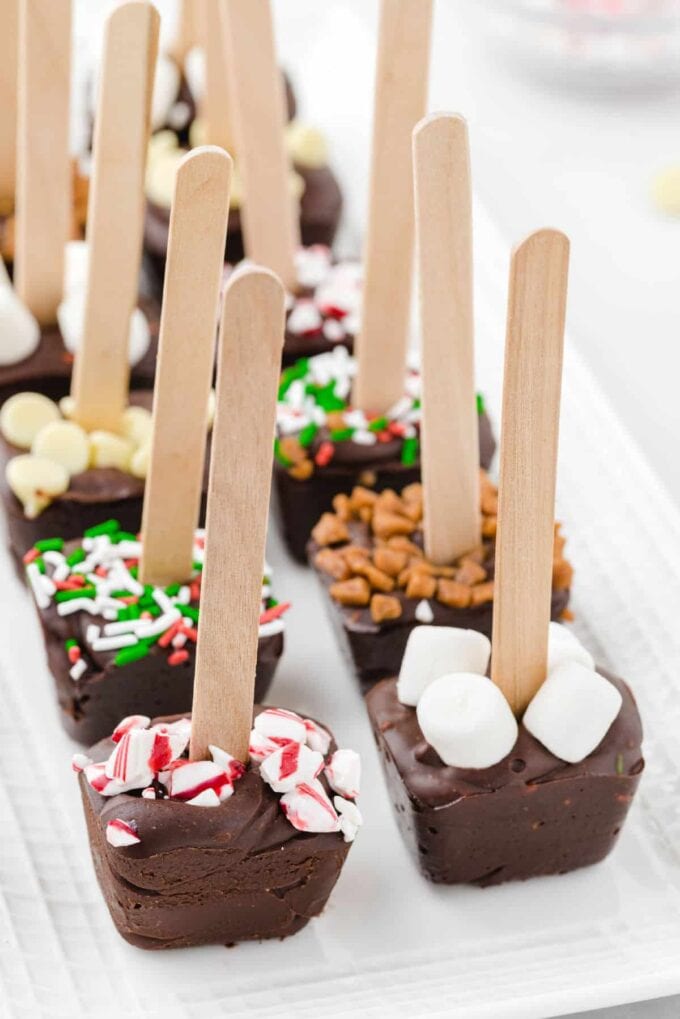
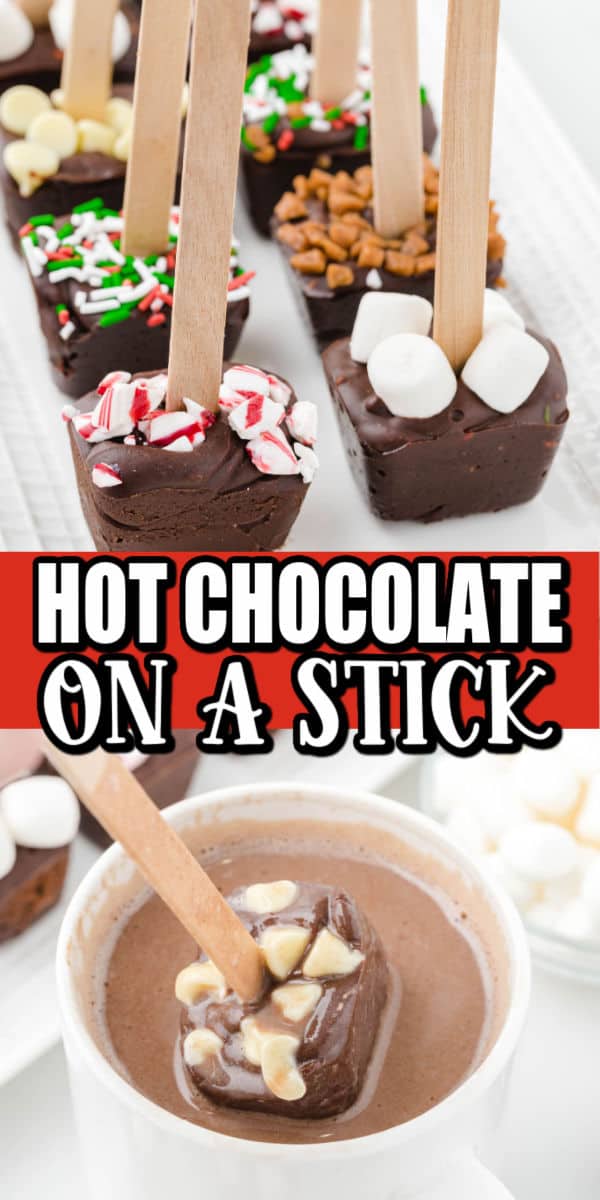
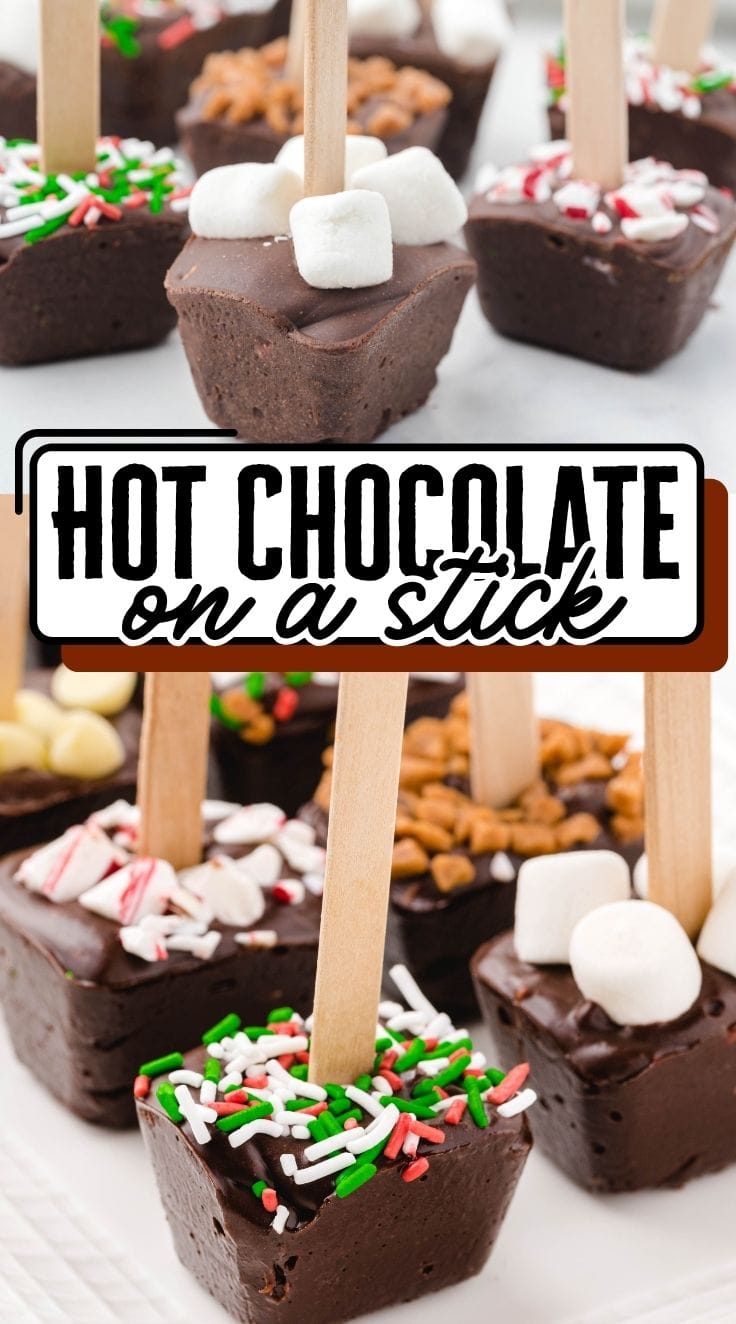
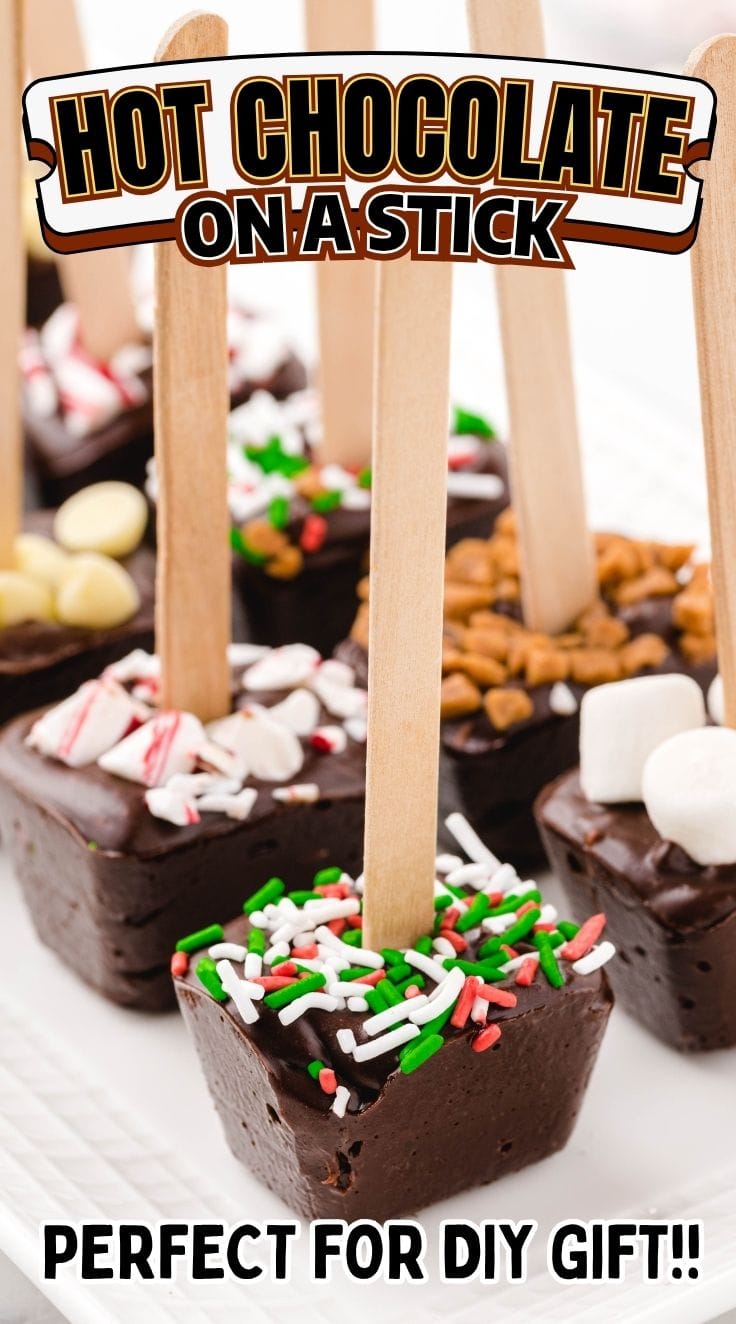
- 1 ½ cups mini marshmallows: You can also use whatever other toppings you would like such as crush candy canes or sprinkles, the list is endless.
- 1 gallon of whole milk
How to Make Hot Chocolate on a Stick
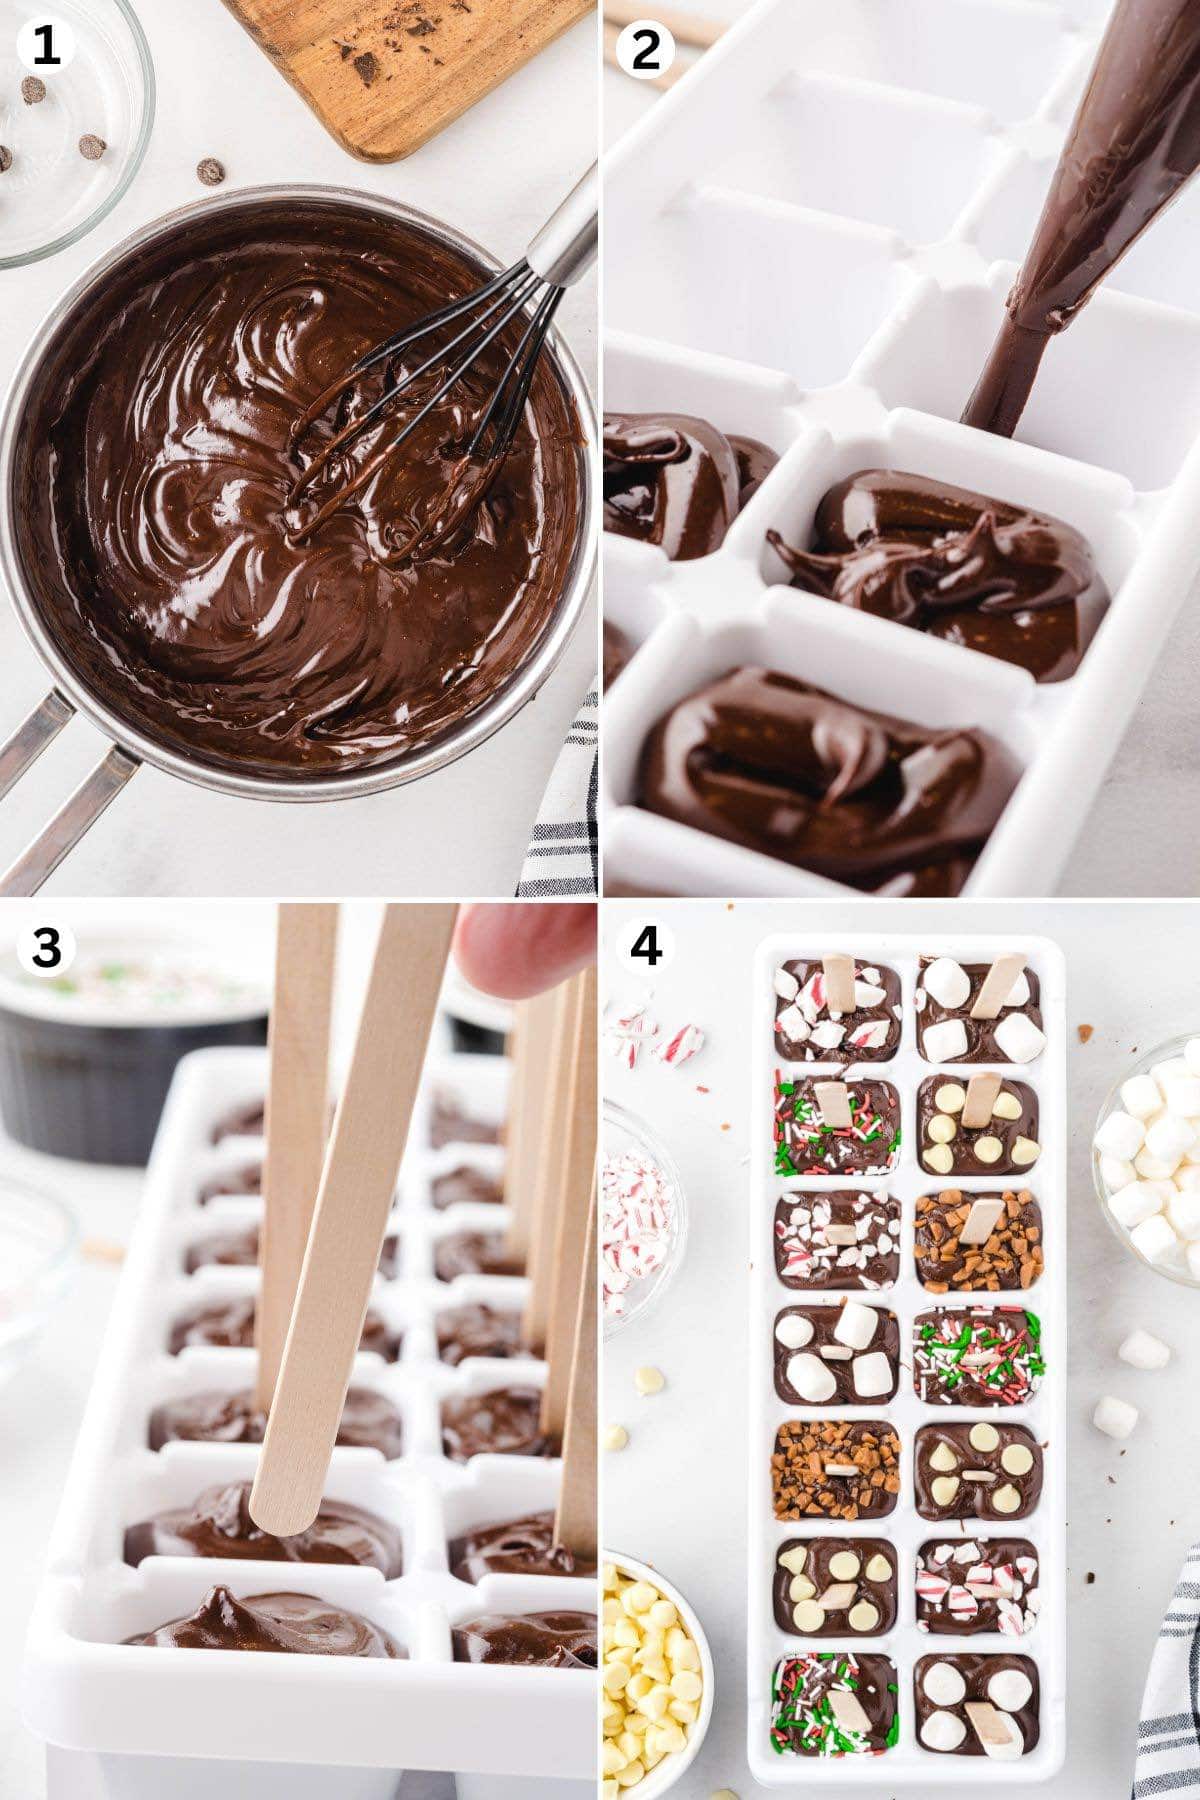
- In a large bowl add the semi-sweet chocolate chips and the broken up pieces of the bittersweet chocolate baking bar. Set aside.
- Heat heavy cream and sweetened condensed milk in a saucepan over medium heat. Heat the mixture until it reaches about 120-130*F (about 3-4 minutes).
- Pour the milk mixture into the large bowl with the chocolates. Whisk to completely incorporate the hot milk and chocolate to make a smooth chocolate sauce.
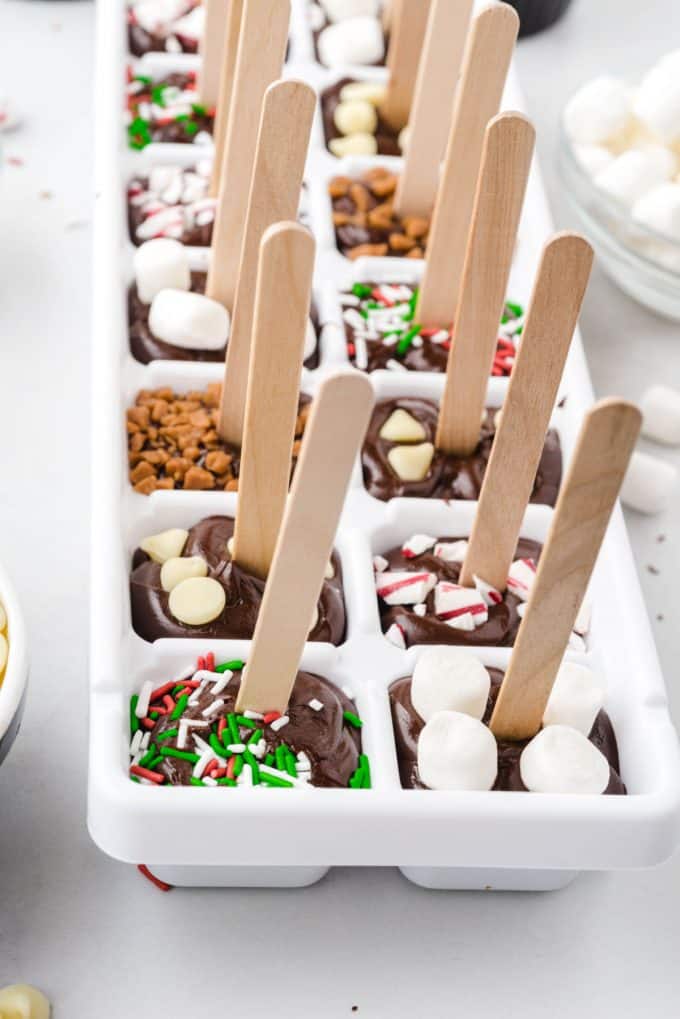
- Add chocolate to a piping bag or plastic storage bag and snip off the end. Pipe the melted chocolate into each of the square openings about ¾ full to leave some space for the toppings.
Pro-Tip: If you choose to omit a garnish topping then you can fill your squares all the way full. - Add the popsicle stick or lollipop stick to the center of each square.
- Add desired topping to each pressing topping down gently into chocolate.
- Refrigerate until solid at least 3 hours or overnight.
How to Make the Hot Chocolate using the Chocolate on a Stick
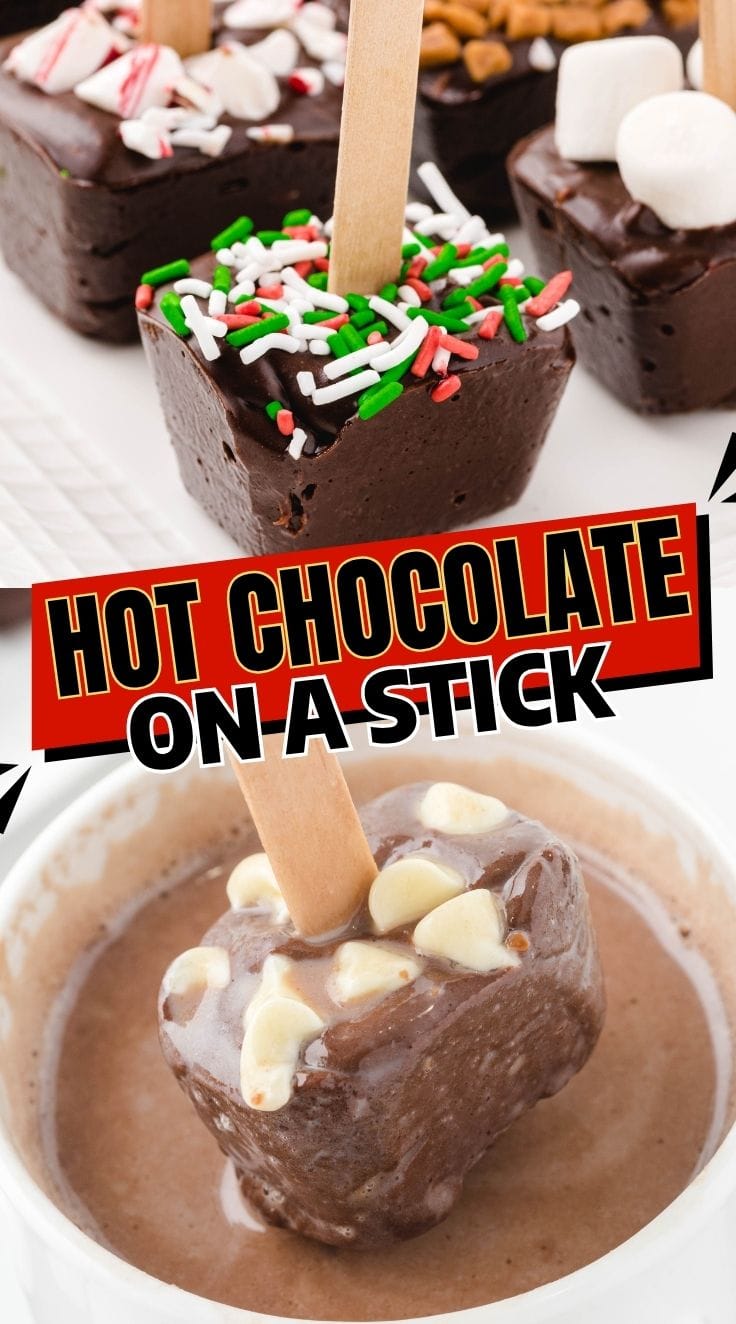
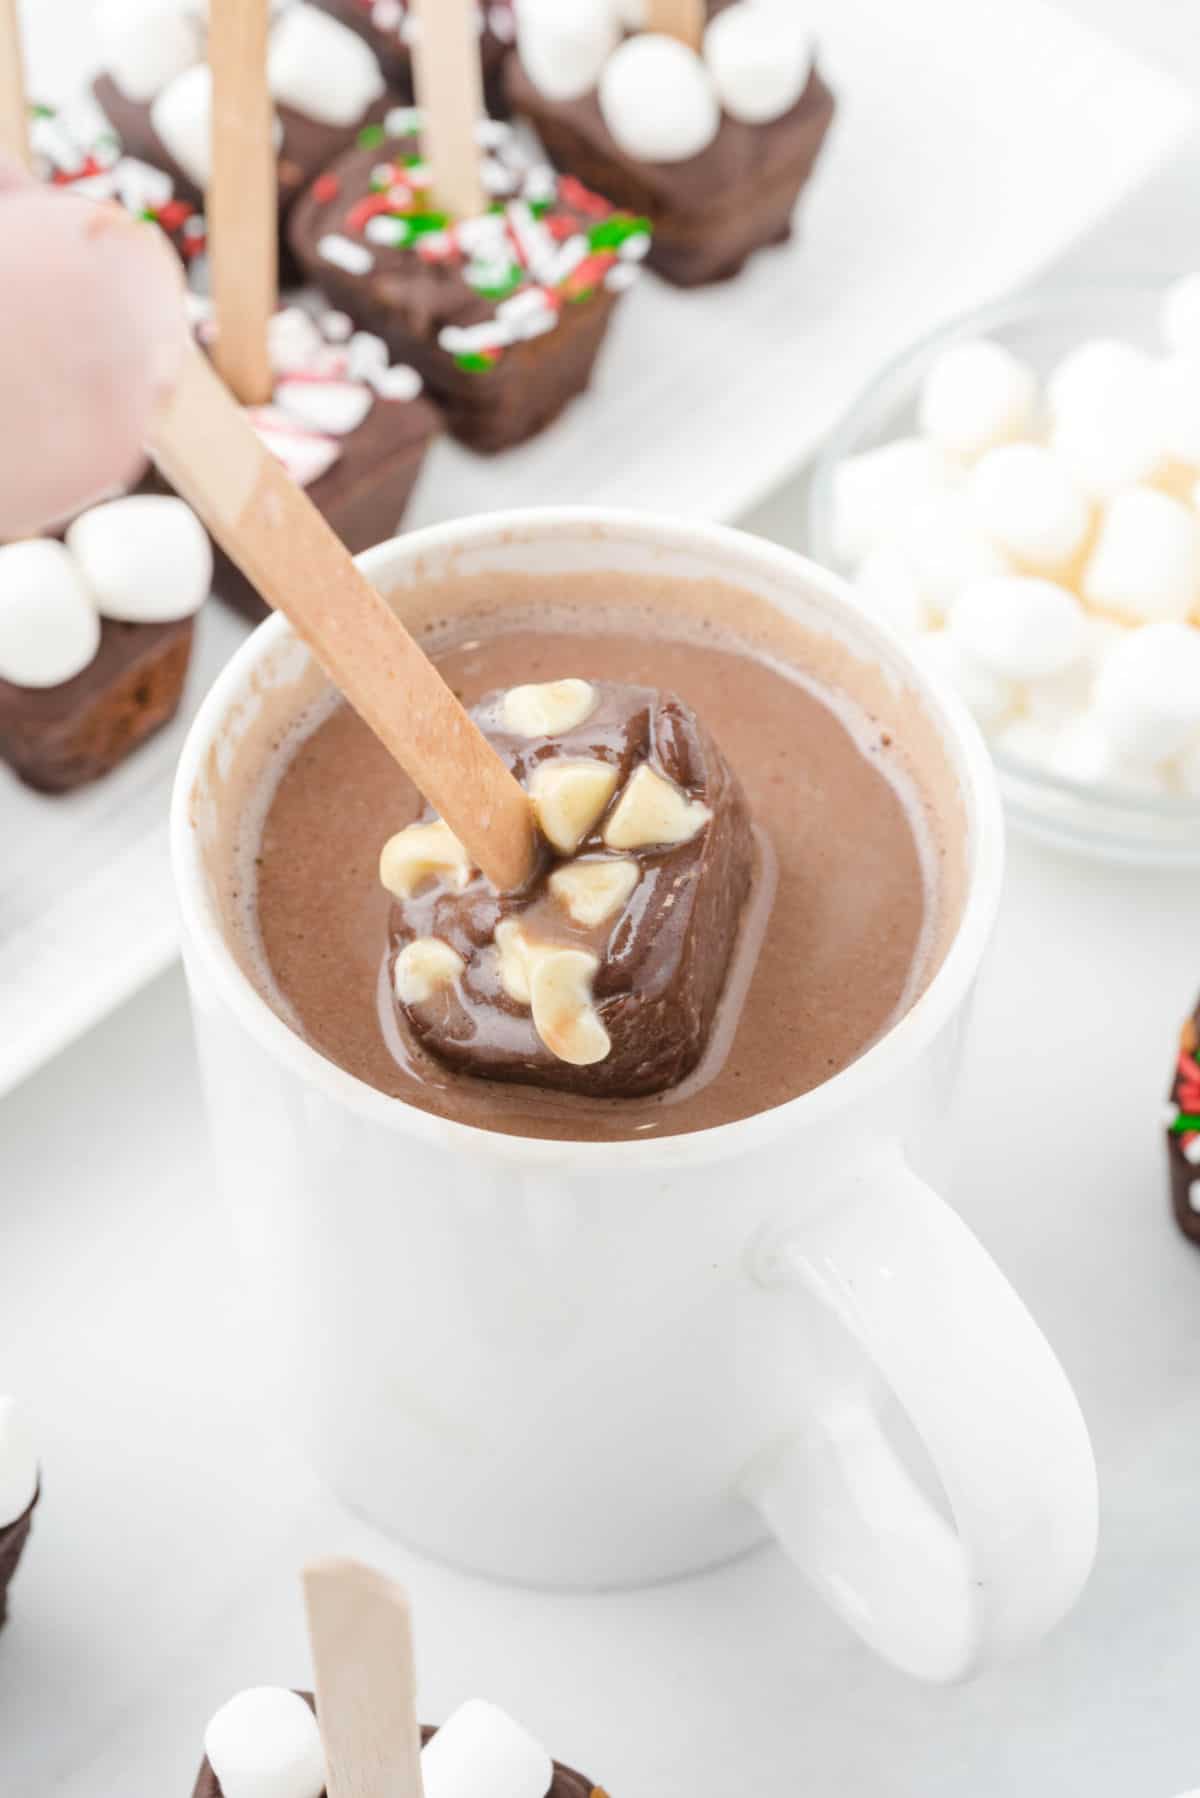
- Remove 2 individual squares from the silicone mold to make 1 mug of hot chocolate.
- Place two hot chocolate cubes on a stick into a large 10-12 oz. mug.
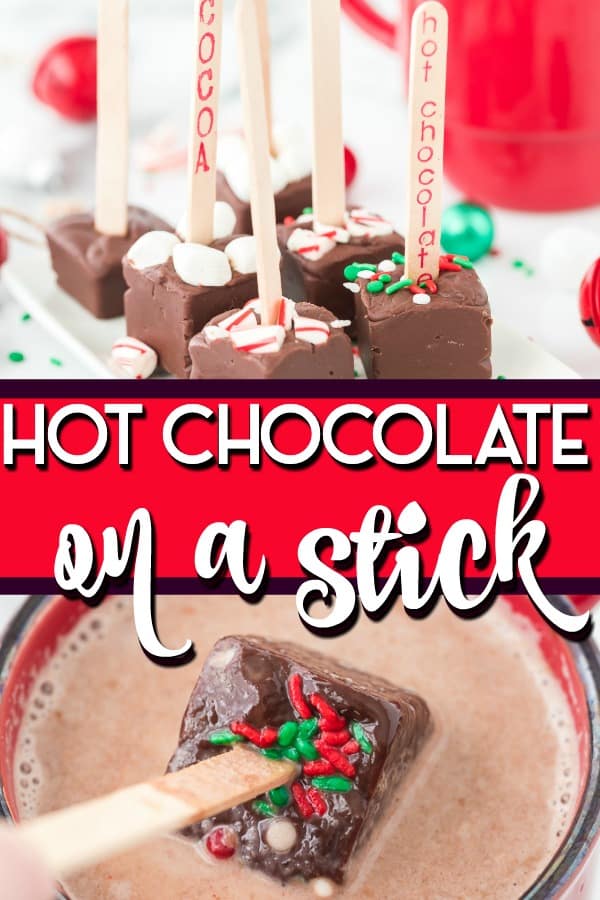
- In a microwave safe, add the whole milk and heat on high for 2 – 2 ½ minutes. Pour the hot milk into the mug, over the hot chocolate cubes.
- Stir around the chocolate using the lollipop stick until it is completely melted and you have a rich cup of hot chocolate with marshmallows.

Pro-Tips
- When filling the molds, lift the silicone baking pan a few inches and drop once or twice (or shake) to get the chocolate to level out.
- Check on the hot chocolate sticks while they are chilling to be sure that the sticks are staying centered and upright. If they begin to lean, give them a gentle nudge back into place!

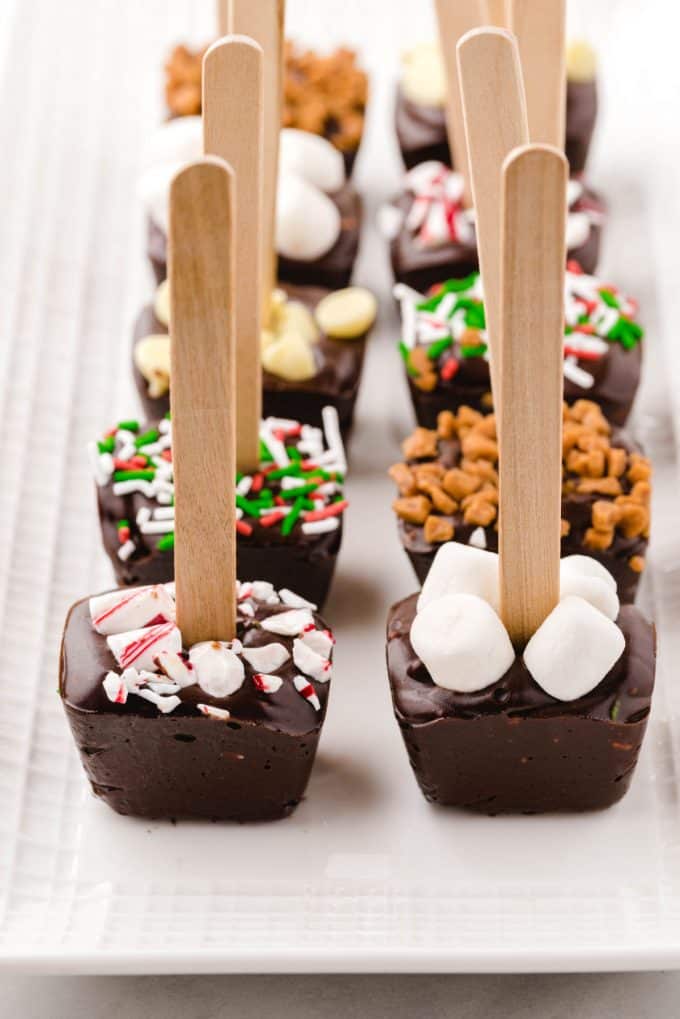
Topping Variations
There is no right or wrong when it comes to toppings and decorations. But here are some of our favorite toppings:
- Crushed peppermint candy or candy cane
- Holiday-themed M&M’s
- Mini marshmallows
- Holiday sprinkles
- Crushed Butterfinger candy
- Health bar
- White chocolate drizzle
Storage Tips
To store your hot chocolate on a stick you will need to remove all the individual servings and place them into a lidded plastic container. You can store them for up to a month in the refrigerator.
More Cute edible DIY Holiday Gifts
- DIY Peppermint Candy Bowls
- DIY Peppermint Candy Spoons
- Chex Mix Christmas Crack
- Hot Chocolate Cookie Cups
- Melted Snowman Chocolate Bark
- Reindeer Pretzels
- Chocolate Covered Oreo Reindeer Cookie
- Hot Chocolate Bombs
- Instant Pot Hot Chocolate Bombs (Valentine’s Day Edition)
Hot Chocolate on a Stick
Ingredients
- 3 cups semi-sweet chocolate chips (I used Nestle Toll House chips)
- 4 ounces bittersweet (60% cacao) baking bar broken into small pieces (I used Ghirardelli brand)
- 14 oz can sweetened condensed milk
- ½ cup heavy cream
- 1½ cups mini marshmallows (you can also use whatever other toppings you would like such as crush candy canes or sprinkles, the list is endless.)
- 28-30 lollipop sticks
- 1 gallon whole milk (1 cup of milk per mug of hot chocolate made)
Instructions
- Place 2 (15 squares ~ 1.5in.x1.5in.x1.5in. per each square) silicone molds onto a rimmed baking sheet. Set aside.
- In a large bowl add the semi-sweet chocolate chips and the broken up pieces of the bittersweet chocolate baking bar. Set aside.
- In a medium saucepan, on medium heat, add the sweetened condensed milk and heavy cream. Heat the mixture until it reaches about 120-130*F. This will take about 3-4 minutes.
- Pour the milk mixture into the large bowl with the chocolates. Your chocolates should be completely covered by the hot milk mixture. Allow this to sit, undisturbed, for 3-4 minutes before whisking it to completely incorporate the hot milk and chocolate to make a smooth chocolate sauce.
- Transfer the melted chocolate mixture to a large piping bag, or zip top plastic bag with the corner snipped off. You will want to make sure that you keep the open tip facing up until you are ready to pipe the chocolate into the silicone molds.
- Pipe the melted chocolate into each of the square openings about ¾ full. You want to leave some space to top each of your chocolate squares with 4-5 mini marshmallows, gently pressing them down. If you choose to omit a garnish topping then you can fill your squares all the way full.
- Place 1 stick into the center of each chocolate square. Place the tray of hot chocolate squares into the refrigerator to chill, and firm up, for 3 hours up to overnight.
- Once the hot chocolate squares have firmed up you will remove 2 individual squares from the silicone mold to make 1 mug of hot chocolate.
- To make the hot chocolate you will place two hot chocolate cubes on a stick into a large 10-12 oz. mug. This will serve 14-15 (1 cup) servings of hot chocolate drink (2 squares per 1 cup milk)
- In a microwave safe, 2 cup measuring cup with a spout, add the whole milk and heat on high for 2 – 2 ½ minutes. This will scald, not boil, your milk so that it is hot enough to melt your hot chocolate cubes. Pour the hot milk into the mug, over the hot chocolate cubes. Using your lollipop sticks you will stir around the chocolate until it is completely melted and you have a rich cup of hot chocolate with marshmallows. You will discard the lollipop sticks once you have made your mug of hot chocolate.
Jenn’s Notes
- I highly recommend you use good quality chocolate chips, and baking bars, for this recipe. Use brands that you enjoy eating on their own because this is the flavor that will be very forward in your mug full of hot chocolate. I like Ghiradelli, Nestle, Lindt, Guittard or any other high quality chocolate.
- I tried this recipe swapping out the semi-sweet chocolate chips for all milk chocolate. I will note that the hot chocolate squares did not set-up firmly so they were very difficult to get out of the silicone molds. This is due to the lower amount of cocoa and the addition of milk in the milk chocolate chips. The semi-sweet chips have a higher cocoa content and no added milk or milk fat to them, making them a better choice for this recipe. However, you can swap out the bittersweet chocolate bar for a milk chocolate bar in the recipe. The squares may still be a little difficult to remove from the silicone mold but it is not terrible. This will give you a slightly sweeter hot chocolate.
- Using whole milk or 2% milk is best for this recipe however, if you prefer a non-dairy option then I would stick to an unflavored/unsweetened variety. I do not recommend low-fat, skim milk or water for this recipe.
- You can add any variety of toppings to your hot chocolate cubes other than the mini marshmallows. Some great options are mini m&m’s, holiday sprinkles, toffee bits or crushed candy canes. I am a traditionalist and prefer the mini marshmallows the most, plus the mini marshmallows help to keep the lollipop sticks upright while the chocolate chills and sets so that is a bonus to using them. No matter which topping you choose you will want to make sure they are lightly pressed into the warm chocolate so they stay put once the chocolate has hardened.
- You can substitute food grade popsicle sticks for the lollipop sticks. Make sure to get them from the baking/candy aisle of your grocery or craft store. You DO NOT want to use the kind from the arts and craft section.
- If you do not want to use the silicone molds, you can use a parchment lined 8×8 baking pan and pour all the warm chocolate mixture into the prepared pan. Once the chocolate has partially hardened, you can score the top in a grid of 1 ½ in. x 1 ½ in. squares. You can then place your sticks into the middle of each square to set fully. Alternately, you can just cut the firmed up chocolate into squares, add 2 squares into your mug with hot milk and stir with a spoon to completely dissolve the chocolate. You can top your mug of hot chocolate with a handful of mini marshmallows.
Nutrition Info


My kids can’t wait to try this!
Omgosh, this stuff is SO good. Don’t just put it in hot milk to make hot chocolate, eat it! It’s like the best fudge I’ve ever had. It’s so easy, and it firmed up great. I’m planning to give these away as Christmas gifts. I had 4 recipes to try, but I’m going to stick with this one.
I love this, Allison!
This recipe is very easy and can be enjoyed by all! I love easy recipes especially for the holidays❤️
This recipe is crap, don’t bother. The Hot chocolate will not melt off the stick in a cup, you have to make it in a pot on the stove. Otherwise it doesn’t stay hot enough to melt it all. Then when it’s finally done, the hot chocolate tastes like garbage.
How long do these stay good for? Room temp and/ or refrigerated?
Can I use a non-stick mini muffin tin for these?
That’s what I used. The only draw back was that it wasn’t deep enough, so there would only be enough chocolate for a 4 oz. cup of hot chocolate (1/2 cup). A friend told me to use small paper cups so I’m going to try that.
Hi there! I tried these last night. I followed the recipe and made a couple of ice trays. It’s been over 24hrs since I refrigerated them. They are still too soft to come out of the trays. Any advice?
I am having the same issue, I really think this is so cute and want to have these for my kids and also to gift, but I can’t get it to work at all. Any suggestions or responses yet?
Sorry I totally missed your comment. I would pop them in the freezer for a few minutes to help them set up good before removing.
It’s a thing with me, I found a little .mistake at the top of this article. After telling not to use water, it says make sure water is hot enough to melt chocolate. Just FYI
These look like they may be the treat I have been looking for to take to a family gathering.