This post may contain affiliate links. Please read our disclosure policy.
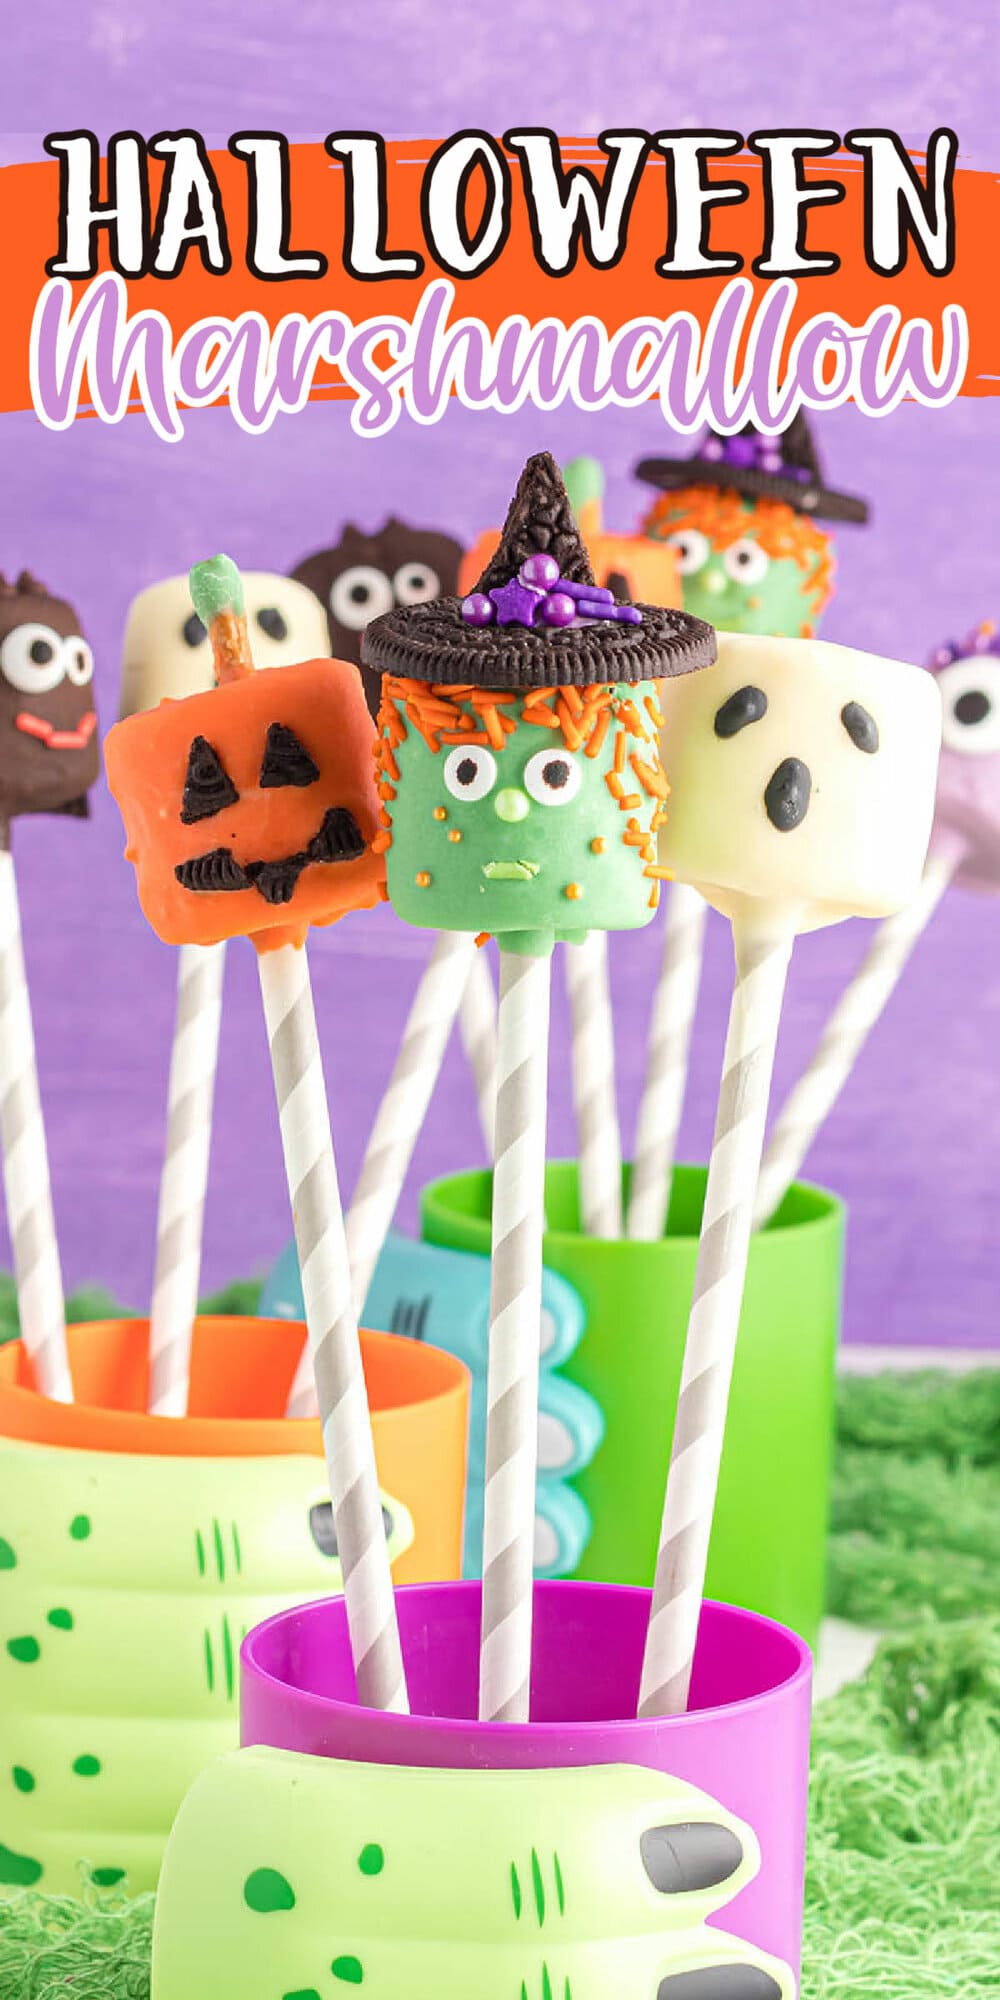
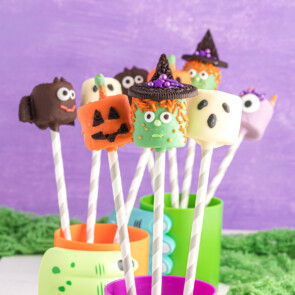
Halloween Marshmallows add an adorably spooky twist to any Halloween dessert tray and are perfect treats for a haunted Halloween party or handing out as favors or gifts.
Dipped in chocolate and decorated with sprinkles, Oreos, and pretzels, it’s so much fun and super easy to create add an adorably spooky twist to any Halloween dessert tray and are perfect treats for a haunted Halloween party or handing out as favors or gifts.


Easy Halloween Marshmallow Treats
Halloween Marshmallows recipes take the classic cake pop and give them an easy-to-make marshmallow Halloween treats twist.
When you’re pressed for time and don’t feel like baking, Halloween marshmallow pops are the perfect way to dress up dessert and decorate holiday treats with kids.
Making chocolate-covered marshmallow lollies is as simple as dipping a marshmallow in melted candy, then adding fun faces and features, like hats, wings, and hair.
Halloween treats made with marshmallows create less mess than cooking a cake (for cake pops), plus these decorated marshmallow desserts taste just as delicious!
Why We Love This Halloween Marshmallow Pops Recipe
- Easy treats to make for Halloween.
- Uses simple ingredients for decorating.
- Fun craft for a kid’s party.
- Customize your candy coating by changing the colors to match any season or celebration.
- Great for a fall bake sale, Halloween-themed parties, gift giving, or handing out as holiday party favors.
Other Easy Halloween Recipes
Ingredients
- Marshmallows
- Paper straws or lollipop sticks
- Belgian extra dark chocolate
- Belgian white chocolate
- Oil-based candy color
- Pretzel stick
- Oreo cookies
- Assorted sprinkles
- Unicorn horn sprinkles
- Mini chocolate chips
- Candy eyes
Substitutions and Additions
- Make A Mummy: Dip your marshmallow into melted white chocolate and then decorate by drizzling additional white chocolate stripes to make a wrapped mummy look. You can top your mummy with clear sprinkles and add two eyes.
- Form A Frankenstein: Dip your marshmallow into melted green chocolate and then cover the top with chocolate sprinkles. Add two eyes and a mouth to your monster.
- Create Your Own Creature: Feel free to create your own creepy creature or make your own original monster with a variety of candy, cookies, and frosting.
Recommended Tools
- Microwave-safe bowl or mason jar
- Mixing bowls
- Plate or baking sheet
- Waxed paper
How to Make Halloween Marshmallows
- Melt The Chocolate: For each character, you will need to melt the white chocolate in the microwave in 20-second increments, stirring well in between. In a separate bowl melt more white chocolate and add a few drops of each candy coloring.
- Create Your Characters:
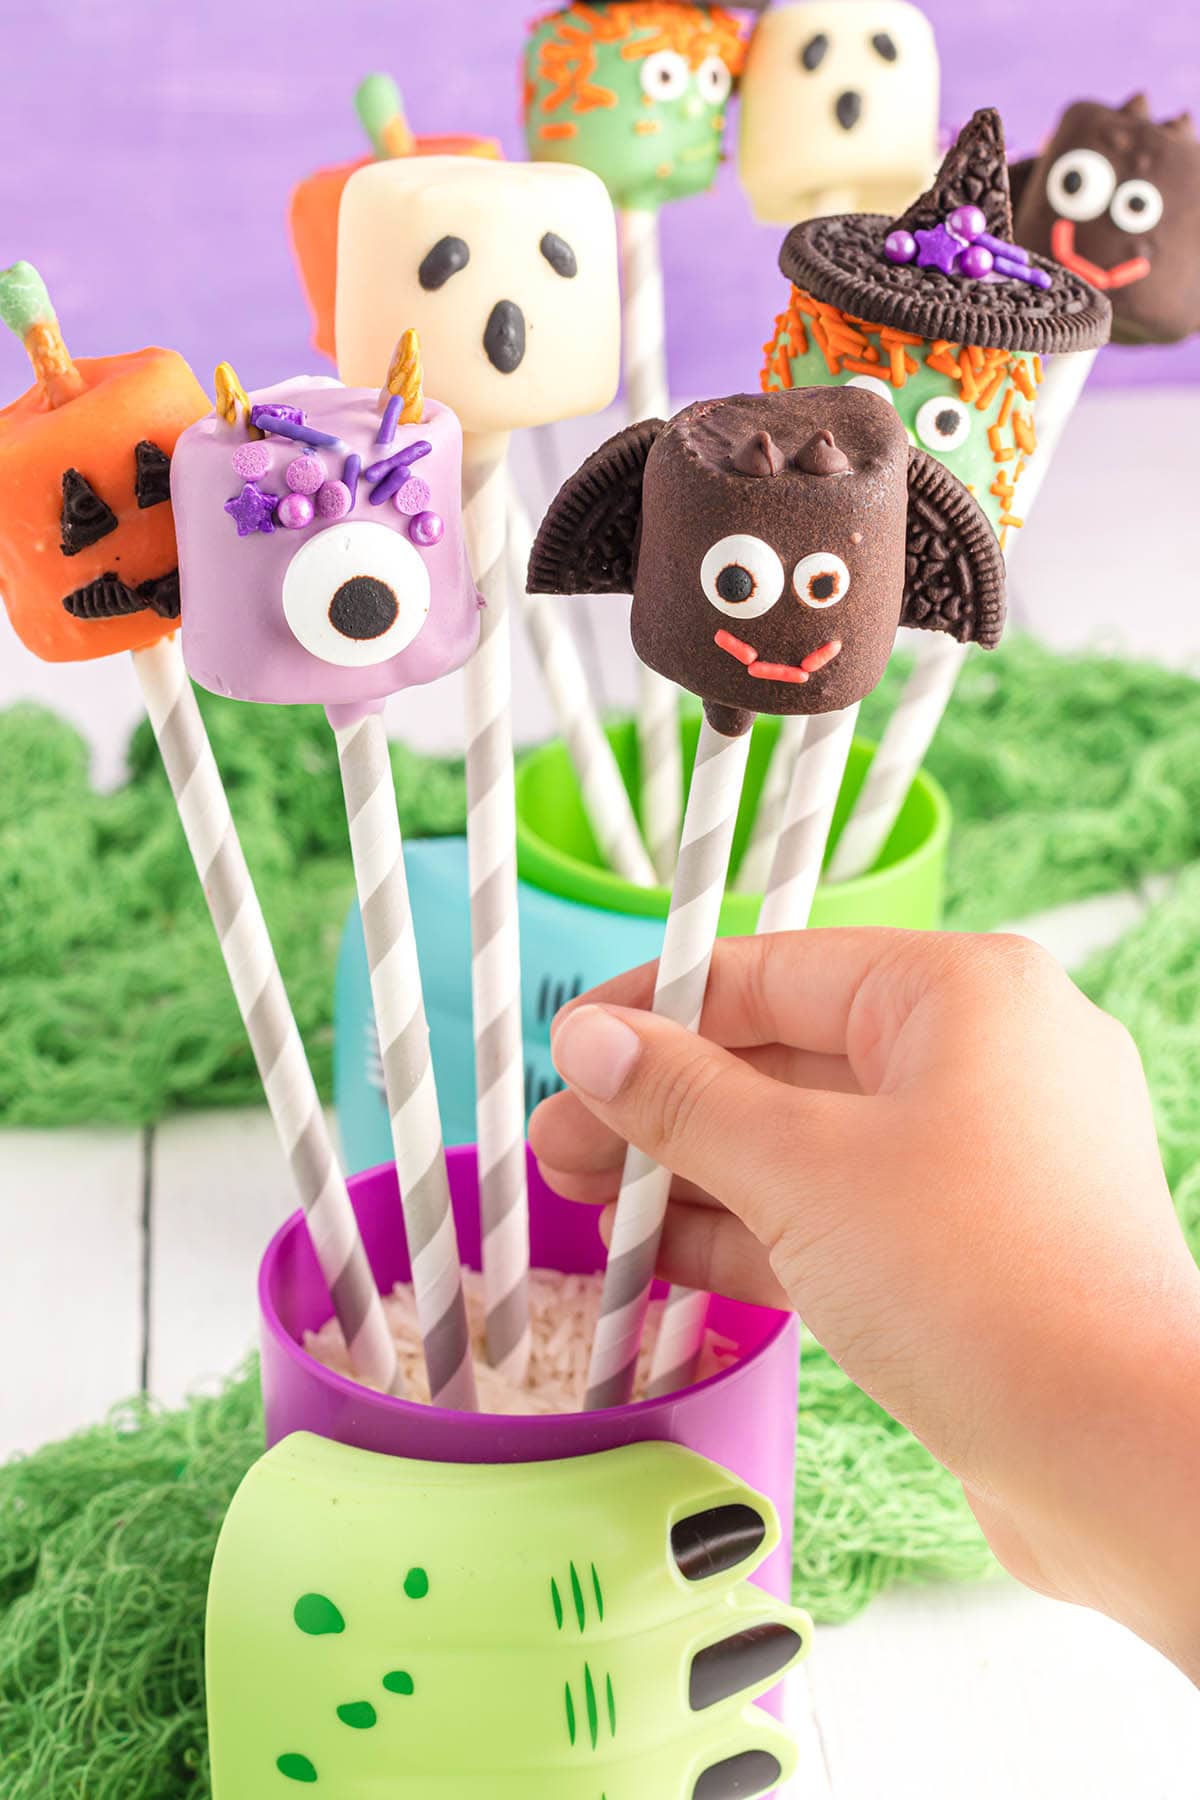
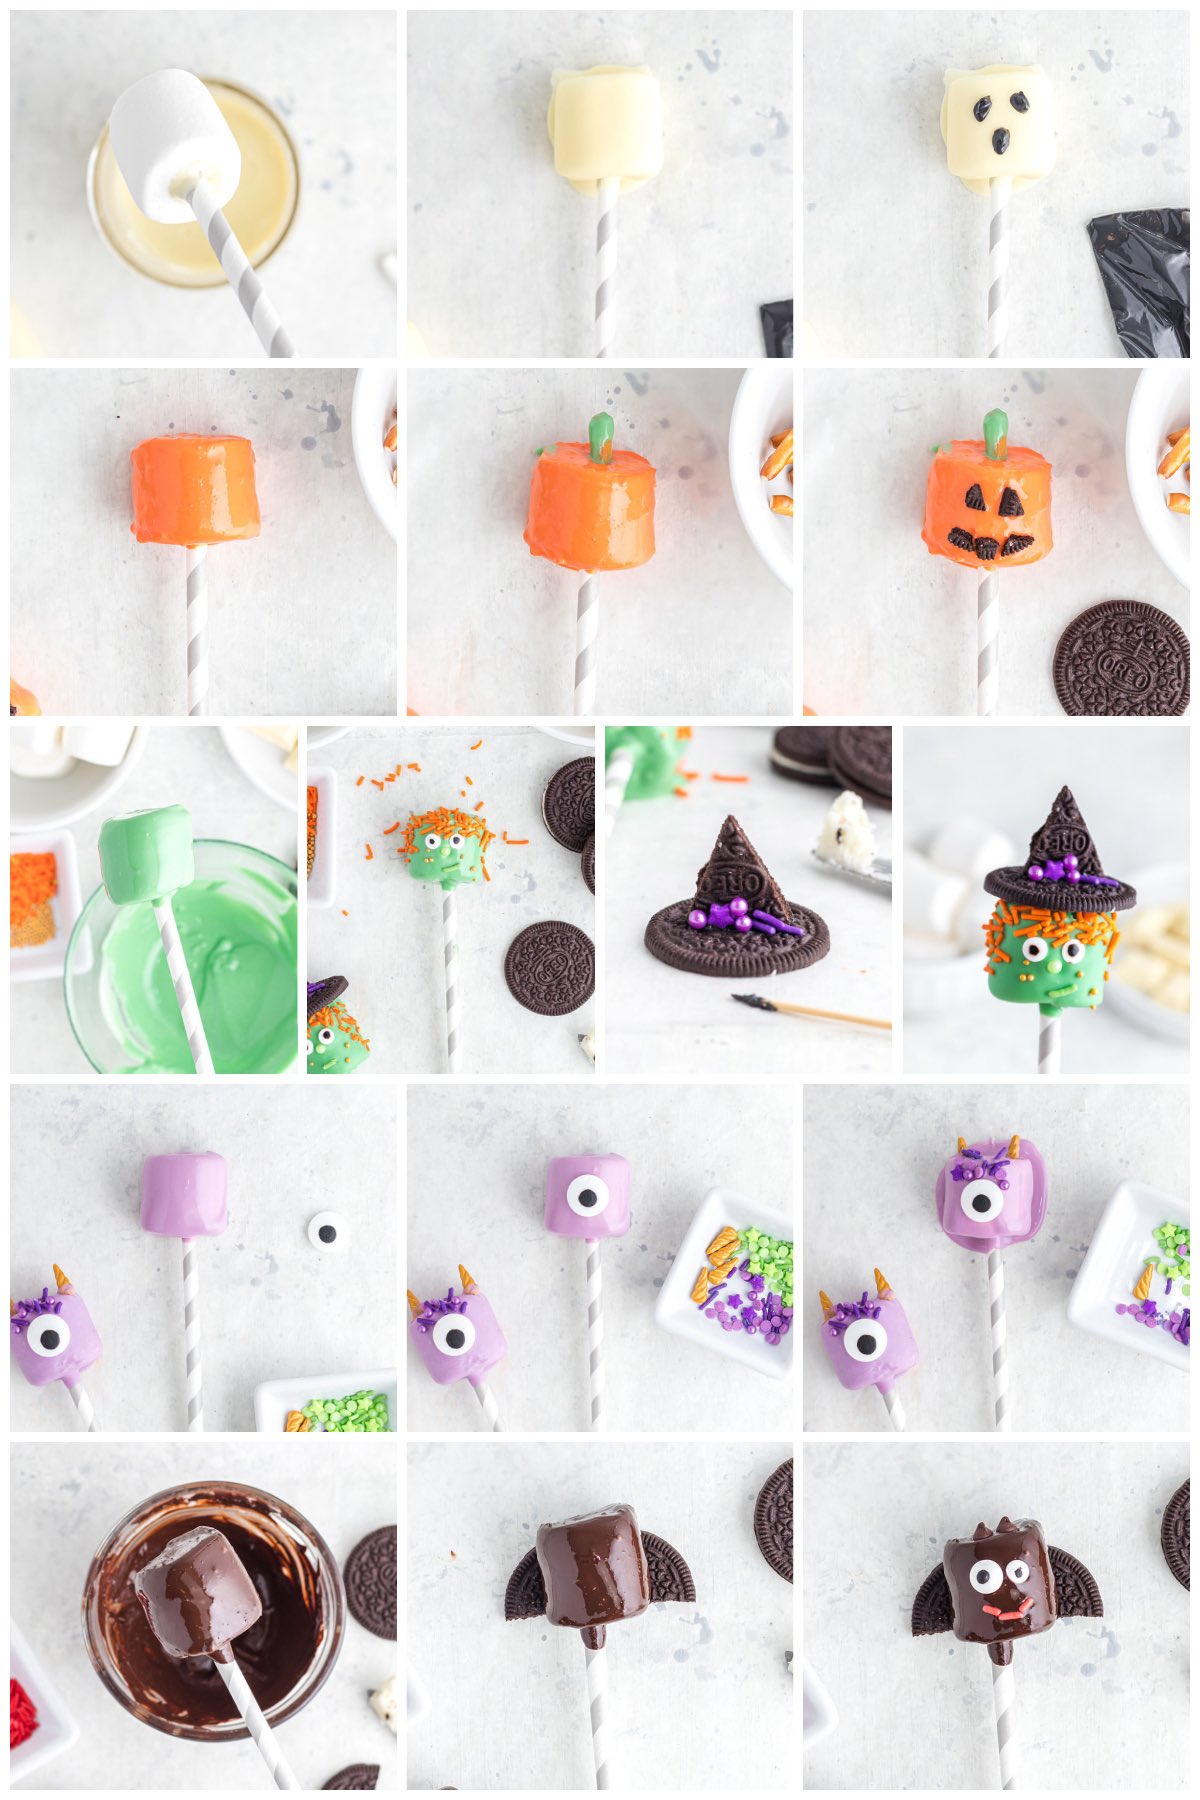
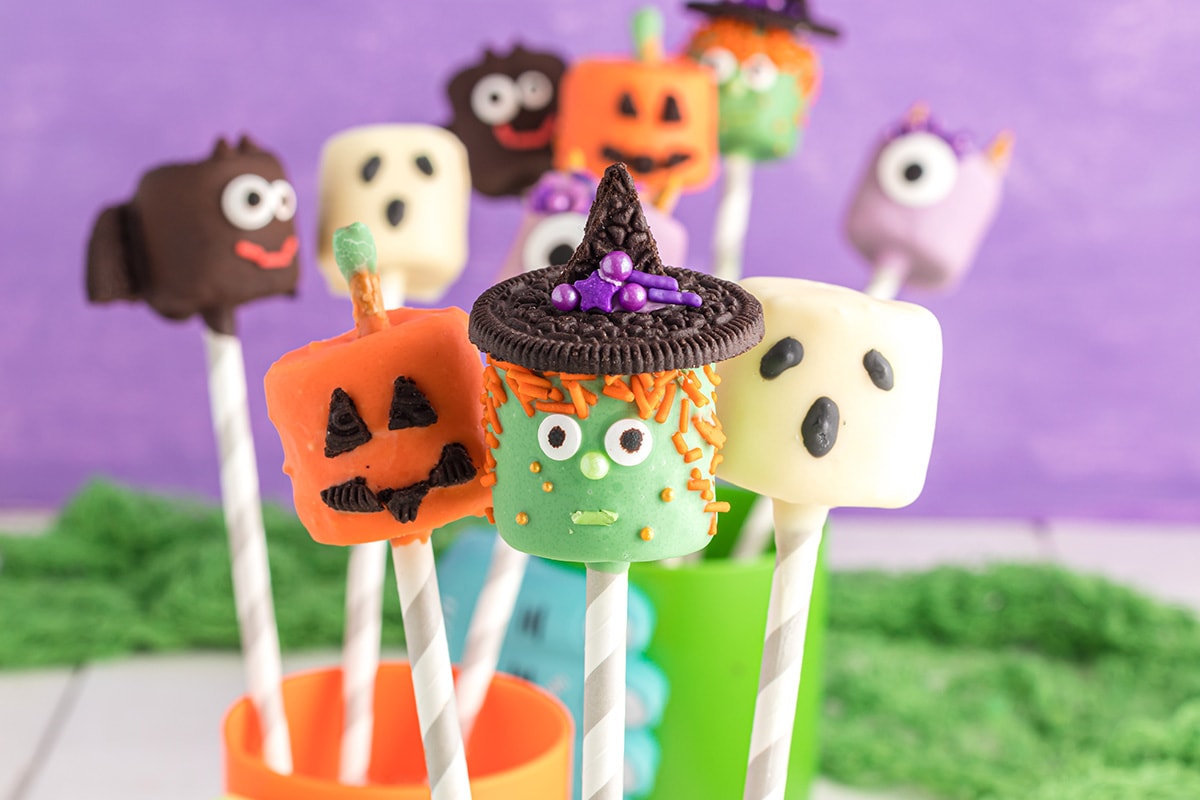
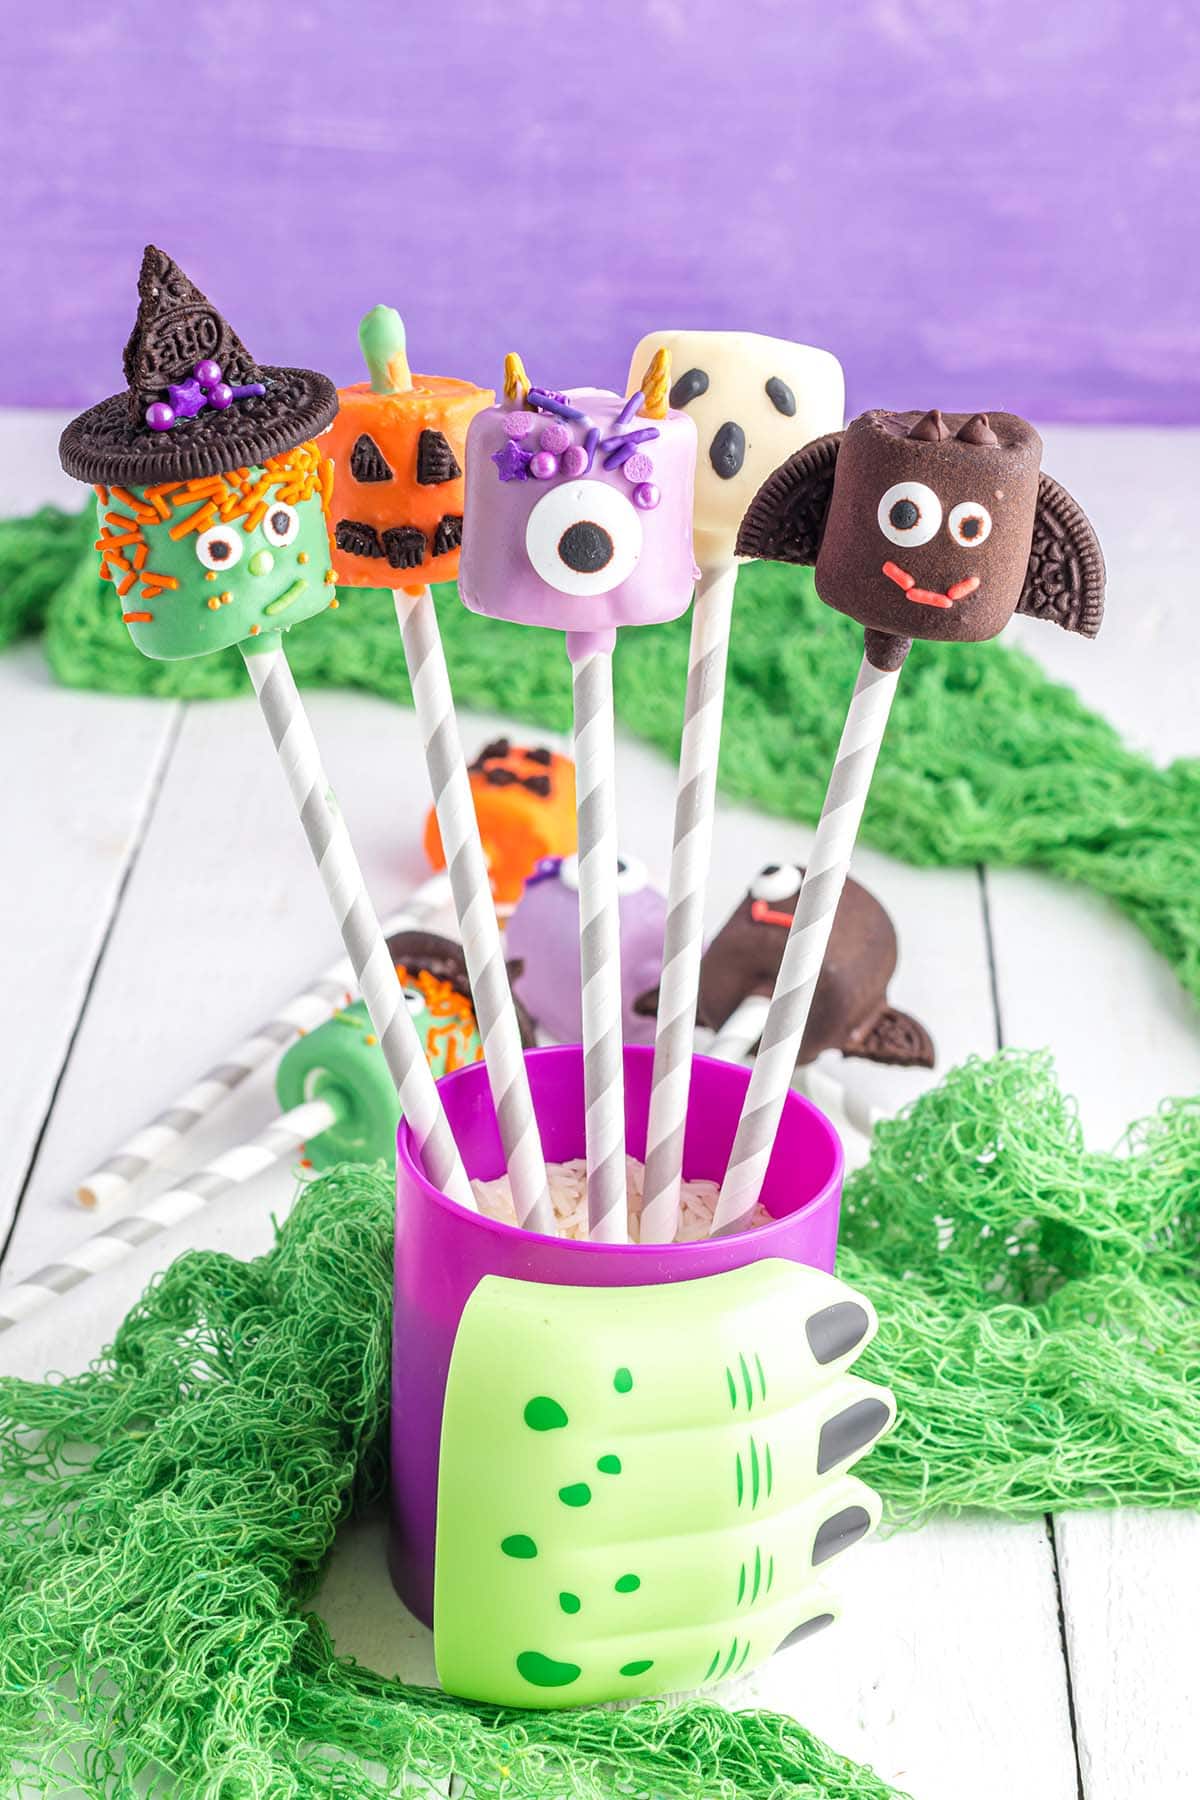
Ghost: Pierce a chocolate-dipped straw or stick into the base of a marshmallow and then dip it into the melted white chocolate to coat. Allow any excess chocolate to drip back into the bowl and refrigerate to set. Once hardened, pipe two black oval-shaped eyes and a mouth.
Jack-O-Lantern: Pierce a chocolate-dipped straw or stick into the base of a marshmallow and then dip it into the melted orange chocolate to coat. Allow any excess chocolate to drip back into the bowl. Decorate with 2 small Oreo cookie triangles for the eyes and 3 small jagged shapes for the mouth. Break a pretzel stick in half, dip the tip in green chocolate, and insert the “stem” into the top of the marshmallow.
Witch: Pierce a chocolate-dipped straw or stick into the base of a marshmallow and then dip it into the melted green chocolate to coat. Allow any excess chocolate to drip back into the bowl. Add candy eyes, a round green sprinkle for the nose, a green Jimmie sprinkle for the mouth, and orange jimmies for the hair. Finish the face with some gold nonpareils for warts. Make an Oreo cookie hat with purple sprinkles and attach it to the top of the marshmallow.
Monster: Pierce a chocolate-dipped straw or stick into the base of a marshmallow and then dip it into the melted purple chocolate to coat. Allow any excess chocolate to drip back into the bowl. Add a large candy eye to the center, two unicorn horn sprinkles to the sides, and some purple sprinkles for fur.
Bat: Pierce a chocolate-dipped straw or stick into the base of a marshmallow and then dip it into the melted dark chocolate to coat. Place the dipped marshmallow on top of the Oreo wings, add 2 candy eyes, 2 mini chocolate chip ears, and red Jimmie sprinkles for a mouth. - Serve: Allow each character to set completely before transferring to a serving display. You’ve now created the cutest characters ever and they are ready for the party!
Tip From Our Recipe Developer
- Be careful not to overheat your chocolate as it will burn and ruin the color of your pops.
- Use deep bowls or small mason jars for melting chocolate for best results.
- Colored candy melts in green, purple, orange, black, and white can be used in place of Belgian chocolate if desired. It will save a bit of time with coloring the chocolate if that is an issue for you.
- Use only oil-based candy coloring for this project for the best results.
Storage
- To Store: These are best eaten the day they are made.
More Halloween Treats
- Halloween Spider Cookies Recipe
- Graveyard Chocolate Cheesecake Dip
- Halloween Puppy Chow Chex Mix
- Halloween Monster Sprinkle Cookies
- Mummy Hot Dogs
- Strawberry Ghosts
- Monster Oreo Eyeballs

Halloween Marshmallows
Ingredients
- 10 Marshmallows (regular size)
- ½ cup Belgian extra dark chocolate (measure before melting)
- 2¼ cups Belgian white chocolate divided (measure before melting)
- oil-based candy color for coloring chocolate
- 1 pretzel stick cut in half, (enough for 2 Jack-O-Lantern Pops)
- 2-3 Oreo cookies (for Bat, Witch and Jack-O-Lantern pops)
- assorted sprinkles
- 4 unicorn horn sprinkles (for 2 Monster pops)
- 4 mini chocolate chips (for 2 Bat pops)
- candy eyes in various sizes (2 large eyes for 2 Monster pops, 4 small eyes for 2 Witch Pops, 2 small and 2 medium eyes for 2 Bat pops)
Instructions
Ghost:
- To make the Ghost, in a deep microwave-safe bowl or mason jar melt 1/2 cup white chocolate or enough to immerse a marshmallow and coat it fully. In 20-second increments, stirring well in between. In a separate bowl melt a 1⁄4 cup of white chocolate with a few drops of black candy coloring for the eyes.
- Prepare a plate or baking sheet lined with waxed paper. Set aside. (reserve for other pops to set).
- Start by dipping a paper straw or lollipop stick in the melted white chocolate then pierce it into the base of a marshmallow. You can allow it to set if it seems like it’s not secure. Next dip your marshmallow in the white chocolate, fully coating all sides and the base. Allow any excess chocolate to drip back into the bowl or jar. Place it on the wax paper-lined plate and refrigerate to set. Meanwhile, put a bit of the melted black chocolate in either a piping bag or sandwich bag with a tiny hole cut out for piping. (reserve leftovers for the Bat pop.)
- When the white chocolate has set on the marshmallow remove it from the refrigerator and add two oval-shaped eyes and a mouth to form your Ghost. Allow the Ghost to set completely before transferring to a serving display.
Jack-o-lantern:
- To make the Jack-o-lantern, in a deep microwave-safe bowl or mason jar melt 1⁄2 cup white chocolate enough to immerse a marshmallow and coat it fully. Mix in some orange candy coloring, melt in 20-second increments, stirring well in between. In a separate bowl melt 1⁄2 cup of white chocolate and add a few drops of green candy coloring.
- Dip the paper straw or lollipop stick in the orange chocolate and then into a marshmallow.
- Dip the marshmallow in the orange chocolate. Evenly coat on all sides and base and allow the excess chocolate to drip back into the jar or bowl. Place the pop on the wax paper-lined plate.
- Carefully separate an Oreo cookie. Scrape the cream off of one of the sides of the cookie. Using a paring knife and a cutting board carefully cut 2 small triangles for the eyes and 3 small jagged shapes for the mouth. It doesn't have to be perfect just have fun!
- Place the Oreo shapes on the marshmallow to form the eyes and mouth. To complete your Jack-o-lantern break a pretzel stick in half and insert it into the green melted chocolate if you would like. Then allow the Jack-o-lantern to fully set. Reserve the extra green chocolate for the Witch pop.
Witch:
- To make the Witch, dip a paper straw in the melted green chocolate reserved from the Jack-o-lantern above. (you may need to re-warm the chocolate in the microwave in 10 to 15-second increments).
- Dip the straw into a marshmallow and then fully dip and coat the marshmallow with the green chocolate until evenly coated. Allow excess chocolate to drip off and then place on the wax paper-lined plate.
- Add candy eyes to the marshmallow followed by a round green sprinkle for the nose. Next add a green Jimmie sprinkle for the mouth, followed by orange jimmies for the hair. Finish the face with some gold nonpareils for warts.
- To make the witch hat, scrape the cream from an oreo cookie. Use one side of the cookie as the base for the hat and cut a triangle with a paring knife for the top of the hat. Use some of the reserved black chocolate from the Ghost above to attach the triangle to the hat base. Add a little more chocolate to the seam of the hat and base to adhere some purple sprinkles to decorate the hat. (you may need to rewarm the black chocolate in 10-15 second increments).
- When the Witch has fully set attach the hat using some more melted black chocolate on the top. You can place it in a cup in the refrigerator to allow it to set upright! Once dry your witch is party-ready!
Monster:
- To make the Monster, in a deep microwave-safe bowl or mason jar melt 1⁄2 cup white chocolate or enough to immerse a marshmallow and coat it fully. Mix a few drops of purple candy coloring in with the chocolate and melt In 20-second increments, stirring well in between.
- Dip a paper straw into the purple chocolate and then into a marshmallow. Dip the marshmallow in the purple chocolate and allow it to fully coat the marshmallow and the excess to drip back into the jar.
- Place the marshmallow on the wax paper-lined plate and add a large candy eye to the center. Next, add two unicorn horn sprinkles to the sides and some purple sprinkles for fur.
- Allow your monster to fully set before adding to the party display!
Bat:
- To make the Bat, in a deep microwave-safe bowl or mason jar melt 1⁄2 cup extra dark Belgian chocolate or enough to immerse a marshmallow and coat it fully. Melt in 20-second increments, stirring well in between.
- Start by preparing the bat wings. Take a scraped Oreo cookie half. Cut the round in half and then in half again to form 2 wings. Place the Oreo wings on the wax paper-lined plate. Set aside.
- Next, dip a paper straw in some dark chocolate. Then insert the straw into a marshmallow. Dip the marshmallow into the dark chocolate until fully coated on all sides and the base. Place the dipped marshmallow on top of the Oreo wings.
- Next add 2 candy eyes, followed by 2 mini chocolate chip ears and red Jimmie sprinkles for a mouth.
- Allow all to set and the cutest bat ever is ready for the party!
Jenn’s Notes
- Be careful not to overheat your chocolate as it will burn and ruin the color of your pops.
- Use deep bowls or small mason jars for melting chocolate for best results.
- Colored candy melts in green, purple, orange, black, and white can be used in place of the Belgian chocolate if desired. It will save a bit of time with coloring the chocolate if that is an issue for you.
- Use only oil-based candy coloring for this project for the best results.


i rate this 5 stars because i made this and it turned out amazing and i loved it thank you soooo much for the idea!!!!