This post may contain affiliate links. Please read our disclosure policy.
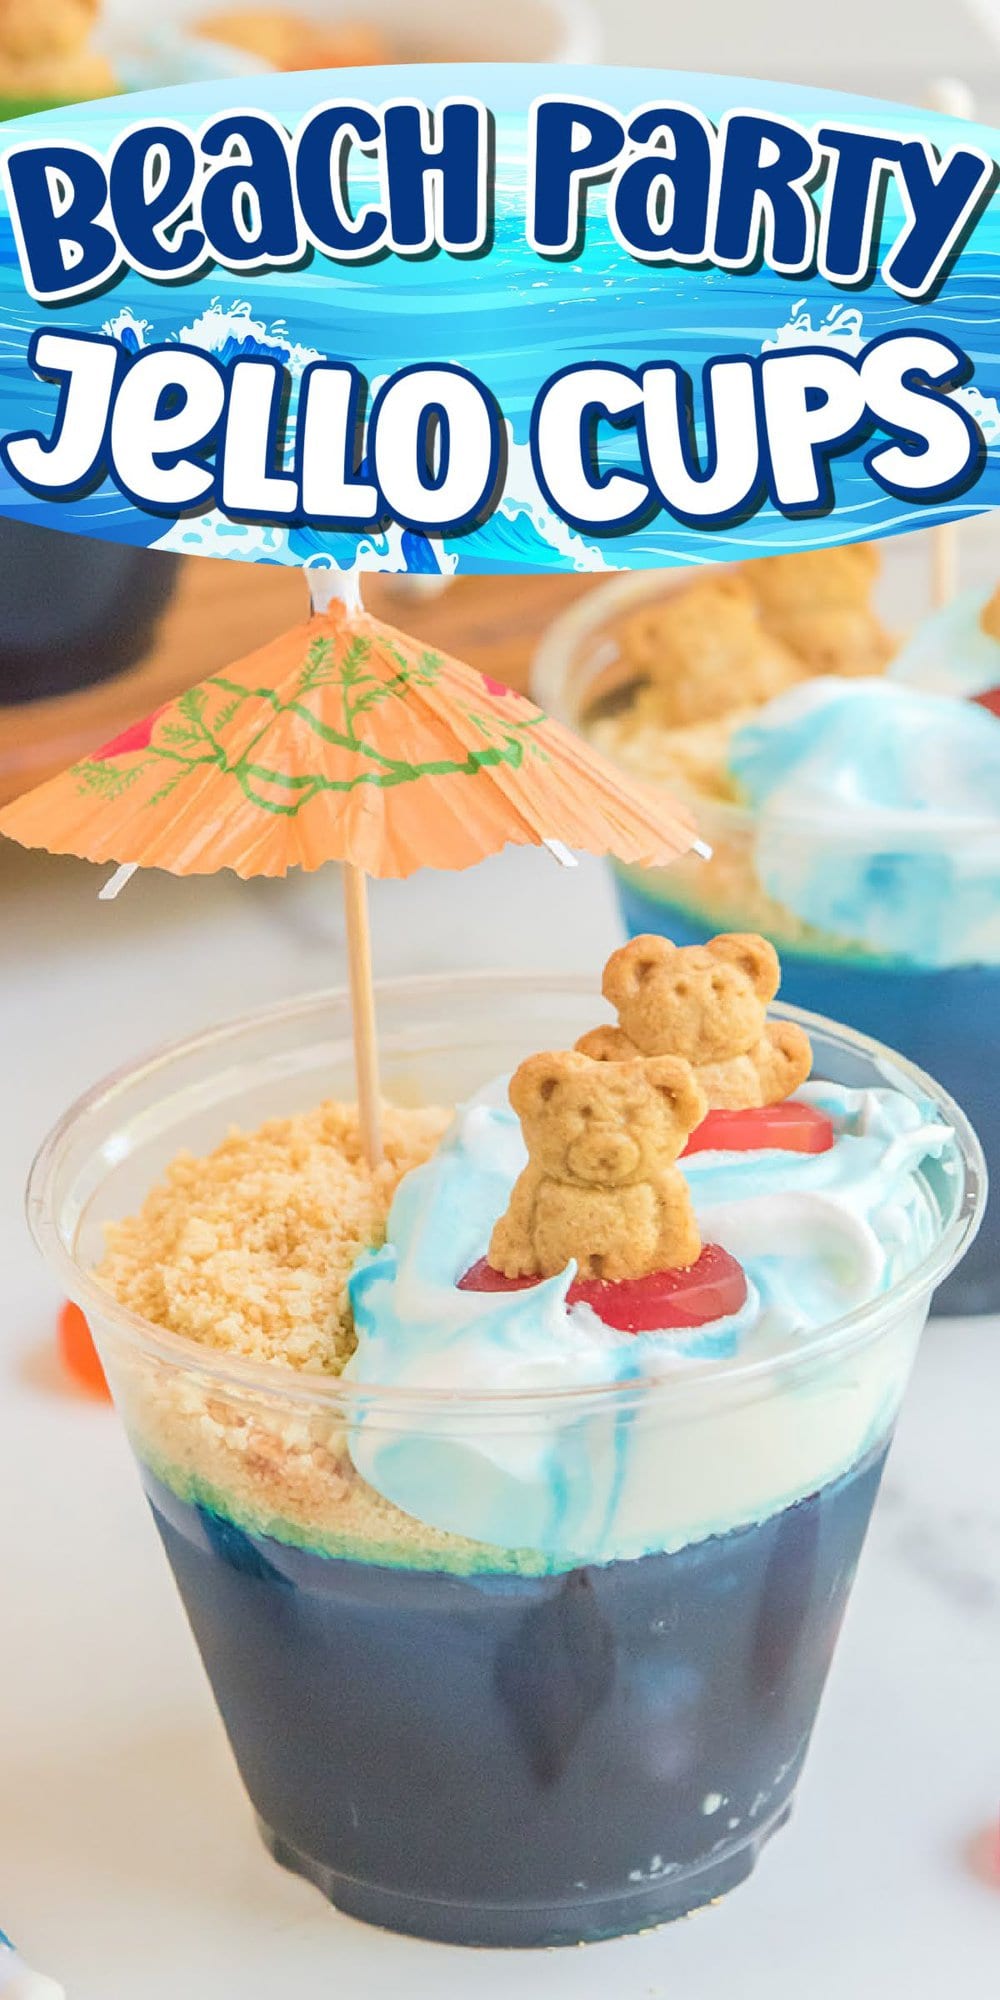
Embrace the summer vibe with our Beach Party Jello Cups, a delectable dessert crafted in just 15 minutes and sure to bring a wave of delight to your guests.
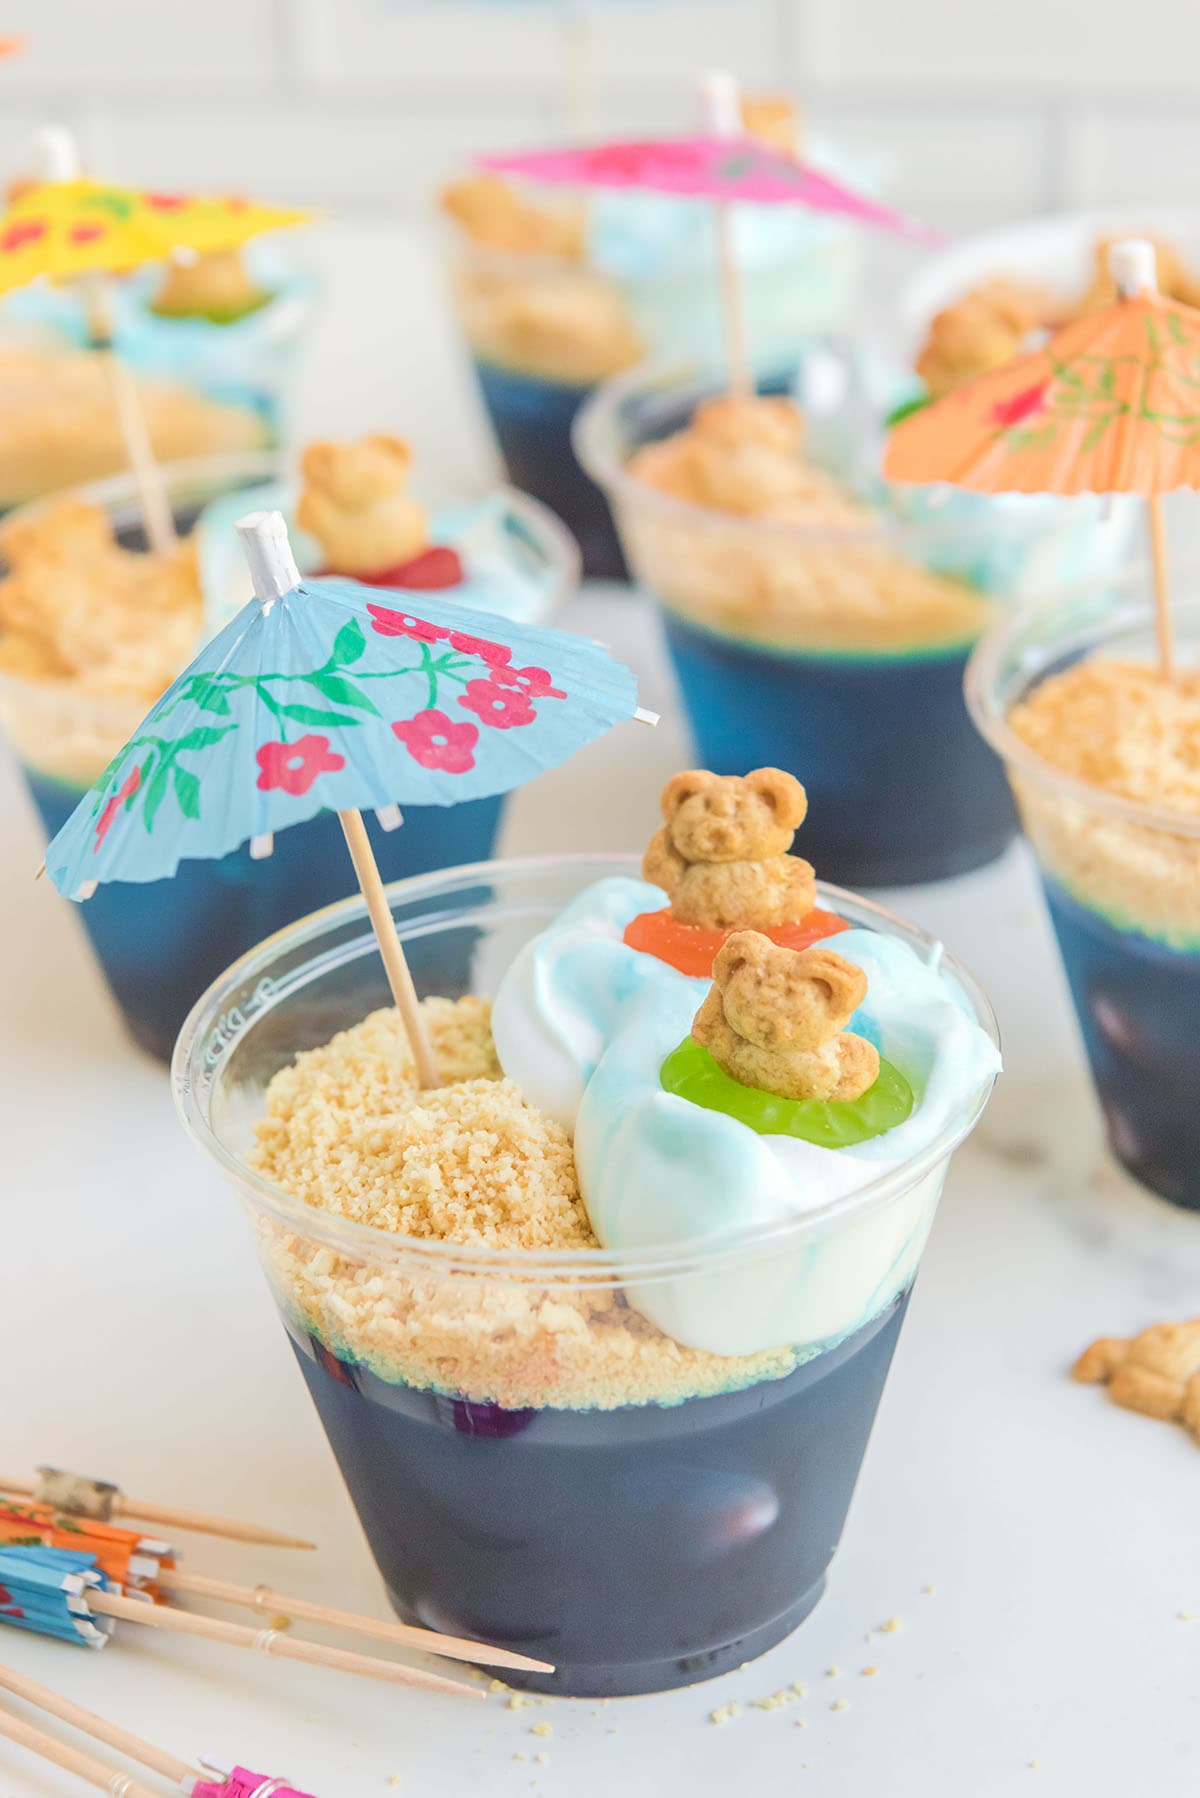
Day At The Beach Jello Cups
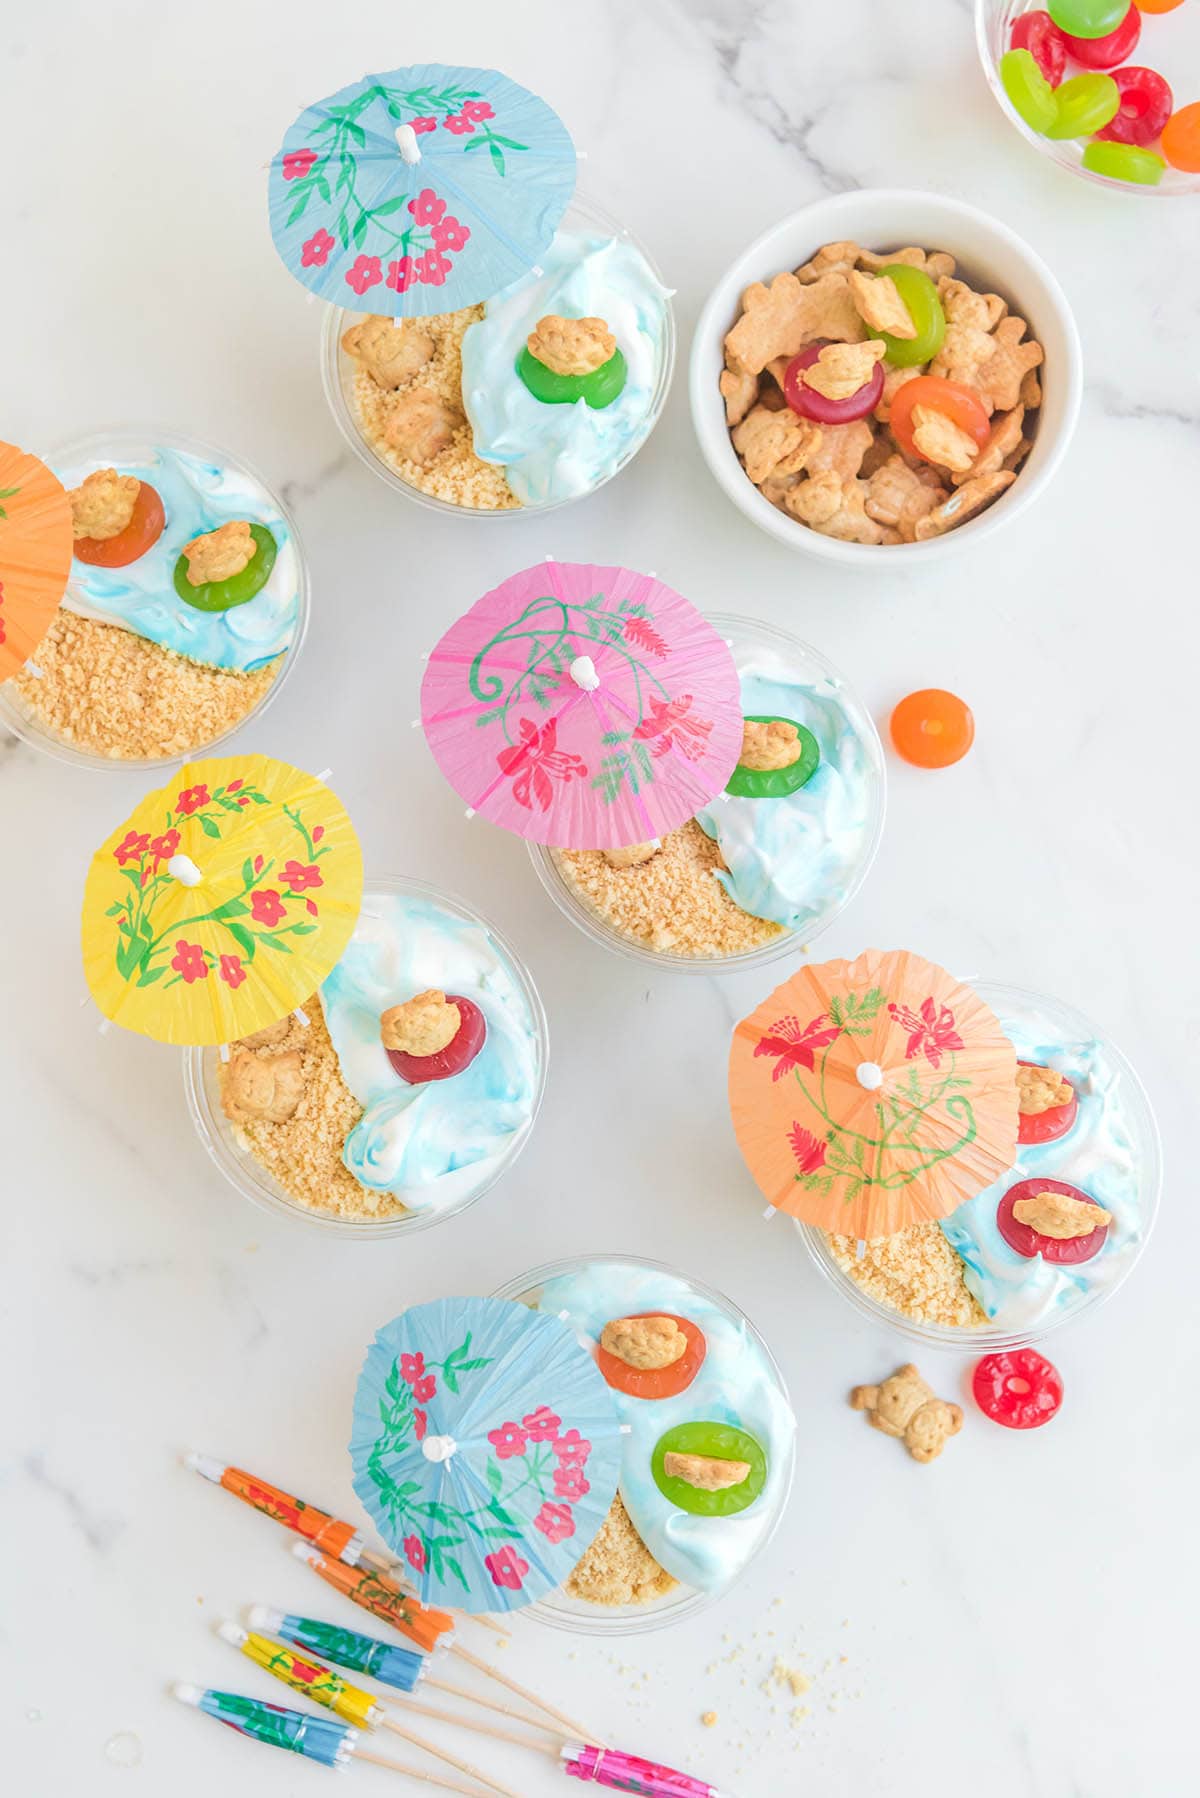
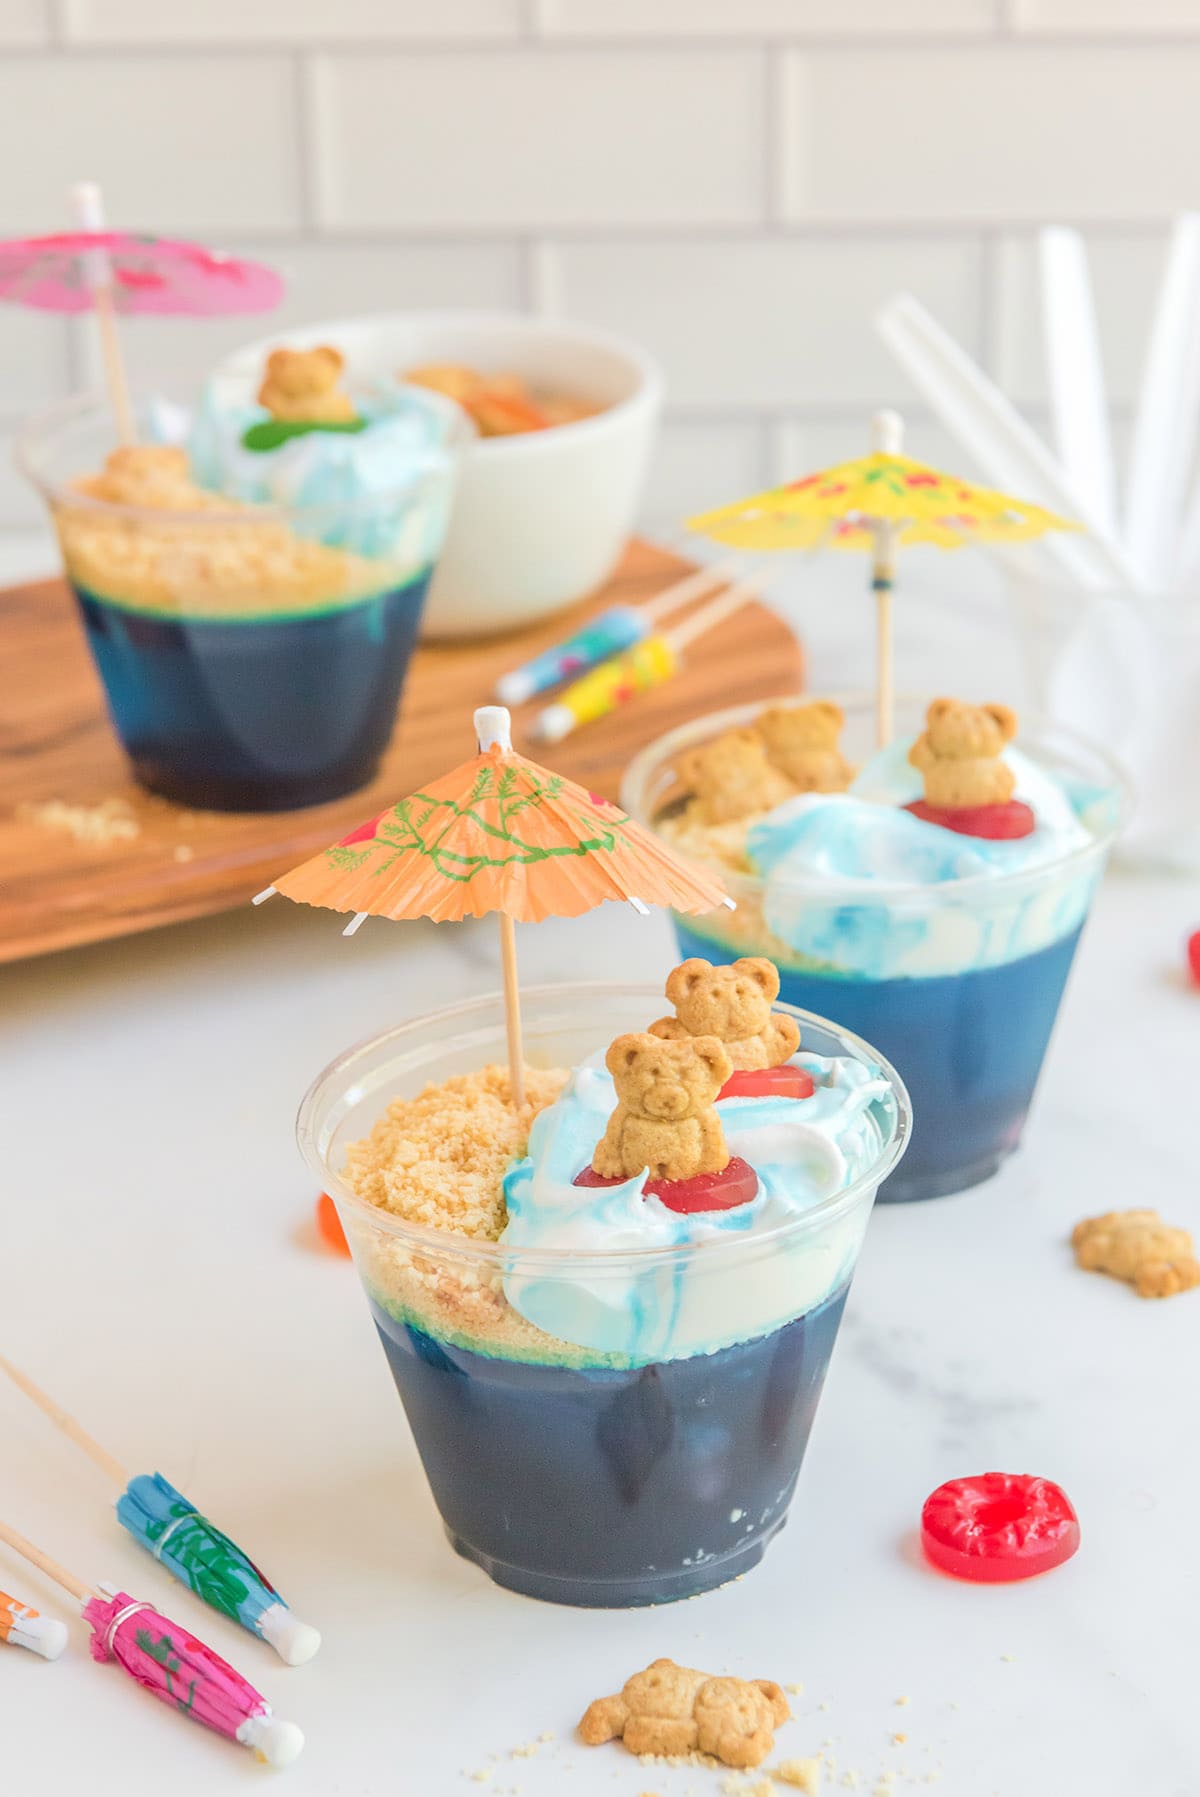
Our Beach Party Jello Cups recipe is so quick and easy to make using only fruit-flavored jello, water, colored Cool Whip, and the cutest combination of candy, crushed cookies, and drink umbrellas for decoration.
These single-sized beach-themed cups come complete with Golden Oreo crumbs to create the sand, ocean water foam formed from whipped topping, teddy grahams floating inside lifesaver inner tubes, cocktail umbrellas to shade the bears from the sun, and there’s even some Swedish fish swimming as a hidden surprise.
Both kids and adults will love these ocean-themed desserts – they’re cool and refreshing pool party treats that you’ll want to prepare in advance so you can spend time swimming outside instead of cooking in a hot kitchen.
Why We Love This Beach Party Jello Recipe
- Quick and easy to make in 15 minutes.
- Uses a handful of simple ingredients.
- Make-ahead recipe is the ideal time-saver for party prep.
- Adorable jello cups for kids and adults!
- Perfect treat for pool parties and warm weather snacking.
- Fun to serve for Memorial Day, Fourth of July, Labor Day, or any summer festivity.
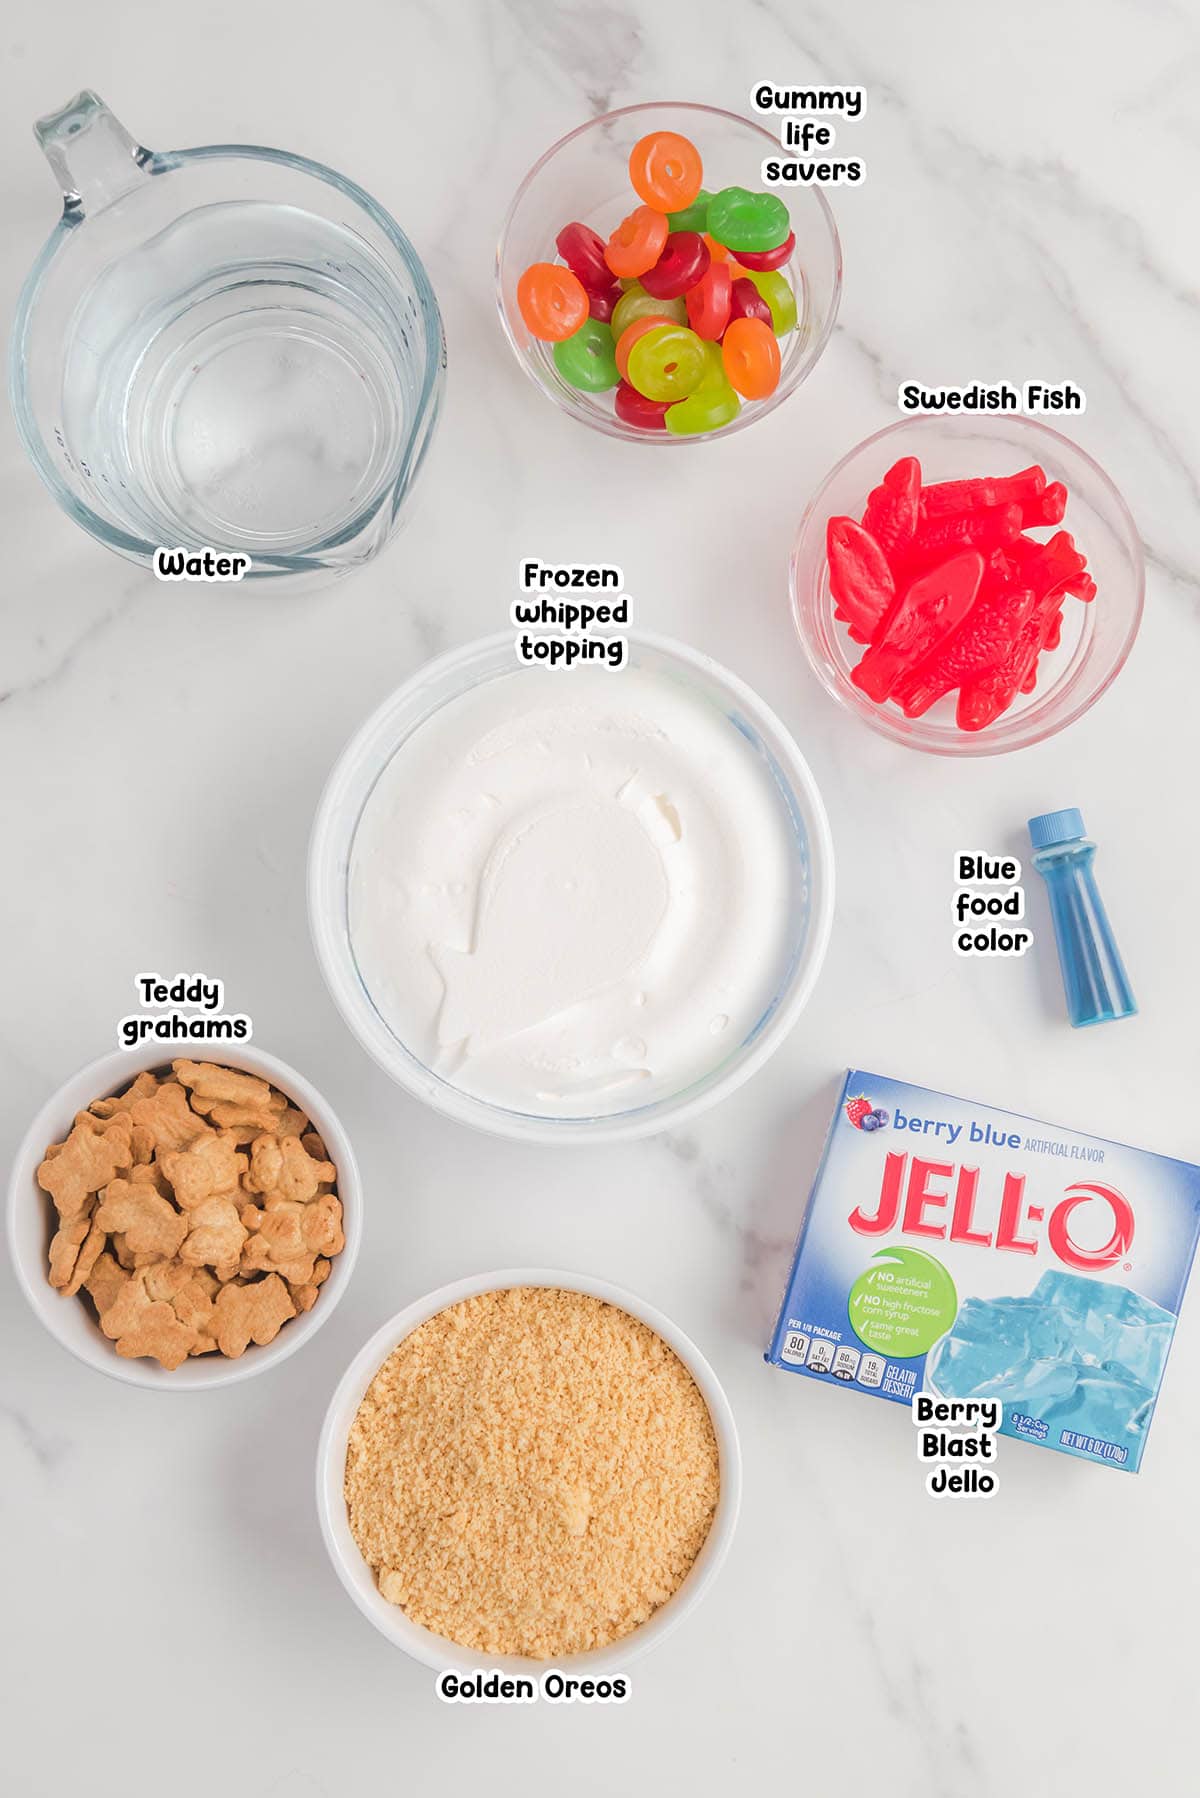
Beach Party Jello Cups Ingredients
- Berry Blast Jello – The main star of the dish. It lends a deep, berry flavor and a beautiful blue color, perfectly representing the ocean in our beach-themed cups.
- Water
- Swedish Fish & Gummy Lifesavers – These contribute the fun, whimsical element to our beach scene. They’re not only sweet and chewy but add a playful touch to the jello cups.
- Golden Oreos – Crushed to resemble beach sand, these cookies bring a delightful crunch, contrasting nicely with the jiggly jello and creamy whipped topping.
- Frozen whipped topping
- Blue food color drops
- Teddy Grahams
- Drink umbrellas
Substitutions and Additions
- Jello Flavor: While Berry Blast is our top choice for its vibrant blue hue, you could switch it up with other flavors like lime for a green sea effect, or even a mango flavor for a more tropical vibe.
- Oreo Alternatives: Can’t find Golden Oreos? You can substitute them with any other vanilla-flavored cookie, like Nilla wafers. Graham cracker crumbs could also work well as ‘sand’ in our beach scene.
- Cute Candy: You can add gummy sharks to the bottom of your cups, place a gummy turtle on top of the sand, cut up a piece of Airhead Xtremes candy to make a beach towel for your Teddy Graham, or get creative with your own ideas.
- Vegan Options: If you’re looking for vegan alternatives, you can substitute the regular Jello with a plant-based gelatin alternative and use vegan-friendly candies instead of Swedish Fish and Teddy Grahams.
- Add Alcohol: Feel free to add alcohol (for adults only) to get your party started! Check out my Pool Party Jello Shots for adorable, alcohol-infused sweet treats.
Remember, any substitutions may alter the taste and texture of the recipe, so use them at your own discretion.

Recommended Tools
- Mixing bowl
- Fork
- 5 oz clear plastic cups
How to Make Beach Party Jello Cups
Creating Beach Party Jello Cups is like sculpting an edible beach scene – it’s a fun, creative process that you’ll enjoy as much as you will love the final product. Let’s get into the details:
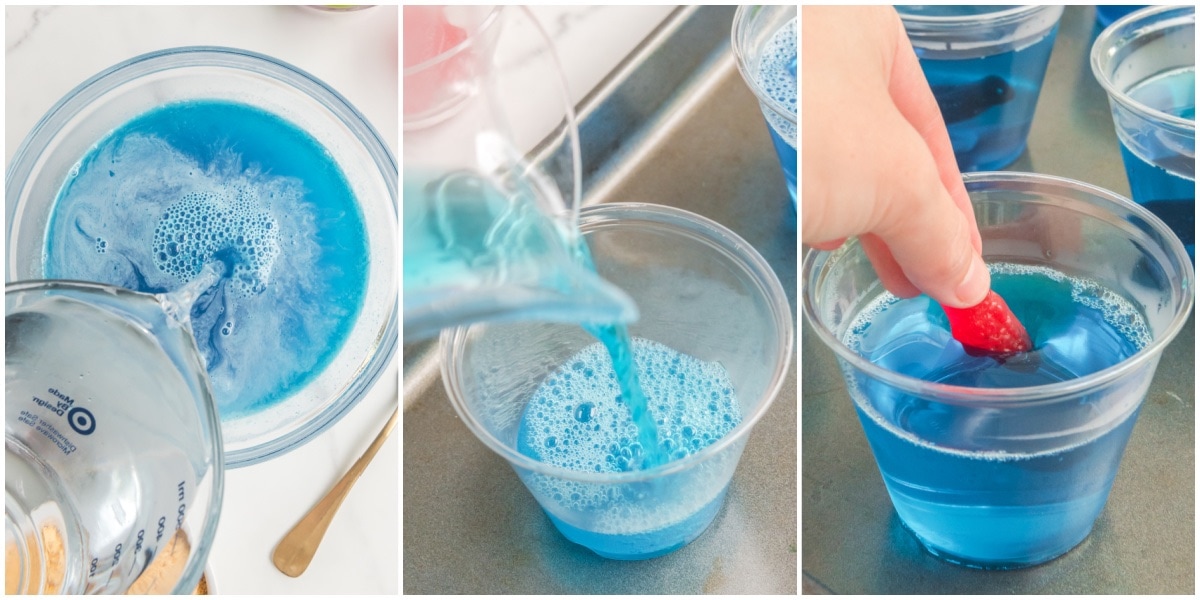
Mixing the Jello: Start by adding your Berry Blast Jello mix to boiling water. Stir until the Jello is fully dissolved, then add cold water and continue mixing. The aim here is to create a smooth, lump-free mixture that will set evenly.
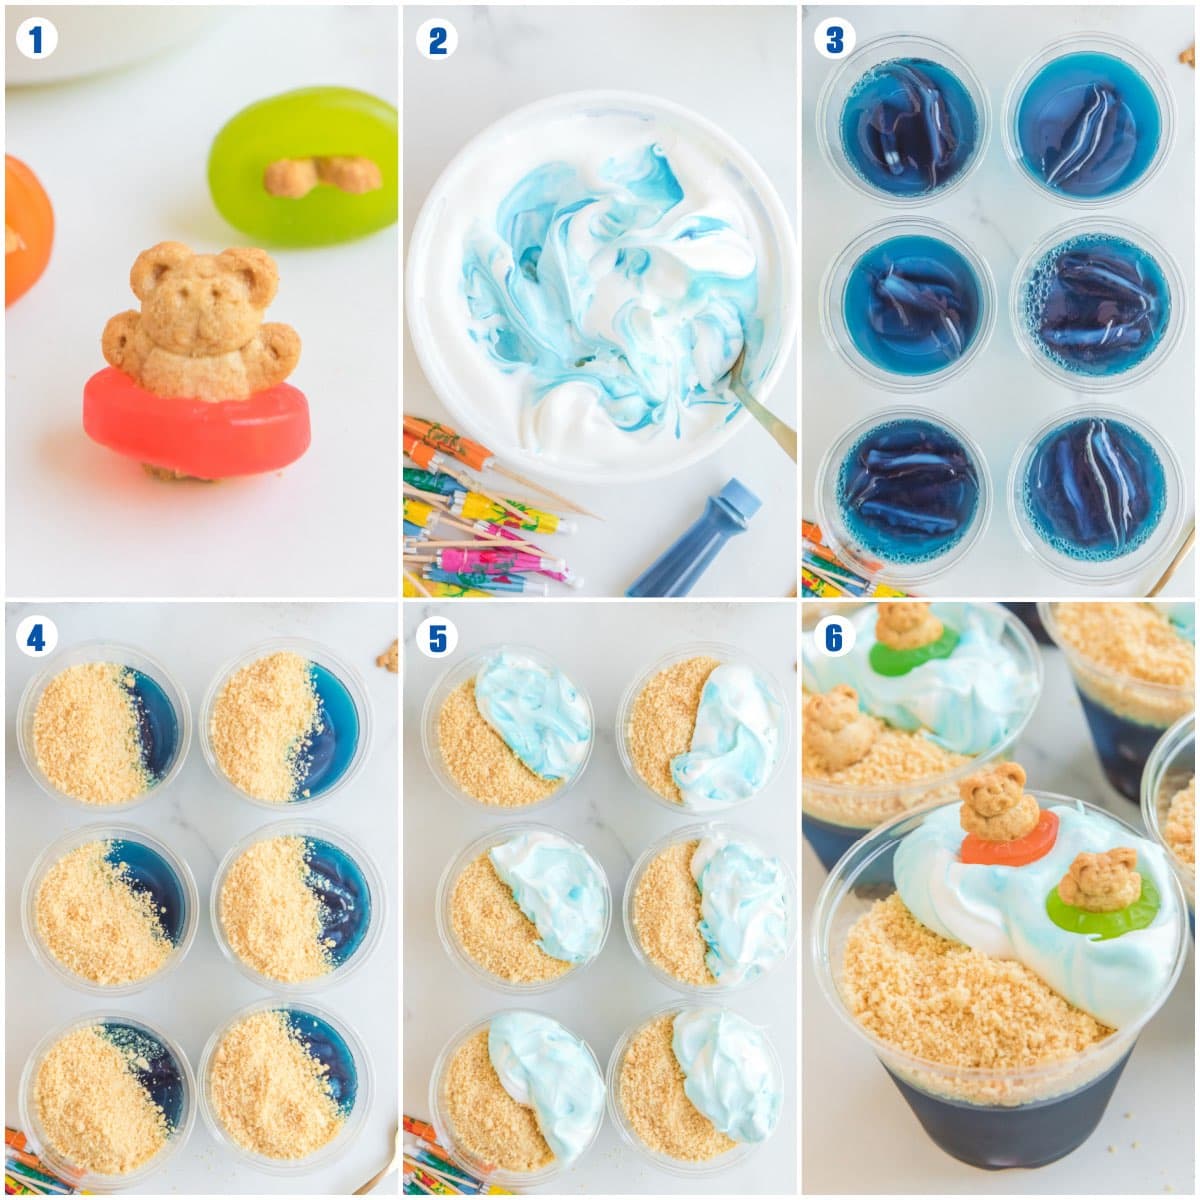
Setting the Jello: Pour the Jello into your cups, leaving about an inch of space from the rim. Pop these in the refrigerator for about an hour until they’re semi-solid. Now’s the time to stick your Swedish fish into the Jello – a fun touch that makes it seem like they’re swimming in the ocean!
Creating the Beach Scene: Once your Jello is fully set, create the ‘sand’ by adding Oreo crumbs to one side of the cup. For the ‘ocean’, add a few drops of blue food coloring to the whipped topping, mixing gently to create an ocean-like effect. Spoon this onto the other side of the cup.
Adding the Details: Add your Teddy Grahams, some with LifeSaver floating in the ‘ocean’ and some without on the ‘sand’. Finish off with a drink umbrella stuck into the ‘sand’, and voila, your Beach Party Jello Cups are ready to impress!
Tips For Making Beach Party Jello Cups
- I like to line up my plastic cups on a flat, firm, moveable surface like a tray or cookie sheet. This makes it easier to move them back and forth from the fridge.
- This recipe is really easy to double or triple (and I recommend it!).
- You may need to add food coloring drops twice. You don’t want to over mix the whipped topping and food color, so use the top streaky portion fully and then add more drops as needed to create more streaky whipped topping to choose from.
- Be sure the whipped topping isn’t warm and completely at room temperature or “soupy”. This recipe works best when there is a bit of texture in the whipped topping.
- You may need to put your jello cups back inside the refrigerator to chill before serving.
How to Serve
A sweet and refreshing dessert, our Beach Party Jello Cups are incredibly versatile when it comes to serving options.
Solo Star: These cups are eye-catching enough to serve as a stand-alone dessert. Their unique presentation is bound to make your guests smile.
Dessert Buffet: If you’re hosting a larger gathering, these jello cups can be a part of a dessert buffet. Consider pairing them with other beach-themed treats for a cohesive look.
How to Store Beach Party Jello Cups
- Make Ahead: You can prepare the Jello cups a day ahead and keep them in the refrigerator until you’re ready to serve. Just hold off on adding the Teddy Grahams and the umbrellas until just before serving to prevent them from getting soggy.
- In the Fridge: Once assembled, the Beach Party Jello Cups can be stored in the refrigerator for up to 3 days.
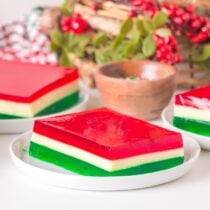
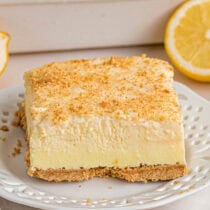
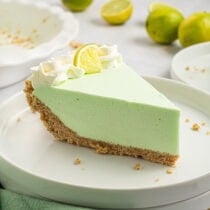
More Summer Recipes
Our Beach Party Jello Cups recipe is a true showstopper, not just for its vibrant and playful presentation, but also for the delightful combination of flavors and textures.
Whether it’s a summer party, a kid’s birthday, or a casual get-together, these jello cups are a unique dessert that’s bound to leave your guests impressed. Happy cooking!
Other Easy Recipes You will Love
- Walking Banana Pudding
- Red White And Blue Jello
- Fresh Fruit Popsicles
- Walking Strawberry Pretzel Salad
- Rainbow Jello

Beach Party Jello Cups
Ingredients
- 6 ounce box of Berry Blast Jello
- 2 cups boiling water
- 2 cups cold water
- 6-12 Swedish Fish
- 12-15 crushed Golden Oreos crushed with a food processor
- 8 ounce tub of frozen whipped topping thawed slightly cooler than room temp
- Blue food color drops
- Teddy grahams
- Gummy life savers
- Drink umbrellas
Instructions
- Add Jello mix to 2 cups of boiling water. Mix with a fork or wish until the Jello is completely dissolved. Add in the cold water and continue mixing.
- When done, pour Jello evenly into (6) 5oz plastic cups. You will pour up to 1 inch before the cup’s rim.
- Place cups inside the refrigerator to chill for 1 hour or until the Jello is semi-solidy. At this point, add 1-2 Swedish dish in the bottom of the Jello sticking them in with your finger. Return to refrigerator to continue chilling for 3-4 hours or overnight.
- When you’re ready to assemble cups, begin by adding the sand to each cup. Add 1-2 heavy spoonfuls of Oreo crumbs to one side of all the cups. This should cover half of the cups surface.
- Without taking the whipped topping out of the container, add about 3 drops of food coloring. Use a fork or spoon to gently mix in. Be sure to not mix in fully. You want to create ocean streaks and lines.
- Add 1-2 spoonfuls of whipped topping to each cup beside the sand crumbs.
- Next wrap your Teddy grahams in their Life Saver Gummy floats. Stretch out the Lifesaver gummies with your fingers before adding the Teddy graham in the middle. Then add the Teddy graham inside their float to the ocean portion of the cups. You can also add Teddy grahams without LifeSaver floats to the sand portion.
- Finish each cup by sticking a drink umbrella inside the sand portion of each cup.
- Serve chilled and enjoy!
Jenn’s Notes
- To Store: You can store your undecorated jello cups covered in the fridge for up to a week. Garnish them just before you are ready to serve.
- I like to line up my plastic cups on a flat, firm, moveable surface like a tray or cookie sheet. This makes it easier to move them back and forth from the fridge.
- This recipe is really easy to double or triple (and I recommend it!).
- You may need to add food coloring drops twice. You don’t want to over mix the whipped topping and food color, so use the top streaky portion fully and then add more drops as needed to create more streaky whipped topping to choose from.
- Be sure the whipped topping isn’t warm and completely at room temperature or “soupy”. This recipe works best when there is a bit of texture in the whipped topping.
- You may need to put your jello cups back inside the refrigerator to chill before serving.