This post may contain affiliate links. Please read our disclosure policy.

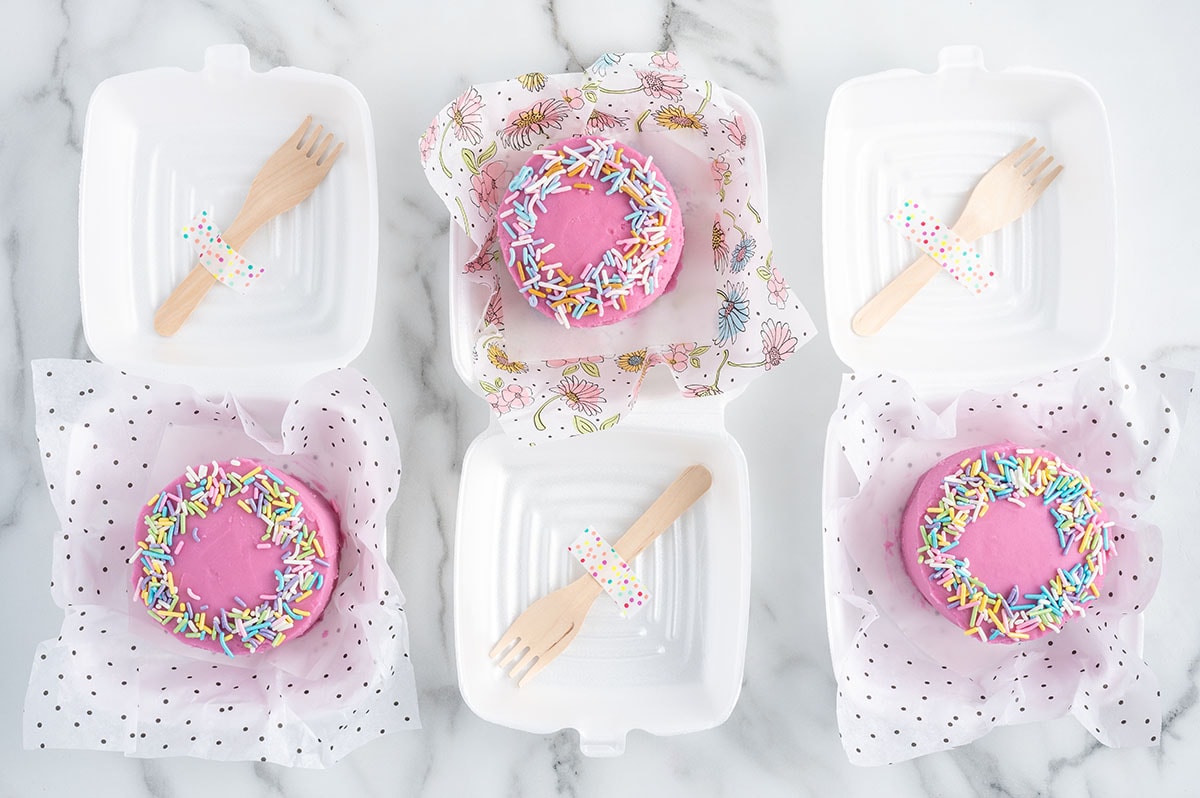
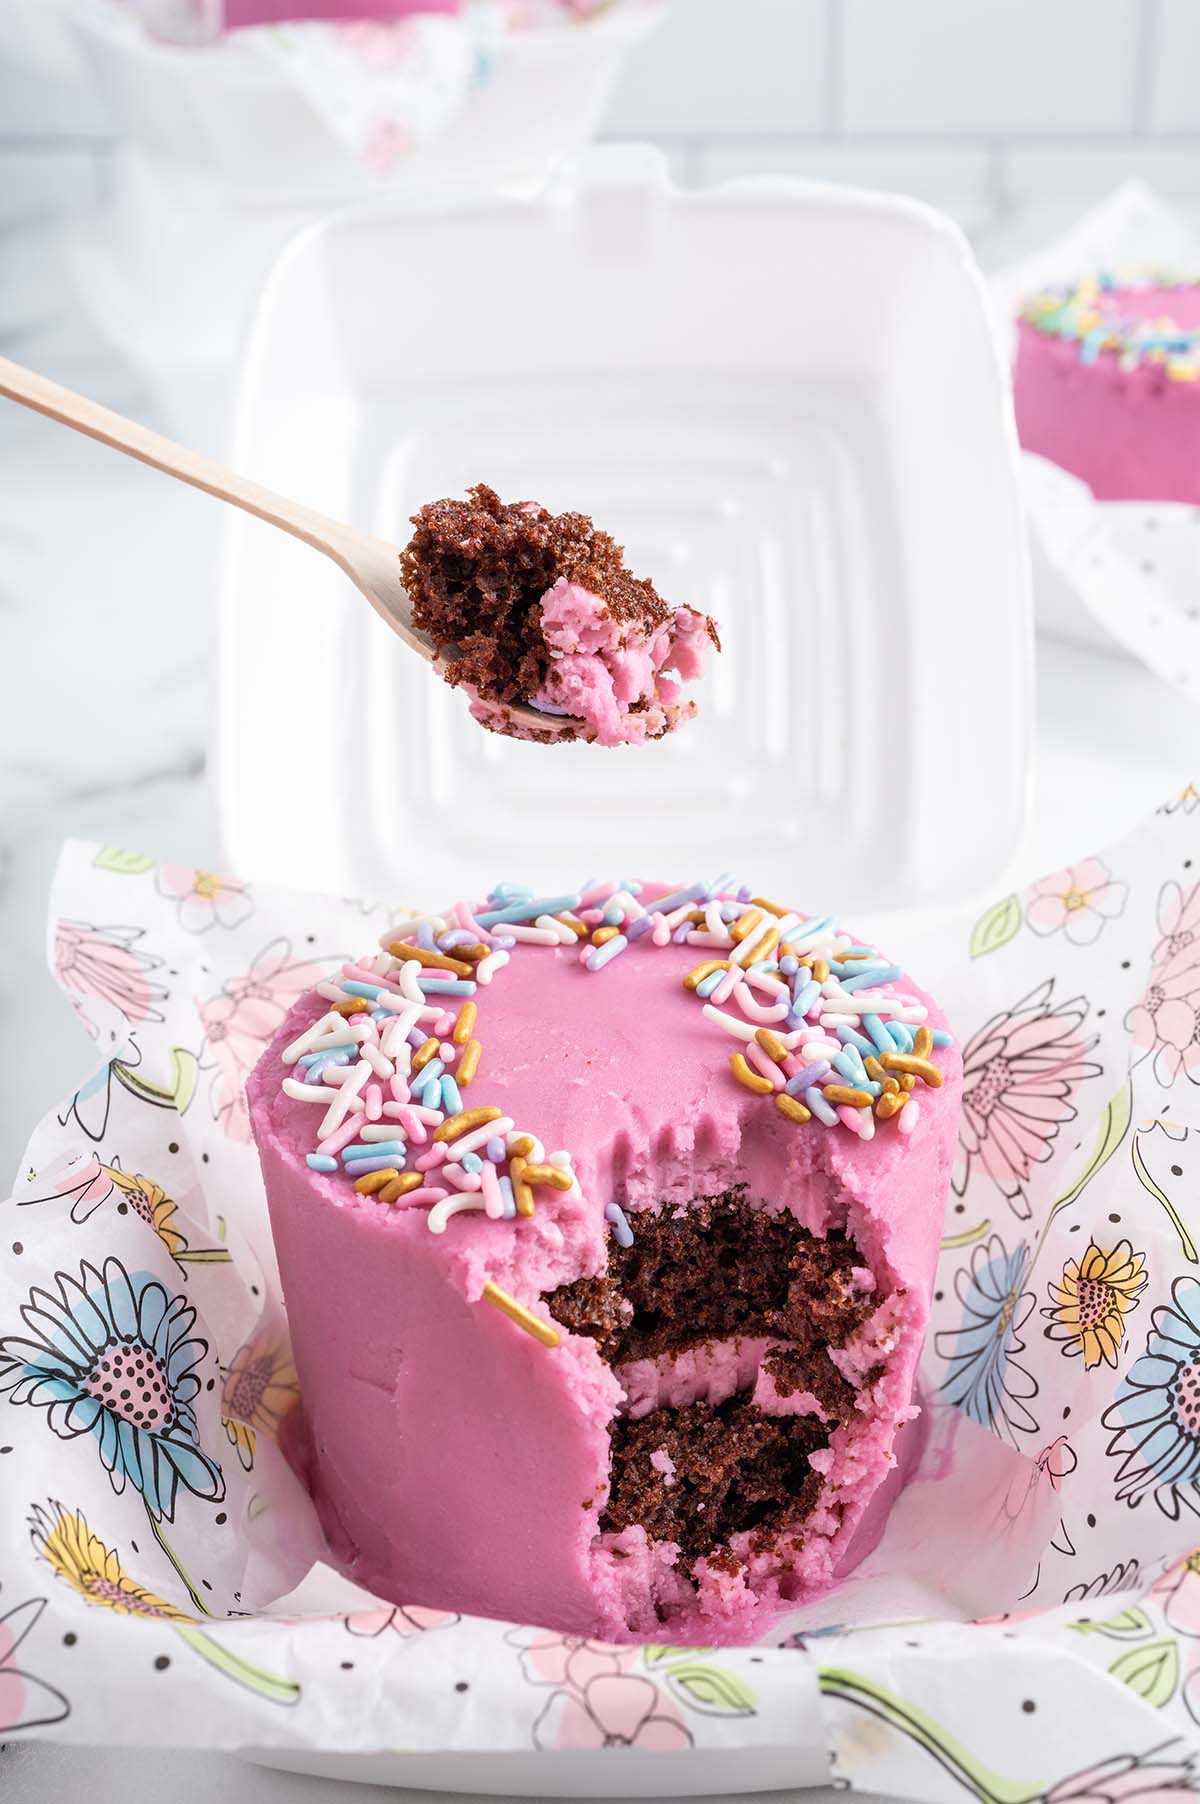
This Lunch Box Cake recipe makes the cutest mini Korean desserts that you can decorate with sprinkles, candies, heartfelt messages, or any eye-catching embellishments.
Easy to make with a cake mix and frosted with buttercream, these petite-sized snacks are packaged in bento boxes and perfect for gift-giving or preparing as a fun, kid-friendly project.
Korean Lunchbox Cake
Learn how to bake the most adorable Lunch Box Cakes (aka Korean bento cakes) with my simple shortcut steps and time-saving tips.
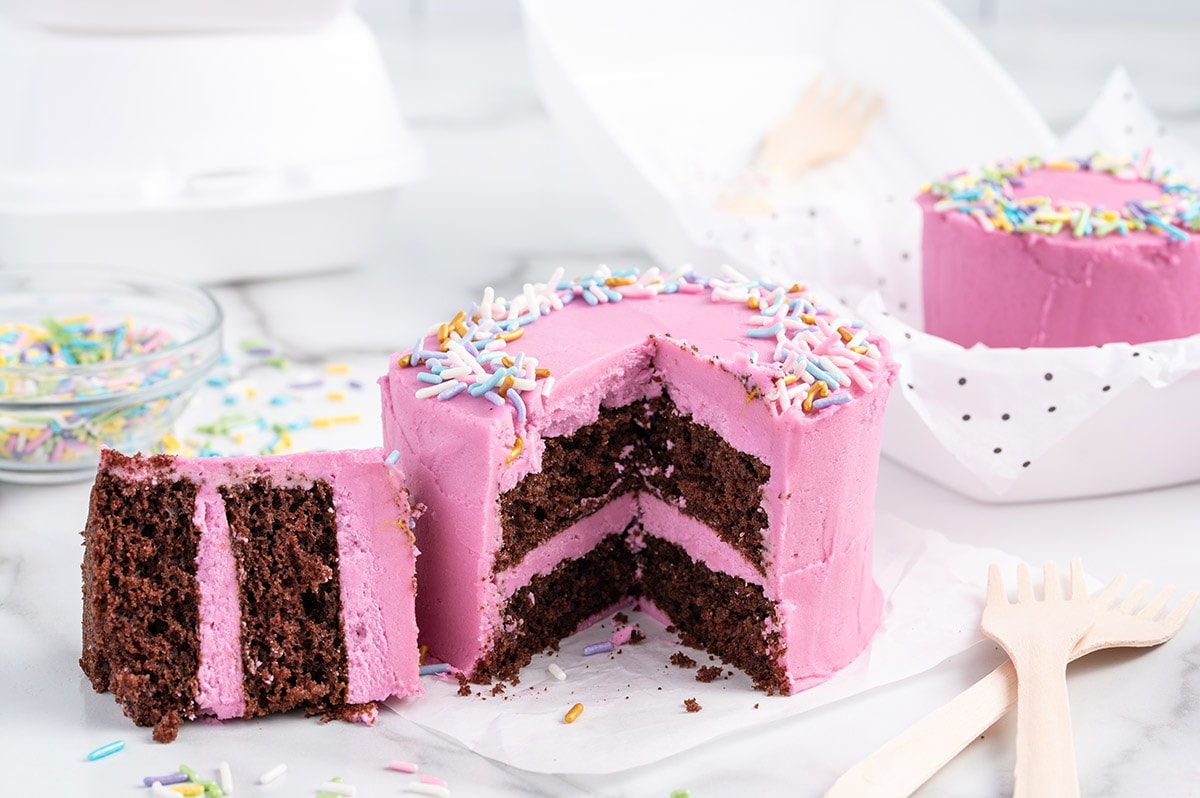
This easy bento cake recipe begins with a box of chocolate cake mix (there are far fewer ingredients than baking a cake from scratch) where the batter is baked on a sheet pan, cut into circles, stacked, frosted, and decorated with a simple design.
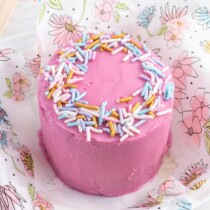
Each mini cake is covered with a homemade buttercream frosting and stored in a clamshell takeout box where it’s eaten as a serving for two.
Lunchbox cakes are often more practical when feeding just a few and cost a fraction of the price of their full-sized counterparts; a Korean mini cake is ideal for customizing with a birthday, anniversary, or celebratory message – even a simple saying can brighten someone’s day.
What Is A Lunch Box Cake?
A lunchbox cake is a type of small-sized confection that’s packaged and eaten inside a takeout box. Often referred to as mini cakes or Korean bento cakes, these sweet treats are a cost-effective way to make a customized cake to serve only a few.
Meant to be minimalistic in design, the main focus of the cake is the written message on top.
Why We Love Korean Lunch Box Cakes
- Quick and easy to make with a cake mix hack.
- Uses simple kitchen staple ingredients to create the cutest mini cakes.
- Fun for kids layer, pipe, and decorate their customized Korean cakes.
- Great way to practice your decorating skills on a small size surface.
- Sometimes a full-sized cake is too much for only a few people.
- Perfectly portable when packaged in a clamshell box so they’re great for gift giving, party favors, or surprising someone special.

Lunch Box Cake Ingredients
- Devil’s food cake mix
- Water
- Vegetable oil
- Eggs
- Salted sweet cream butter
- Clear vanilla flavoring
- Almond extract
- Powdered sugar
- Heavy whipping cream
- Food color gel: I used fuchsia gel food coloring for my frosting.
- Colorful sprinkles (Optional garnish)
Substitutions and Additions
- Change The Cake Mix: You can substitute any boxed cake flavor for the Devil’s food cake mix. Try chocolate, vanilla, lemon, red velvet, etc. Since the cake is customizable, you can come up with any flavor for this confection. Or if you have a favorite from scratch recipe, you can try using it instead.
- Prepare Cake Pops: Any cake scraps left over after you’ve made the cutouts can be used to make cake pops.
- Frost With Your Favorite: Feel free to frost your Korean lunch box cakes with your favorite kind of frosting. A whipped cream frosting, cream cheese frosting, or buttercream frosting will all work well. Use gel food coloring to create bright-colored frostings.
Recommended Tools
- ½ sheet cake pan
- Parchment paper
- Mixing bowl
- Hand mixer
- Nonstick cooking spray
- 3½-inch round cookie/biscuit cutter
- Offset spatula
How to Make Lunch Box Cake
- Bake The Cake: Mix together the cake mix, water, vegetable oil, and eggs. Spread the batter in a cake pan and bake at 350 degrees Fahrenheit for 15-18 minutes.
Pro Tip: Gently run the tip of a knife around the edge of the pan to ensure the cake does not stick to the pan. - Cut Out Circles: Flip the cake over, allow it to cool, and cut out 12 cake circles.
- Form The Frosting: Beat together the butter, vanilla, and almond extract until smooth. Add the powdered sugar, 1 cup at a time, mixing in between each cup, until the frosting is completely smooth. Add the food color gel and continue mixing until the desired color is reached.
Pro Tip: Add the heavy cream if the frosting is too stiff. - Assemble: Place a teaspoon of frosting on a parchment paper square so the cake sticks. Then fill and crumb coat each of the 2-layered cakes. (A crumb coat is a light layer of frosting that is spread around to lock in the crumbs). Place the cakes in the refrigerator to chill and firm up for 1 hour.
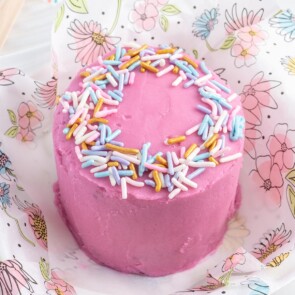
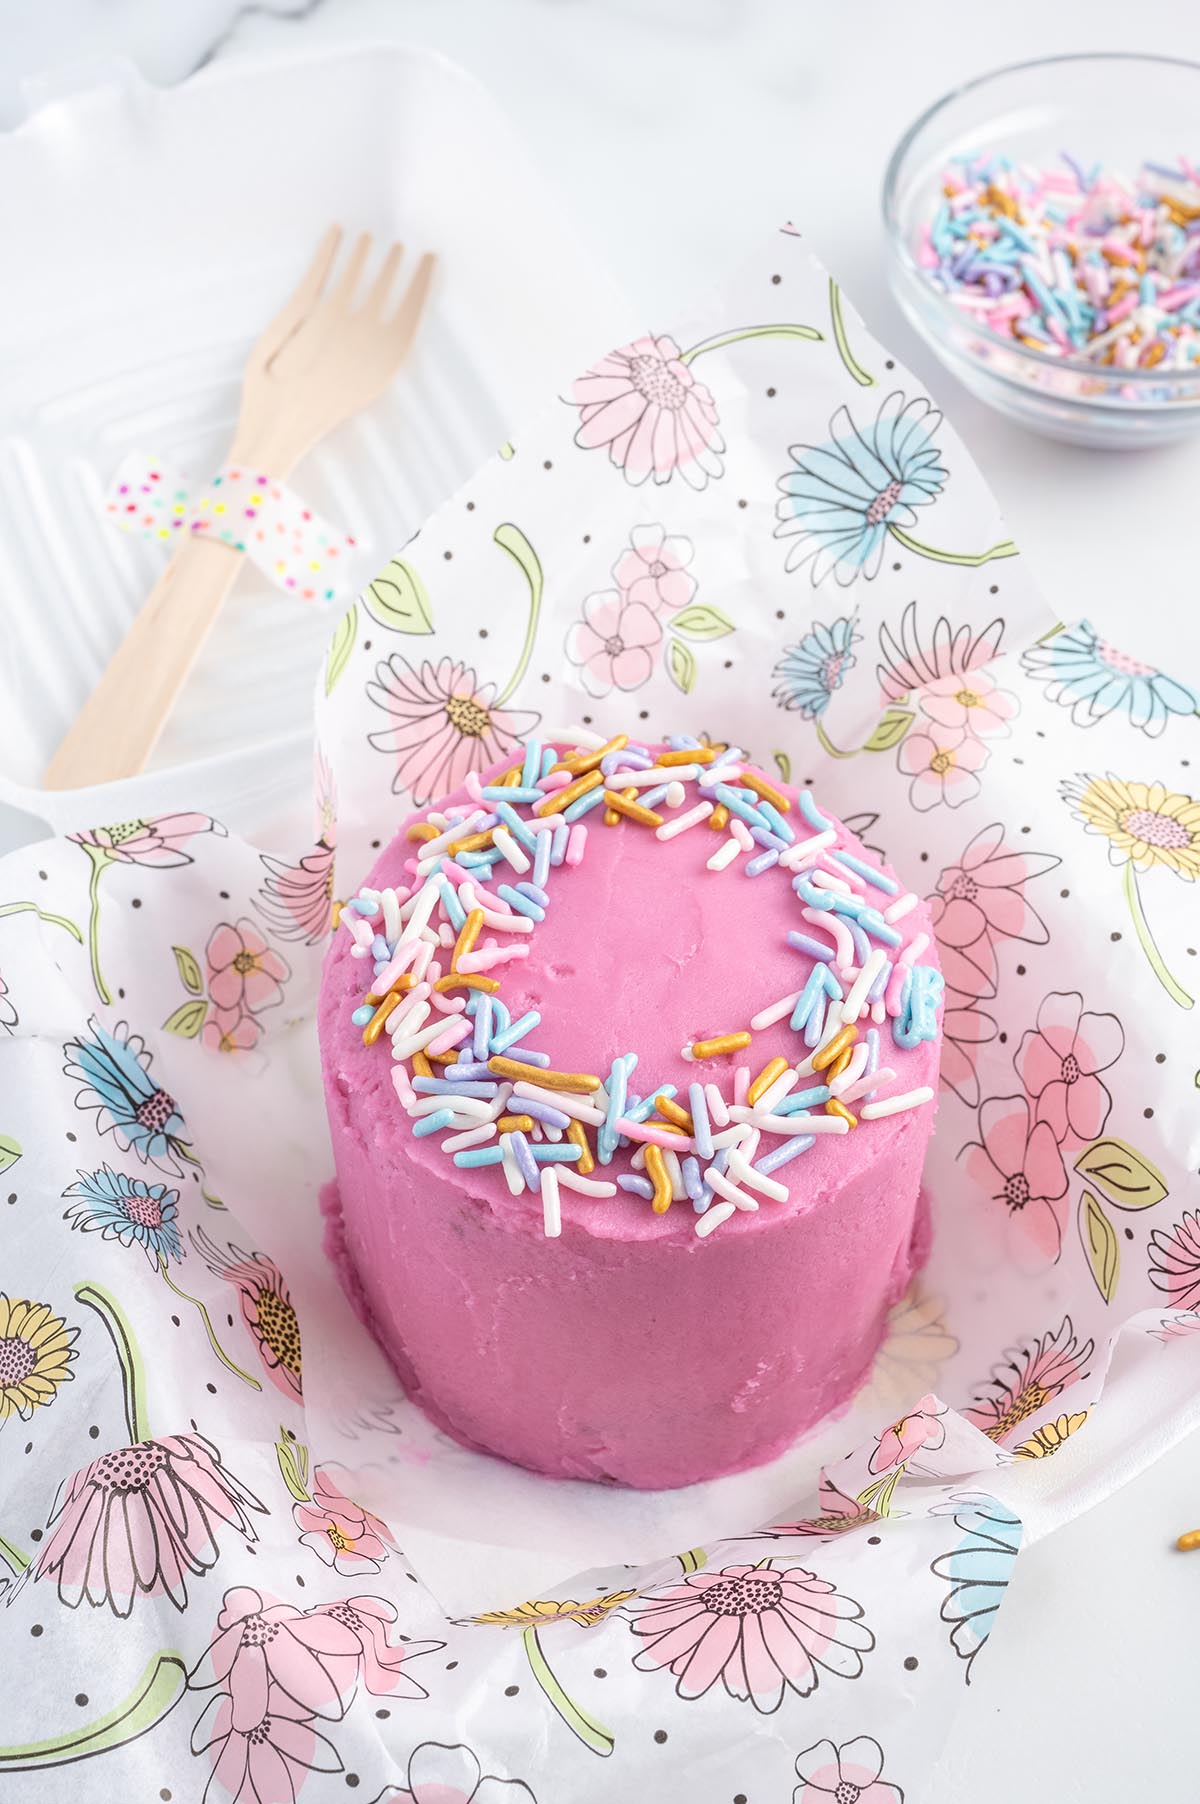
- Coat And Customize: Spread a thicker layer of frosting over the top and sides of the cakes. Add colorful sprinkles or your favorite designs to the top and sides.
- Serve: Chill in the refrigerator until ready to serve or package. Pick up the cake using the parchment and place the cake inside the box.

More Easy Cake Recipes

Tips for Making the Best Lunch Box Cake
- If you are pressed for time, you can substitute canned whipped frosting for the homemade buttercream.
- If you are adding a message on the top of your cake, I like to use a toothpick to sketch it out before piping the words on top. This helps to ensure your letters are evenly spaced.
- Make sure you use a container about 0.5 inches larger all around than your cake. This will allow you to add a piece of parchment paper underneath for easy removal plus ample room at the top.
How to Store Lunch Box Cake
- To Store: Store the frosted cakes in the clamshells, or covered in the fridge for up to 1 week.
- To Freeze: You can freeze the unfrosted layers for up to 3 months. Allow the cake layers to thaw overnight before frosting. You can freeze the frosted cakes for up to 1 month thaw overnight before serving.
What Size Is A Lunch Box Cake?
These small size cakes range from 3.5 to 4 inches, have 2 or 3 layers, and feed 1-2 people. However, they are also available in bigger sizes, such as 6 inches and 8 inches. This recipe makes six 3 ½ inch, 2 layer cakes.
How To Decorate a Lunch Box Cake
Decorate your lunch box cake just like you would a regular cake. Add colorful sprinkles, rosettes, pieces of candy, edible decor, fresh fruit, or pipe a message on top. Just make sure to choose a “flat” design so that it fits in the takeout box without touching the top!
More Great Desserts
- Cakesicles
- Strawberry Snacking Cake
- Oreo Cream Pie
- No-Bake Pumpkin Pie
- Heaven on Earth Cake
- Vanilla Mug Cake
- Chocolate Cornflake Cakes
- Black Forest Icebox Cake
Lunch Box Cakes
Ingredients
Cake Batter
- 15.25 ounce box of Devil’s food cake mix I used Duncan Hines Perfectly Moist
- 1 cup water
- ½ cup vegetable oil
- 3 large eggs room temperature
Buttercream Frosting
- 1½ cups salted sweet cream butter softened
- 1 teaspoon clear vanilla flavoring
- ½ teaspoon almond extract
- 4 cups powdered sugar
- 2-3 tablespoons heavy cream
- 3-5 drops food color gel (I used fuchsia)
- Colorful sprinkles (Optional garnish)
Instructions
- Preheat the oven to 350°F. Line a ½ sheet cake pan with parchment. Spray the pan and parchment paper with nonstick cooking spray. Set it aside.
- Add the cake mix, water, vegetable oil, and eggs to a medium-sized mixing bowl. Use a handheld mixer on medium speed to mix all the ingredients together until well combined.
- Evenly spread the cake batter over the prepared cake pan. Bake for 15-18 minutes, or until a toothpick inserted in the center comes away clean.
- Gently run the tip of a knife around the edge of the pan to ensure the cake does not stick to the pan.
- Spray a piece of parchment paper with nonstick cooking spray and place (sprayed side on top of the cake) on top of the cake.
- Place a cooling rack over the top of the cake. Carefully flip the cake over on top of the cooling rack. Allow the cake to cool completely.
- Use a 3½-inch round cookie/biscuit cutter to cut 12 cake circles. Once all circles are cut out, make the buttercream.
- Using a stand mixer or a large mixing bowl and a handheld mixer on medium-high speed, beat the butter, clear vanilla, and almond extract for 1-1½ minutes until smooth.
- Lower the mixer speed to low and slowly add the powdered sugar 1 cup at a time. Be sure to mix well after each additional cup of powdered sugar.
- Add the heavy cream if the frosting is too stiff.
- Once the powdered sugar has all been added, increase the speed to medium-high and continue mixing until the frosting is completely smooth.
- Add the food color gel and continue mixing until the desired color is reached and no streaks appear.
Assembly
- Cut a 4-inch x 4-inch square of parchment paper. Add 1 teaspoon of buttercream to the center of the parchment square. Center 1 of the cake circles over the buttercream. Spoon 1½-2 tablespoons of buttercream. Use an offset spatula to spread the frosting to the edge of the cake. Center the top cake layer over the bottom layer. Spread 2-2½ tablespoons of buttercream over the top layer.
- Spread a thin layer of buttercream evenly over the sides of the cake. (Don’t worry about this layer of frosting not completely covering the whole cake; this is known as the crumb coat. The final layer of frosting will be added after the cake chills in the refrigerator for about an hour.) Repeat for the remaining cakes. Place the cakes in the refrigerator to chill and firm up for 1 hour.
- Remove the cakes from the refrigerator. Use an offset spatula to spread a thicker layer over the top and sides of the cakes, be sure to smooth as you go. Add colorful sprinkles to the top and sides of the cakes. Chill in the refrigerator until ready to serve these adorable cakes.
Jenn’s Notes
- To Store: Store the frosted cakes in the clamshells, or covered in the fridge for up to 1 week.
- To Freeze: You can freeze the unfrosted layers for up to 3 months. Allow the cake layers to thaw overnight before frosting. You can freeze the frosted cakes for up to 1 month thaw overnight before serving.
- If you are pressed for time, you can substitute canned whipped frosting for the homemade buttercream.
- If you are adding a message on the top of your cake, I like to use a toothpick to sketch it out before piping the words on top. This helps to ensure your letters are evenly spaced.
- Make sure you use a container about 0.5 inches larger all around than your cake. This will allow you to add a piece of parchment paper underneath for easy removal plus ample room at the top.