
This post may contain affiliate links. Please read our disclosure policy.
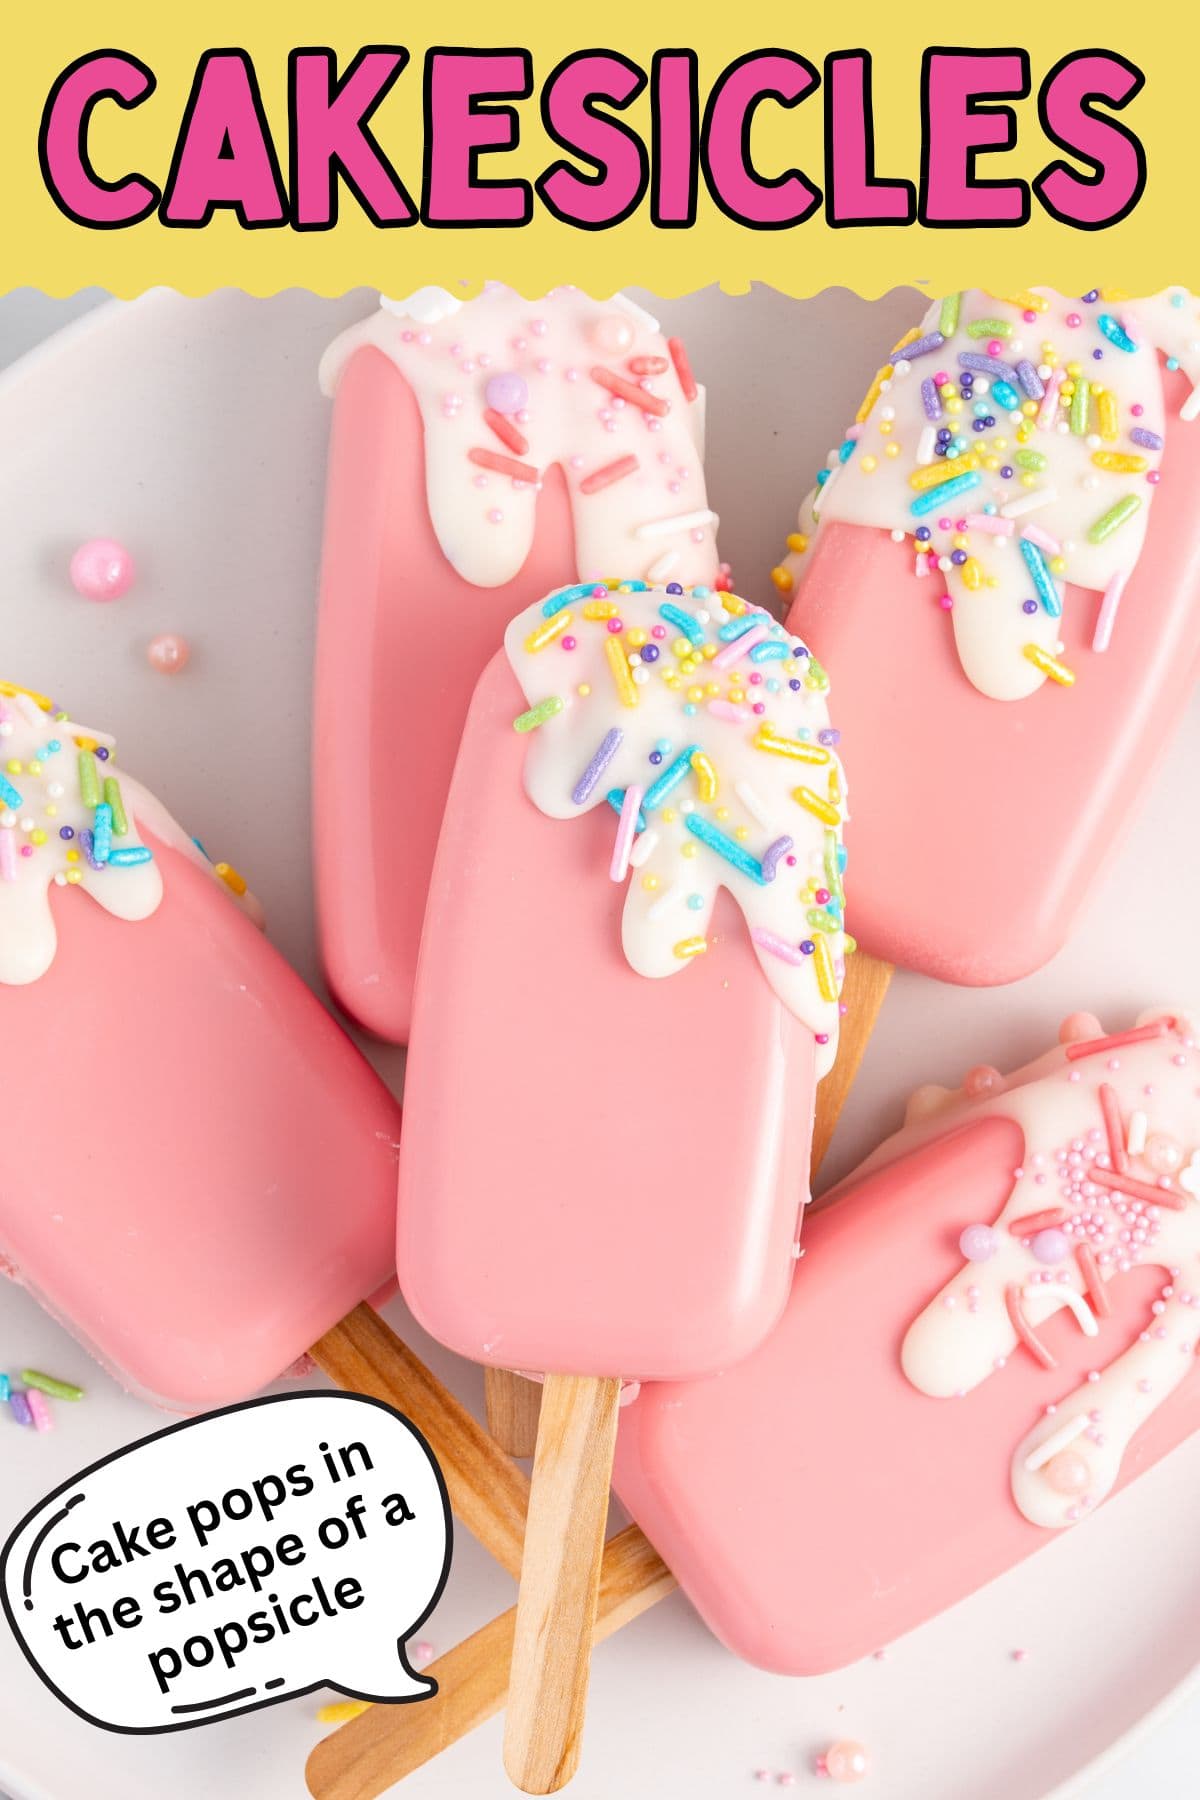
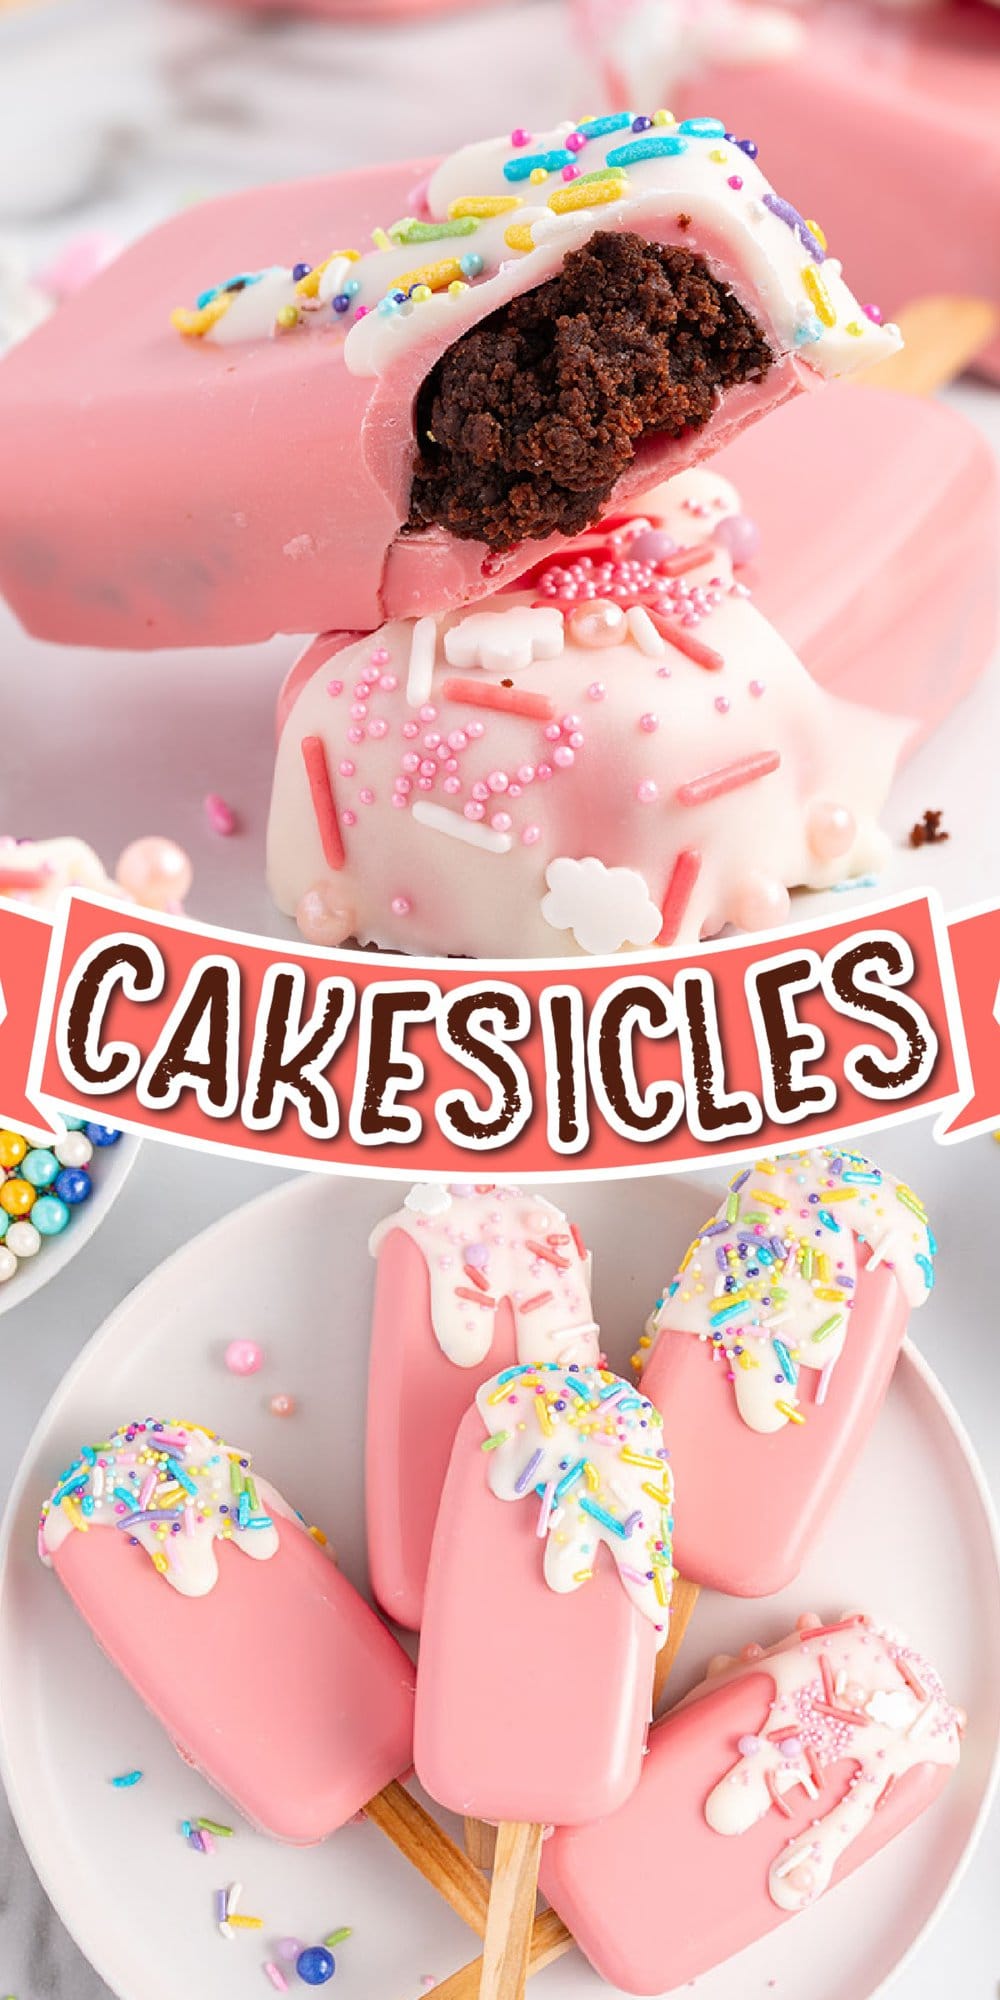
Cakesicles are a creative twist on a traditional cake pop treat, prepared with a box cake mix, a can of frosting, and colored candy coating. Easy to make and fun to eat, cake popsicles can be customized with your favorite flavors and combinations.

What Are Cakesicles?
Cakesicles taste like cake pops and are made by pressing cake crumbs mixed with frosting into candy-coated molds and sealing them with a chocolate shell. You can customize them with different cakes, frostings, and decorations. I’ve tested both mold and dipped methods—now you can pick your favorite!
Ingredients for Cakesicles
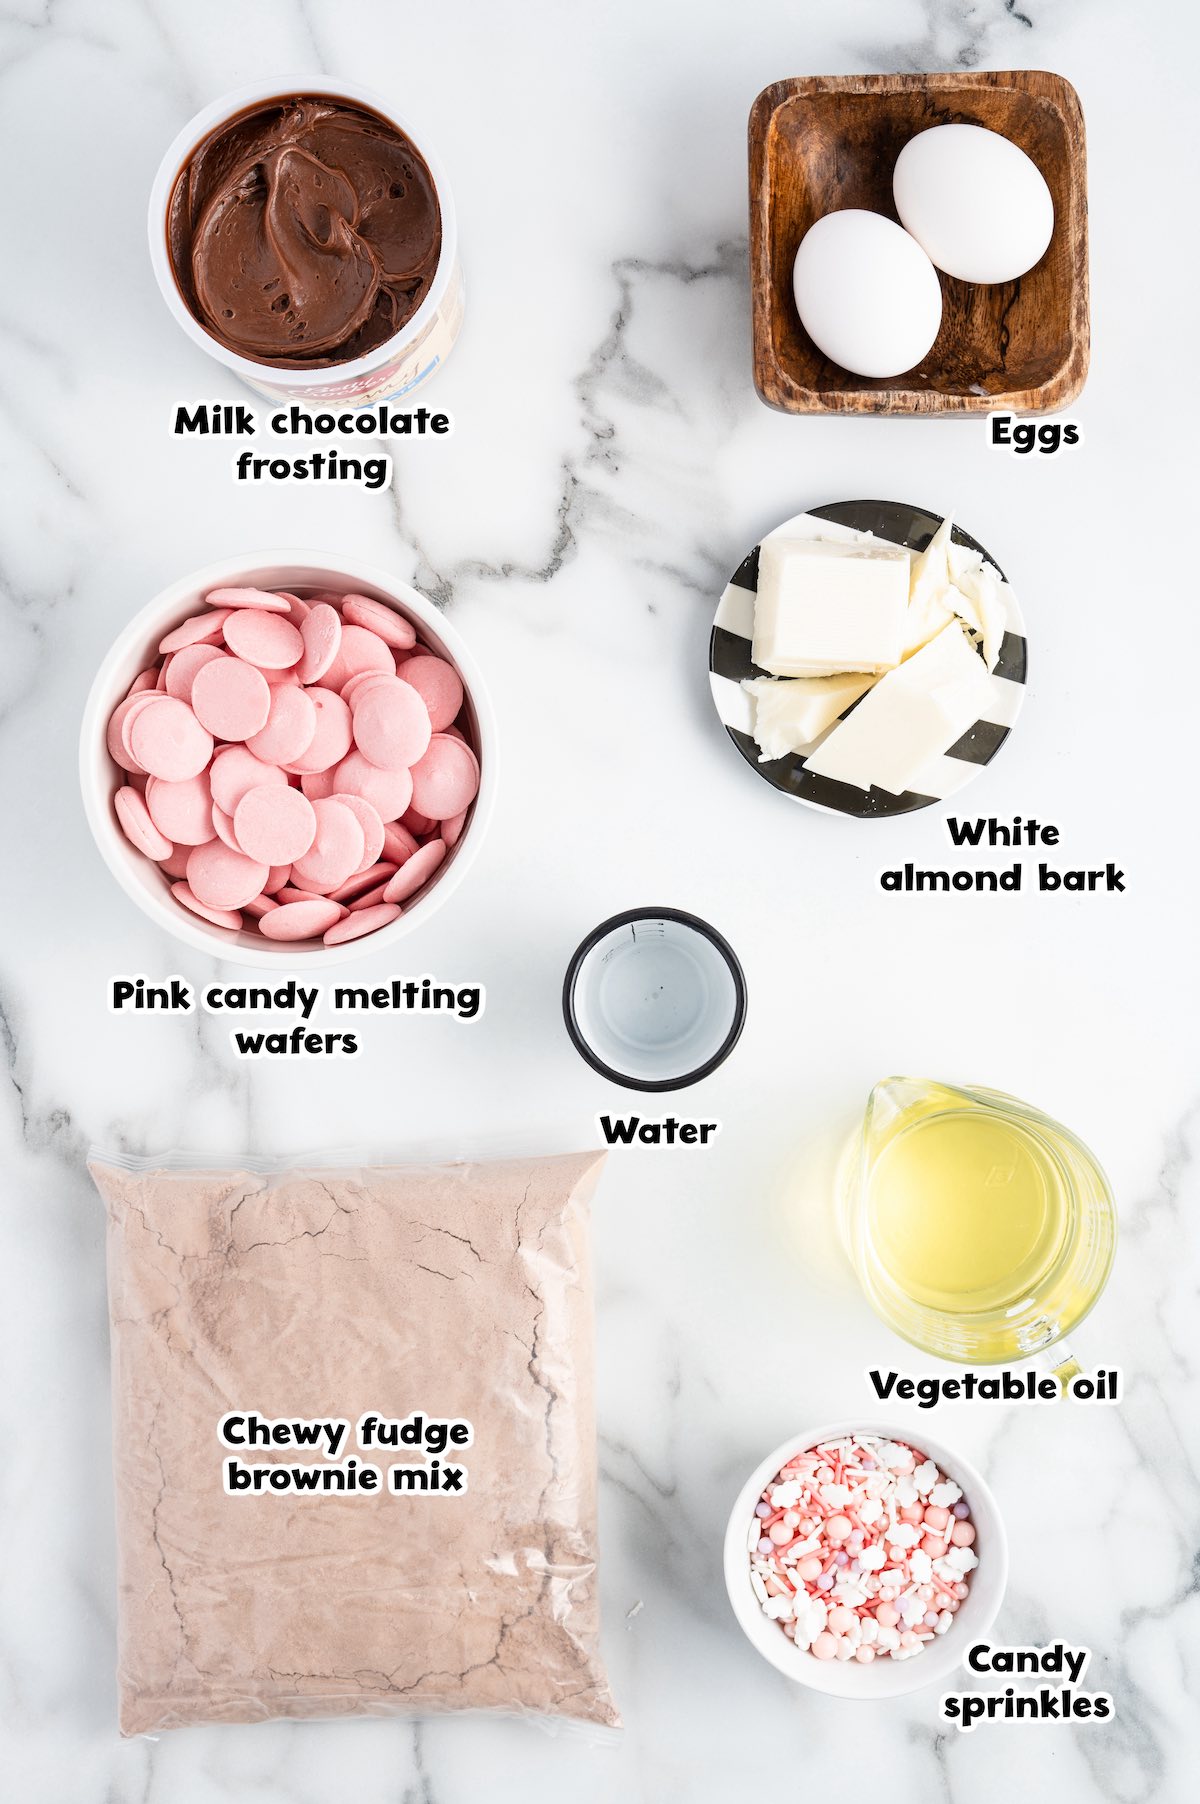
- Chewy fudge brownie mix: You can use any box cake mix or brownie mix to bake your cake filling or use a homemade sheet cake recipe if you prefer. Try vanilla, red velvet, strawberry, or chocolate cake. Just remember to match the frosting flavor to the cake itself.
- Vegetable oil
- Eggs
- Water
- Milk chocolate frosting: Feel free to use your favorite frosting to match the cake flavor. Try carrot cake with cream cheese frosting, birthday cake with homemade buttercream frosting, or lemon cake with lemon frosting.
- Pink candy melting wafers: You can swap the pink color for anything you fancy or use another compound chocolate, baking chocolate, or regular chocolate bar. Choose from semi-sweet, milk, white, or dark chocolate.
- White almond bark or white candy melts
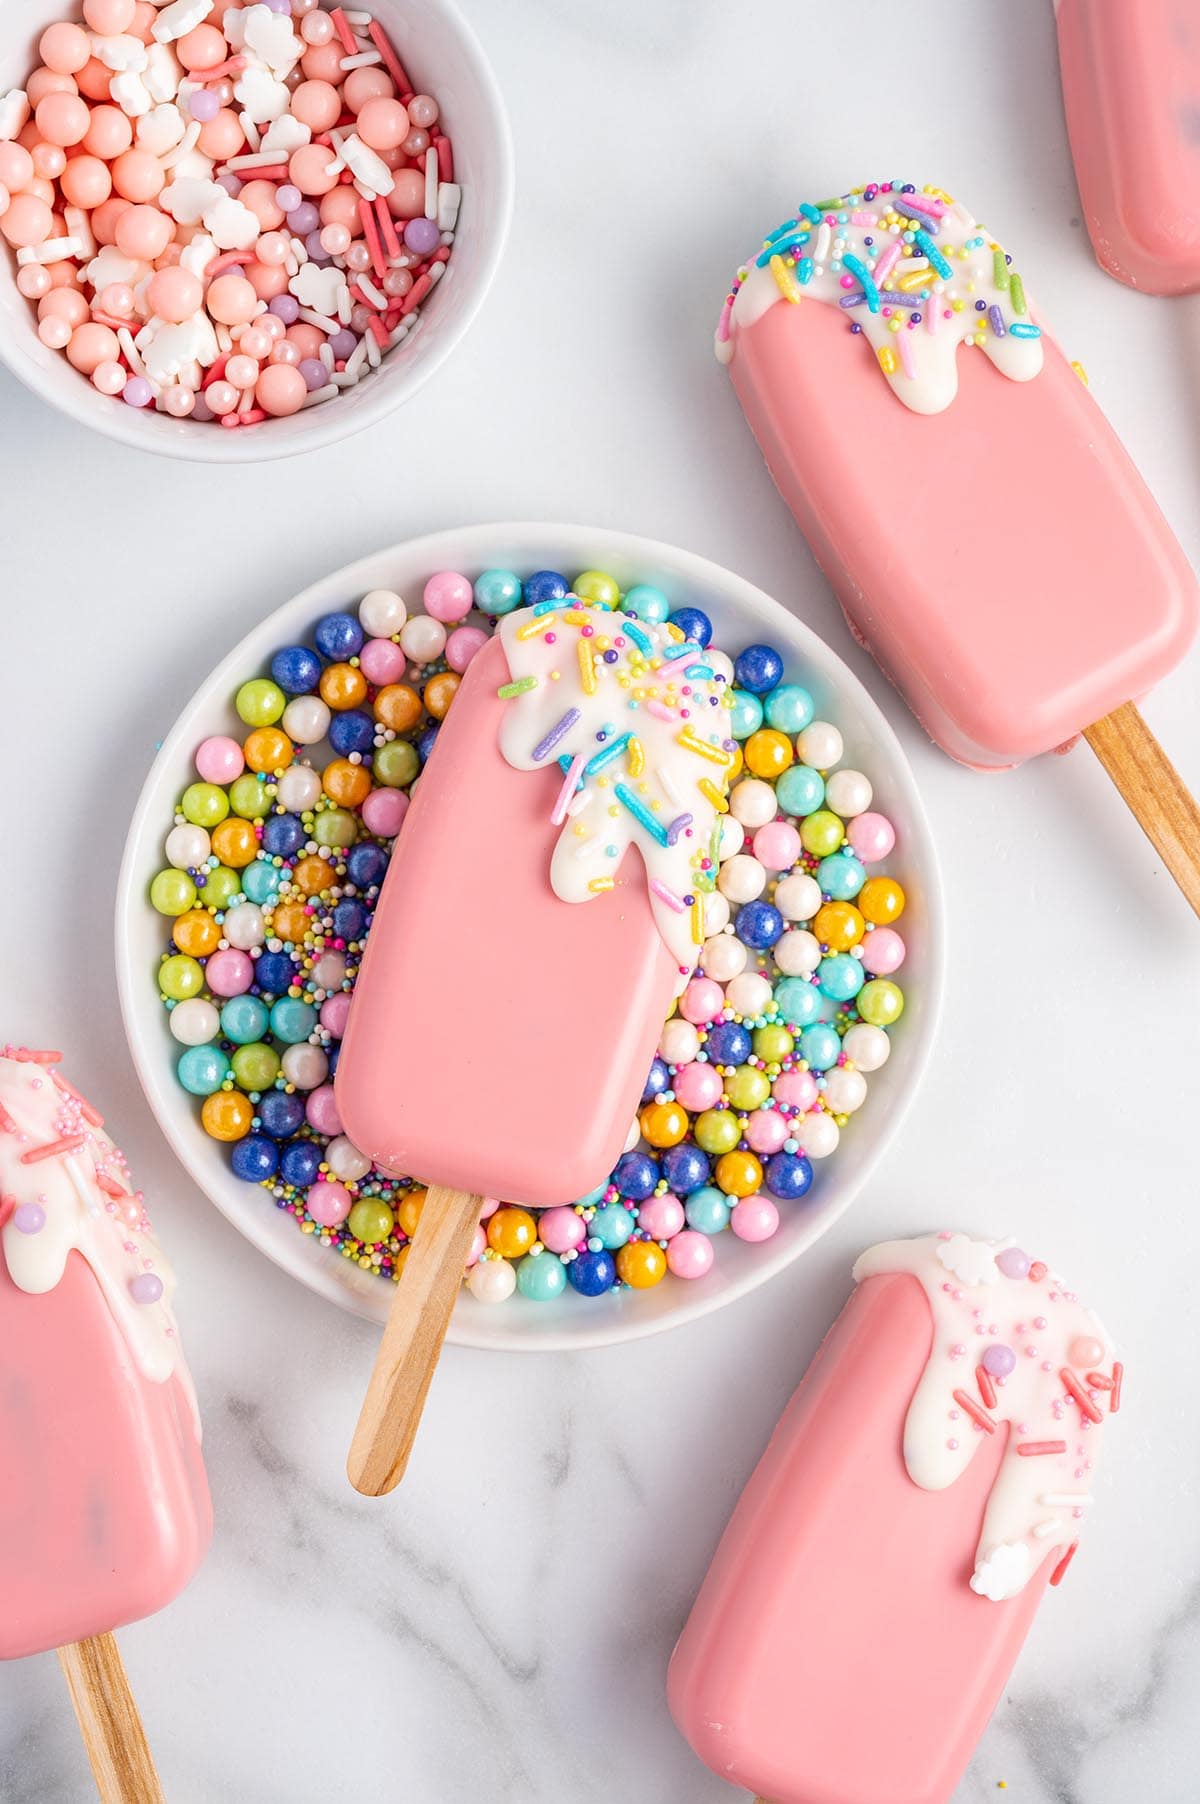
- Candy sprinkles
See the recipe card for full information on ingredients and quantities.
How to Make Cakesicles
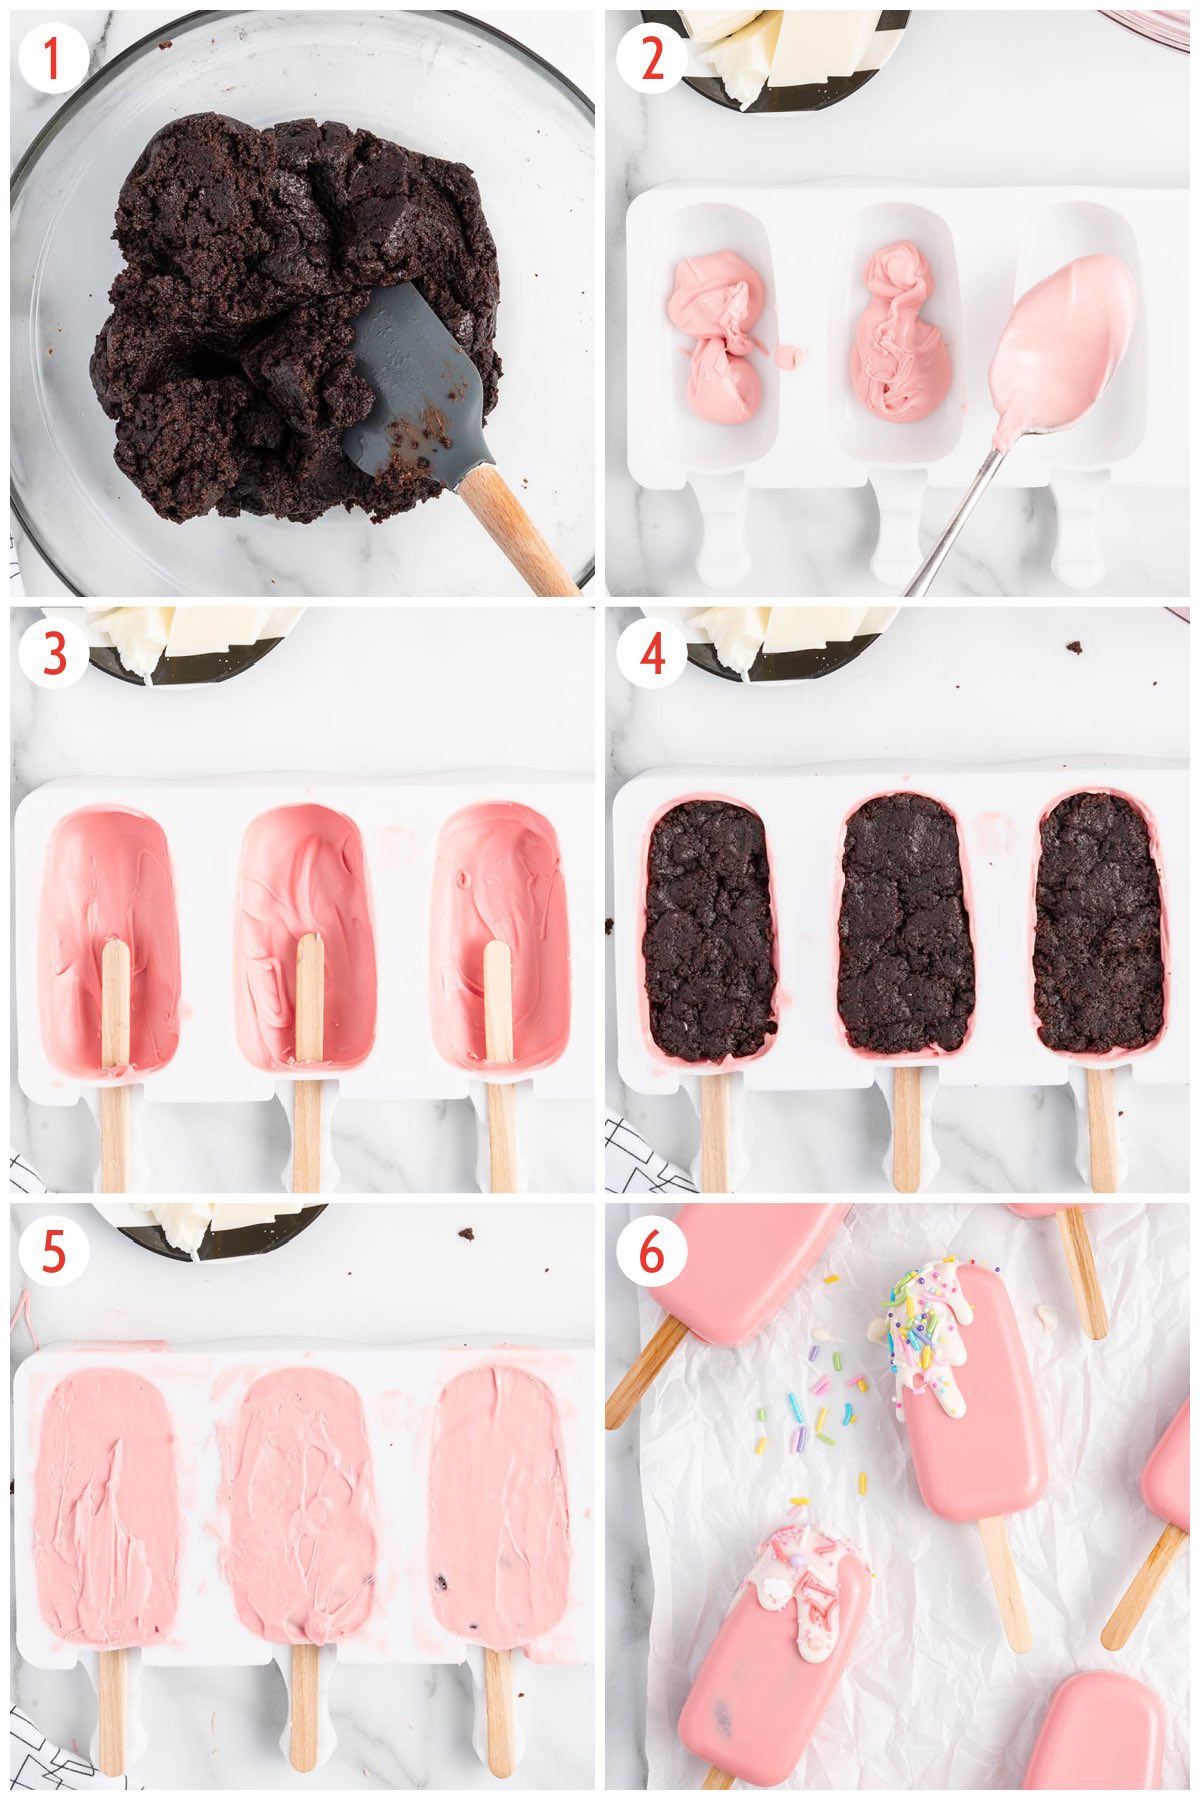
- Bake The Brownies or Cake: In a large bowl, combine the brownie mix, oil, eggs, and water and spread the batter into the baking dish. Bake at 350 degrees Fahrenheit for 25-28 minutes. Cool completely.
- Form The Filling: Break or pulse the brownies (or cake crumbs) into small pieces using your hands or a food processor. Mix the broken brownies with chocolate frosting.
- Microwave The Candy Melts: Heat the candy melts in 30-second intervals, stirring after each interval, until melted and smooth.
- Coat The Cavity: Use a pastry brush or spoon to spread the melted chocolate around the inside of the each cavity, making sure to cover the bottom and up the sides of the mold. Insert the popsicle sticks before the candy hardens.
- Prepare The Popsicles: Press the cake mixture into each mold and cover with a layer of chocolate candy. Use an offset spatula to scrape off any excess. Allow the cakesicles to harden completely before popping them out of the popsicle molds.
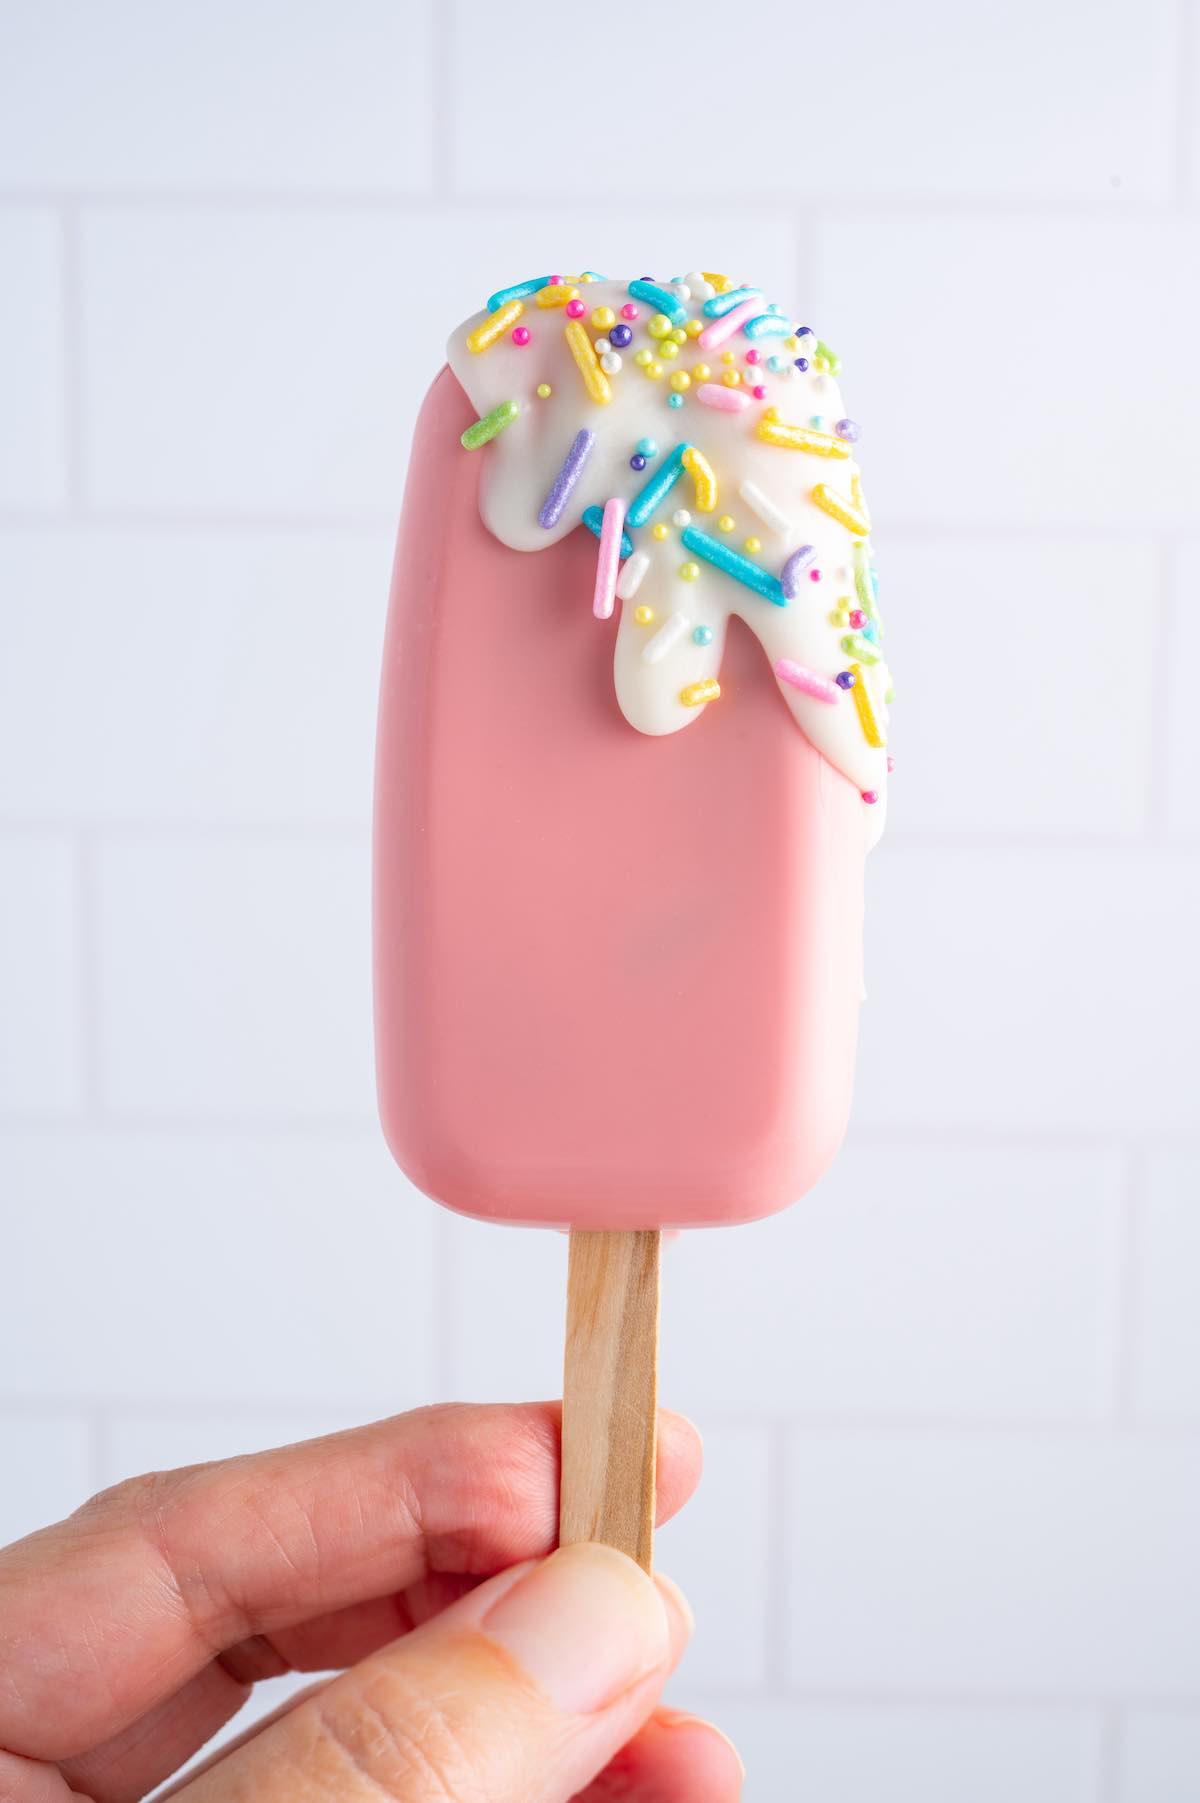
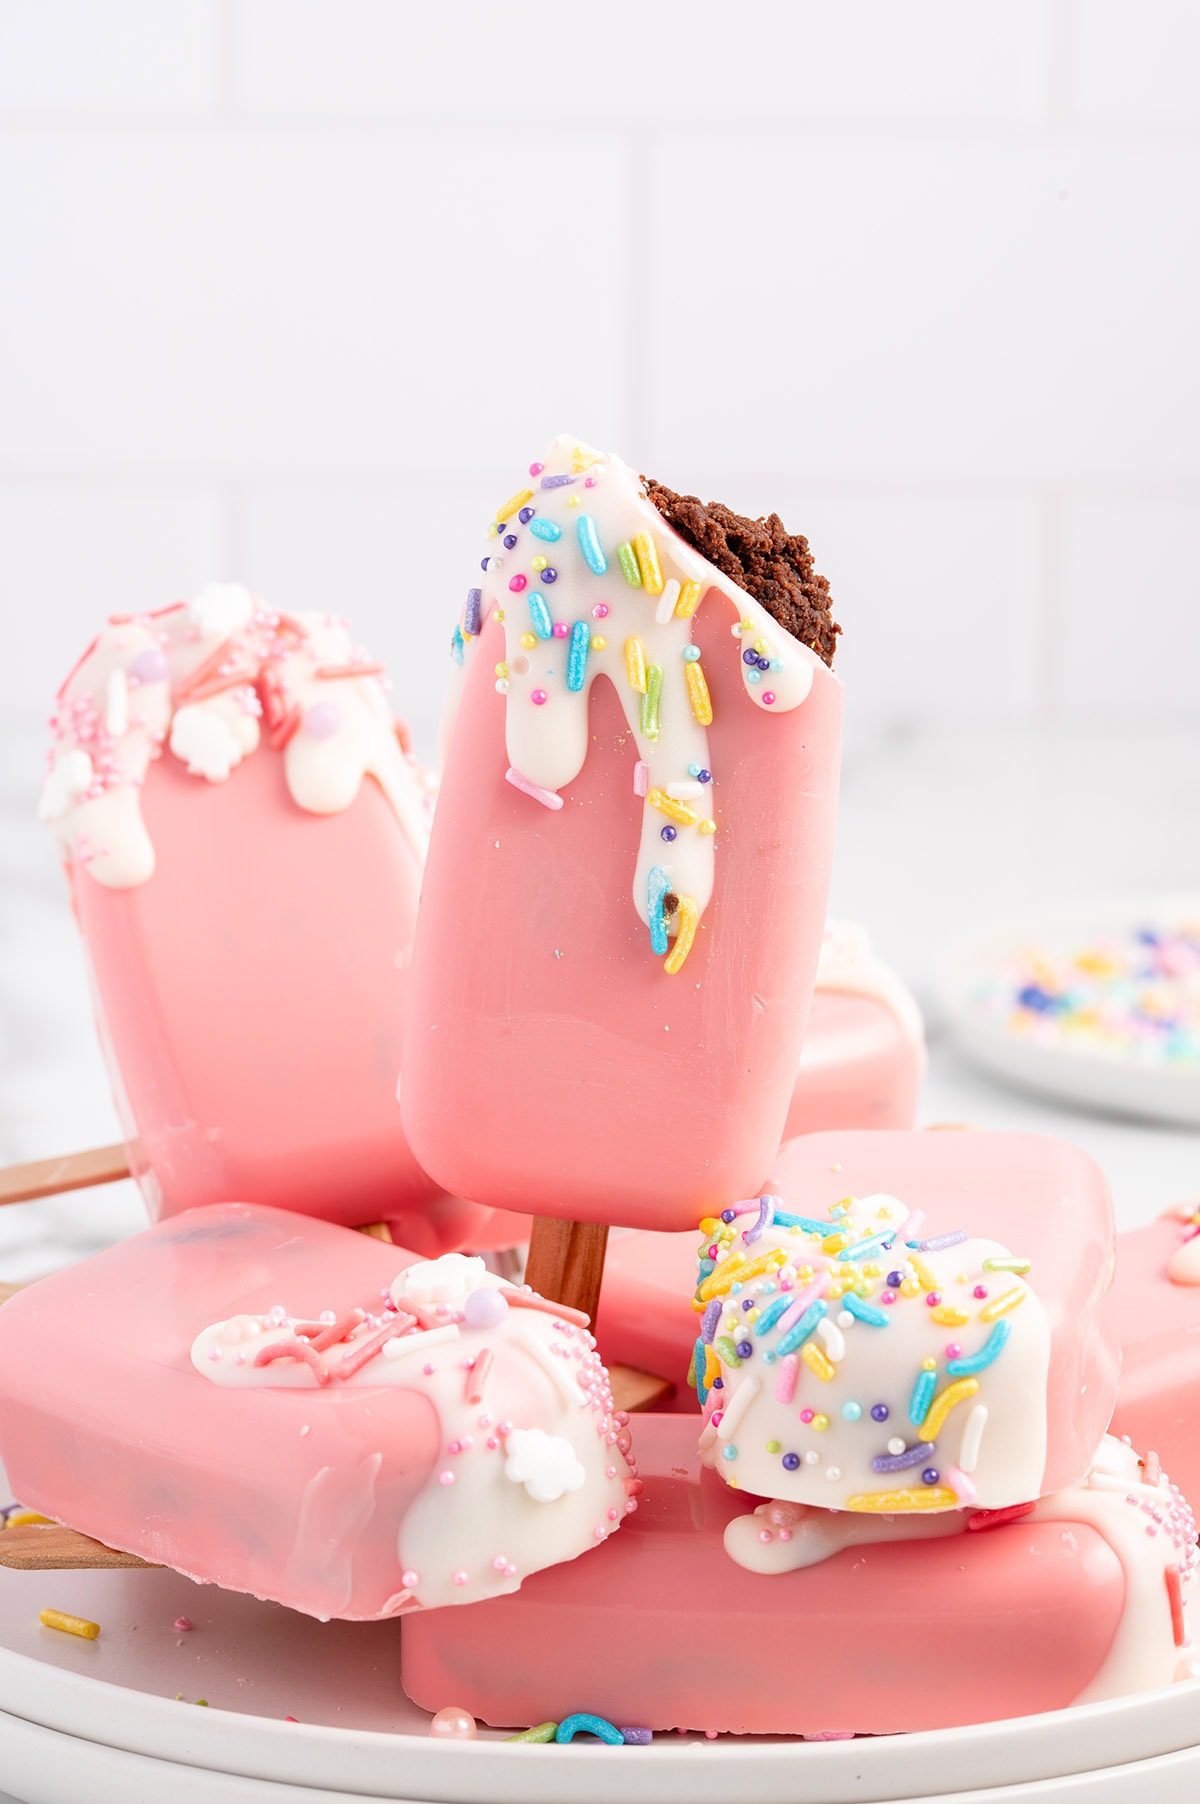
- Decorate The Desserts: Melt the white chocolate and then drizzle it over the very top and over the edge of one side of each cakesicle. Decorate with sprinkles before enjoying and sharing.
Choosing the Best Cakesicle Mold
When choosing the best cakesicle mold, you’ll want consider the shape and size as well as the material of the mold. I prefer making my desserts in silicone cakesicle molds (like this one) because they are easy to remove and have a smooth professional look.
How to Coat Cakesicles
Traditional Method to Coat Cakesicles
Cakesicles molds are fully coated by painting melted chocolate directly into the cavities. This creates a smooth, even outer covering, giving each popsicle a polished look.
Dipping Method To Coat Cakesicles
The cakesicle is held by the stick, submerged directly into the melted chocolate, then removed to allow any excess chocolate drip off. While this approach can be faster, it but might not cover as completely and be a bit more messy.

Tips for Perfect Cakesicles Every Time
- Coat Without Cracks: Use a thin, even layer of melted chocolate and avoid overfilling the mold. Fix cracks with extra chocolate if needed.
- Cool the Cake: Let the cake cool fully before mixing with frosting to prevent melting or uneven coating.
- Chill the Chocolate: Chill chocolate-coated molds briefly to help them set before adding the cake mixture.
- Choose the Best Chocolate: Candy melts work best—no tempering needed and they create a smooth, sturdy shell.
Creative Cakesicle Decoration Ideas
Customize your cakesicles for special holidays or occasions. Coat them in pastels for a baby shower, drizzle with red and green for Christmas, use orange candy for Halloween, or bake funfetti cake crumbles and cover with rainbow sprinkles for birthday parties. You can also swap the sprinkles with crushed cookie crumbs, nuts, mini chocolate chips, or candy.
How To Remove The Cakesicle From The Mold
Make sure the cakesicles have hardened completely before popping them out of the molds. Gently stretch the silicone mold to release the cakesicle. When the cakesicle has completely pulled away from the mold, bend the mold back and slide the cakesicle out. Be mindful of the popsicle stick!
How to Store Cakesicles for Freshness
- To Store: Store any leftovers in an airtight container at room temperature for 2-3 days or in the refrigerator for up to 2 weeks.
- To Freeze: You can freeze the cakesicles for up to 2 months. Allow the cakesicles to thaw overnight in the fridge before serving.
You can also make the cake component ahead of time. Allow the cake to cool to room temperature, wrap it in plastic wrap, and place it in a freezer bag. Store it in the freezer for 2-3 months.
More of Our Favorite Desserts
- Apple Cider Doughnut Cake
- Chocolate Lasagna Recipe
- Crockpot Candy
- Easy Chocolate Fudge
- Homemade Caramels
If you tried this Cakesicles Recipe or any other recipe on my website, please leave a 🌟 star rating and let me know how it went in the 📝 comments below. Thanks for visiting!!!
Cakesicles
Ingredients
Brownie Base
- 18.3 ounce box of chewy fudge brownie mix
- ⅔ cup vegetable oil
- 2 large eggs room temperature
- 3 tablespoons water
- ½ cup milk chocolate frosting
Candy Coating
- 3 cups pink candy melting wafers
- 4 ounces white almond bark
- Candy sprinkles
- You will also need a silicone cakesicle mold and popsicle sticks
Instructions
- Preheat the oven to 350°F. Line a 9×9 baking dish with parchment paper. Be sure to allow 2 sides of the parchment paper to overlap, making a sling of parchment paper. Set it aside.
- Add the brownie mix, vegetable oil, eggs, and water to a large mixing bowl. Stir to combine completely. Do not over-mix.
- Evenly spread the brownie batter into the prepared baking dish. Bake for 25-28 minutes, or until a toothpick inserted comes out clean.
- Allow the brownies to cool completely, about 45 minutes to 1 hour.
- Remove the brownies from the pan using the parchment paper sling. Break the brownies into smaller pieces.
- Using your hands or a food processor, pulse the brownies until they are completely broken apart. (I used a food processor. It helps speed up the process) Transfer the broken brownies to a medium-sized mixing bowl.
- Stir in ½ cup of the chocolate frosting until the frosting is completely incorporated.
- Add the candy melts to a medium-sized microwave-safe bowl. Heat in the microwave in 30-second intervals, stirring after each interval until the wafers are completely melted and smooth.
- Spoon 1½-2 tablespoons into each mold. Use a spoon to evenly distribute the melted candy melts around the inside of the molds.
- Insert the popsicle sticks into the mold before the candy melts harden.
- Shape the brownie and frosting into an oblong shape. Carefully press the brownie mixture into the mold until the brownie is flush with the top of the mold.
- Spoon enough melted candy wafers over the surface of the brownies. Try to keep the lines of the candy melts tight and crisp. This will make sure it doesn’t crack off the back of the cakesicle.
- Add the white almond bark to a small microwave-safe bowl. Heat in the microwave in 30 seconds intervals, stirring after each interval until the almond bark is completely melted. Allow the cakesicles to harden completely before popping them out of the molds.
- Gently stretch the silicone mold to encourage the cakesicle to release. When the cakesicle has completely pulled away from the mold, bend the mold back and slide the cakesicle out. Be mindful of the popsicle stick when removing the cakesicle from the mold.
- Once all the cakesicles are popped out of the molds, dribble/drip the white almond bark over the very top and over the edge of one side of the cakesicle. (You want it to look like melted ice cream or a melting popsicle)
- Sprinkle the white almond bark with your choice of sprinkles before enjoying and sharing.
Jenn’s Notes
- To Store: Store any leftovers in an airtight container in the refrigerator for up to 2 weeks.
- To Freeze: You can freeze the cakesicles for up to 2 months. Allow the cakesicles to thaw overnight in the fridge before serving.
- You can substitute any flavor of baked cake for the brownies. Just remember to match the frosting used in the cake itself with the flavor.
- You can substitute any color of candy melt wafers for pink.
- If you prefer, you can insert the popsicle stick after you have coated the brownies.
- It’s very important to be patient when removing the coated cakesicles. If they do crack and release from the brownie itself, as long as there are no brownie crumbs attached, you can reheat the candy melts and apply it to the cakesicles.
- If the sides of the cakesicles are not fully coated when removed from the molds, dab a bit of the melted candy onto the exposed areas and let dry.


Great taste and consistency
I love to make a a dessert dip.i learn a recipes from u. easy quick. thanks u. 😊 👍