
This post may contain affiliate links. Please read our disclosure policy.

Our Ice Cream Cone Christmas Trees are an easy, edible Christmas craft to make with kids during the holiday season with a surprise inside.
The ice cream cone gets a festive makeover simply using green frosting, a sugar cookie, and sprinkles, and is then filled with your favorite candy.

Ice Cream Cone Christmas Tree Craft
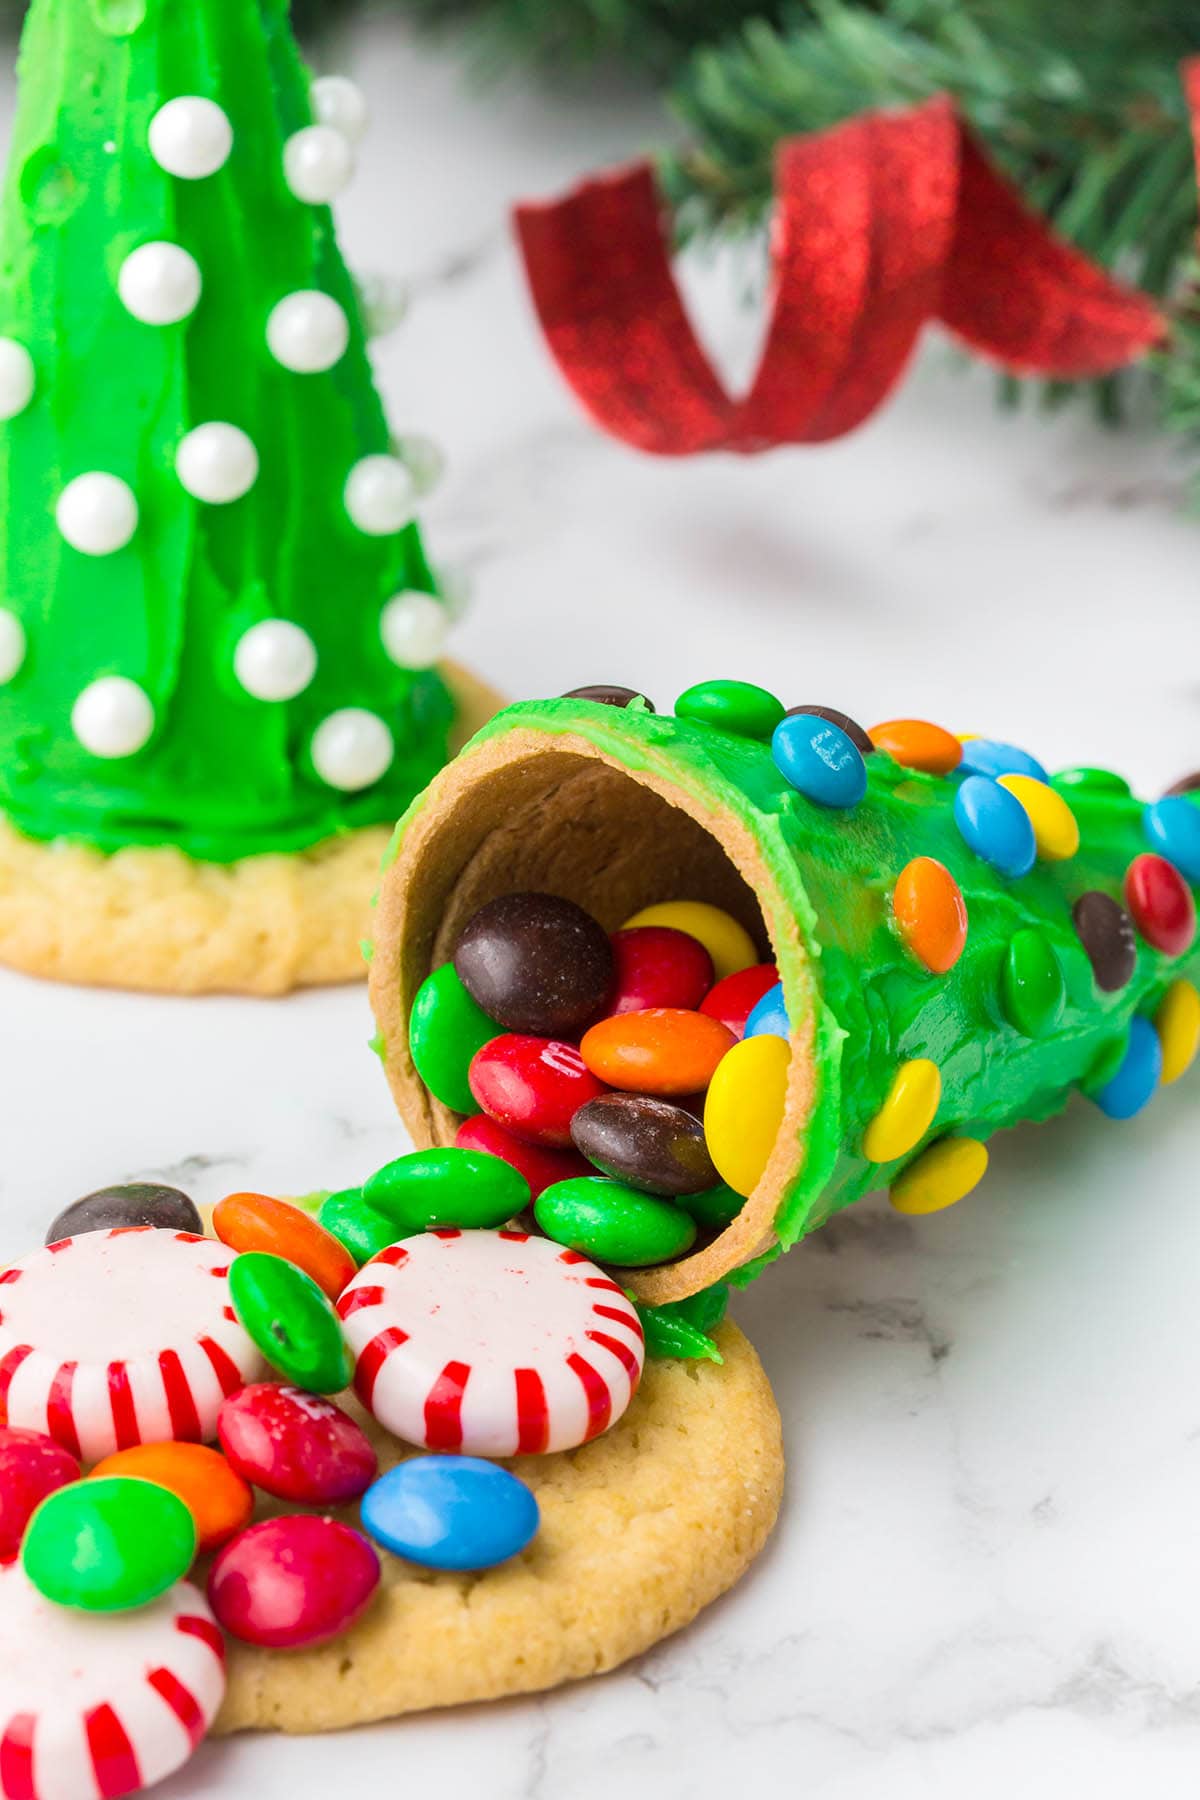
Candy Filled Christmas Trees are so much fun to make, especially when they are an edible craft with a sweet surprise hidden inside!
Sugar cone Christmas trees are stocked with your favorite candy stuffed inside, then set on a cookie to be frosted, decorated, and dressed up for dessert or used as Christmas dessert decorations.
While gingerbread houses are a timeless traditional activity, this Christmas tree cone craft is an easier alternative.
Have fun decorating your Christmas cone trees with an assortment of candy ornaments and sprinkles; they’re the perfect edible treats for parties, playdates, and dessert platters.
Why We Love This Christmas Tree Cones Recipe
- Quick and easy to make a Christmas tree made of food.
- Only uses a handful of simple ingredients.
- Fun craft for kids and adults alike.
- Edible activities double as delicious desserts and adorable decor.
- Perfect for holiday parties, centerpieces, or serving homemade Christmas tree snacks.
Other Easy Christmas Craft Recipes


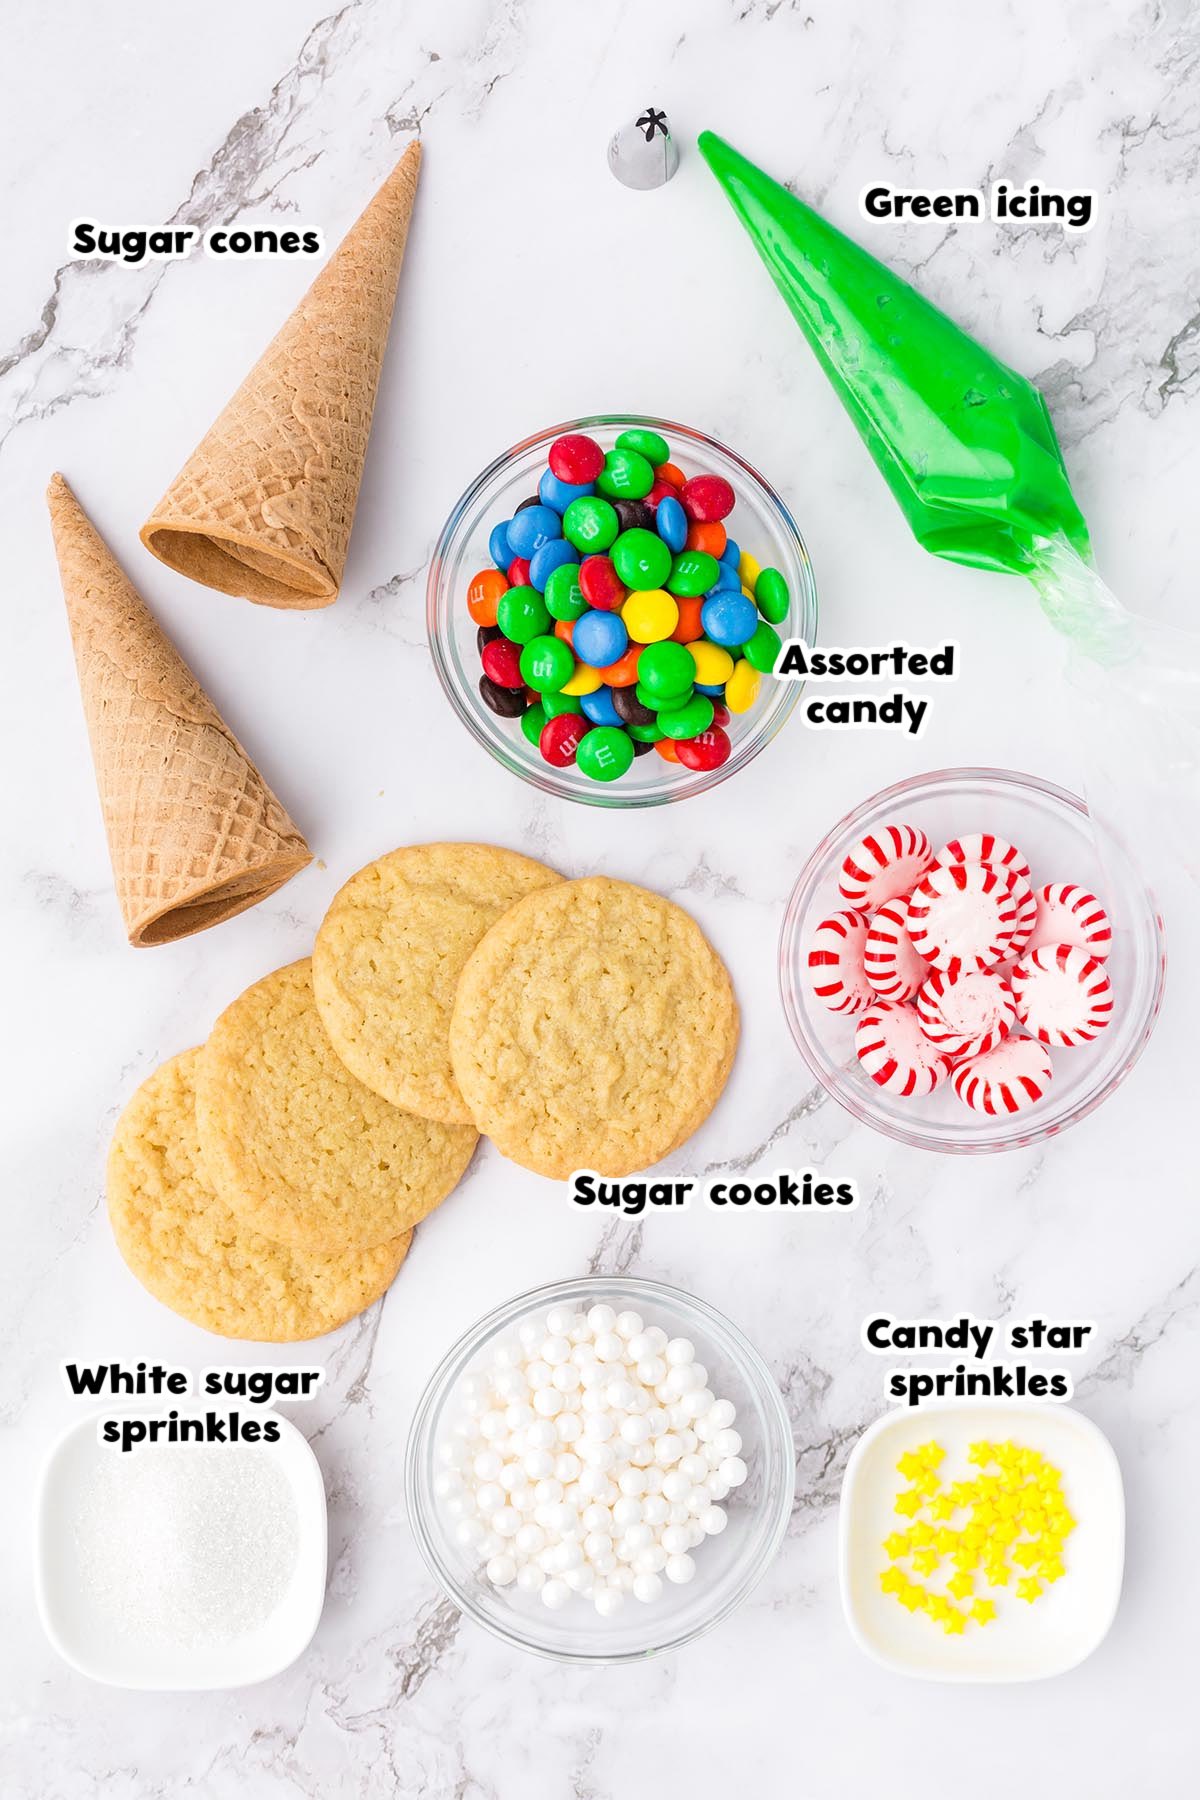
Ingredients
- Sugar cones
- Green icing: You can use store-bought or homemade icing.
- Sugar cookies
- Candy star sprinkles
- White sugar sprinkles
- Assortment of other sprinkles and decorations
- Assorted candy for filling
Substitutions and Additions
- Sugar Cookie Swap: You can substitute the sugar cookies with any variety of flat cookies such as peanut butter cookies, chocolate chip cookies, snickerdoodles, or any of your favorite flavors.
- Fun Fillings: Fill your Christmas tree ice cream cones with peppermints, M&Ms, Skittles, gumdrops, jelly beans, or any other small-size candy.
- Decorate: Decorate your Christmas trees with ornaments made of M&Ms, nonpareils, sprinkles, coconut flakes, or any other festive food.

Recommended Tools
- Pipping bag or zip lock bag
- 6-point star tip (or another star-type icing tip)
- Small knife
How to Make Candy-Filled Christmas Trees Ice Cream Cones
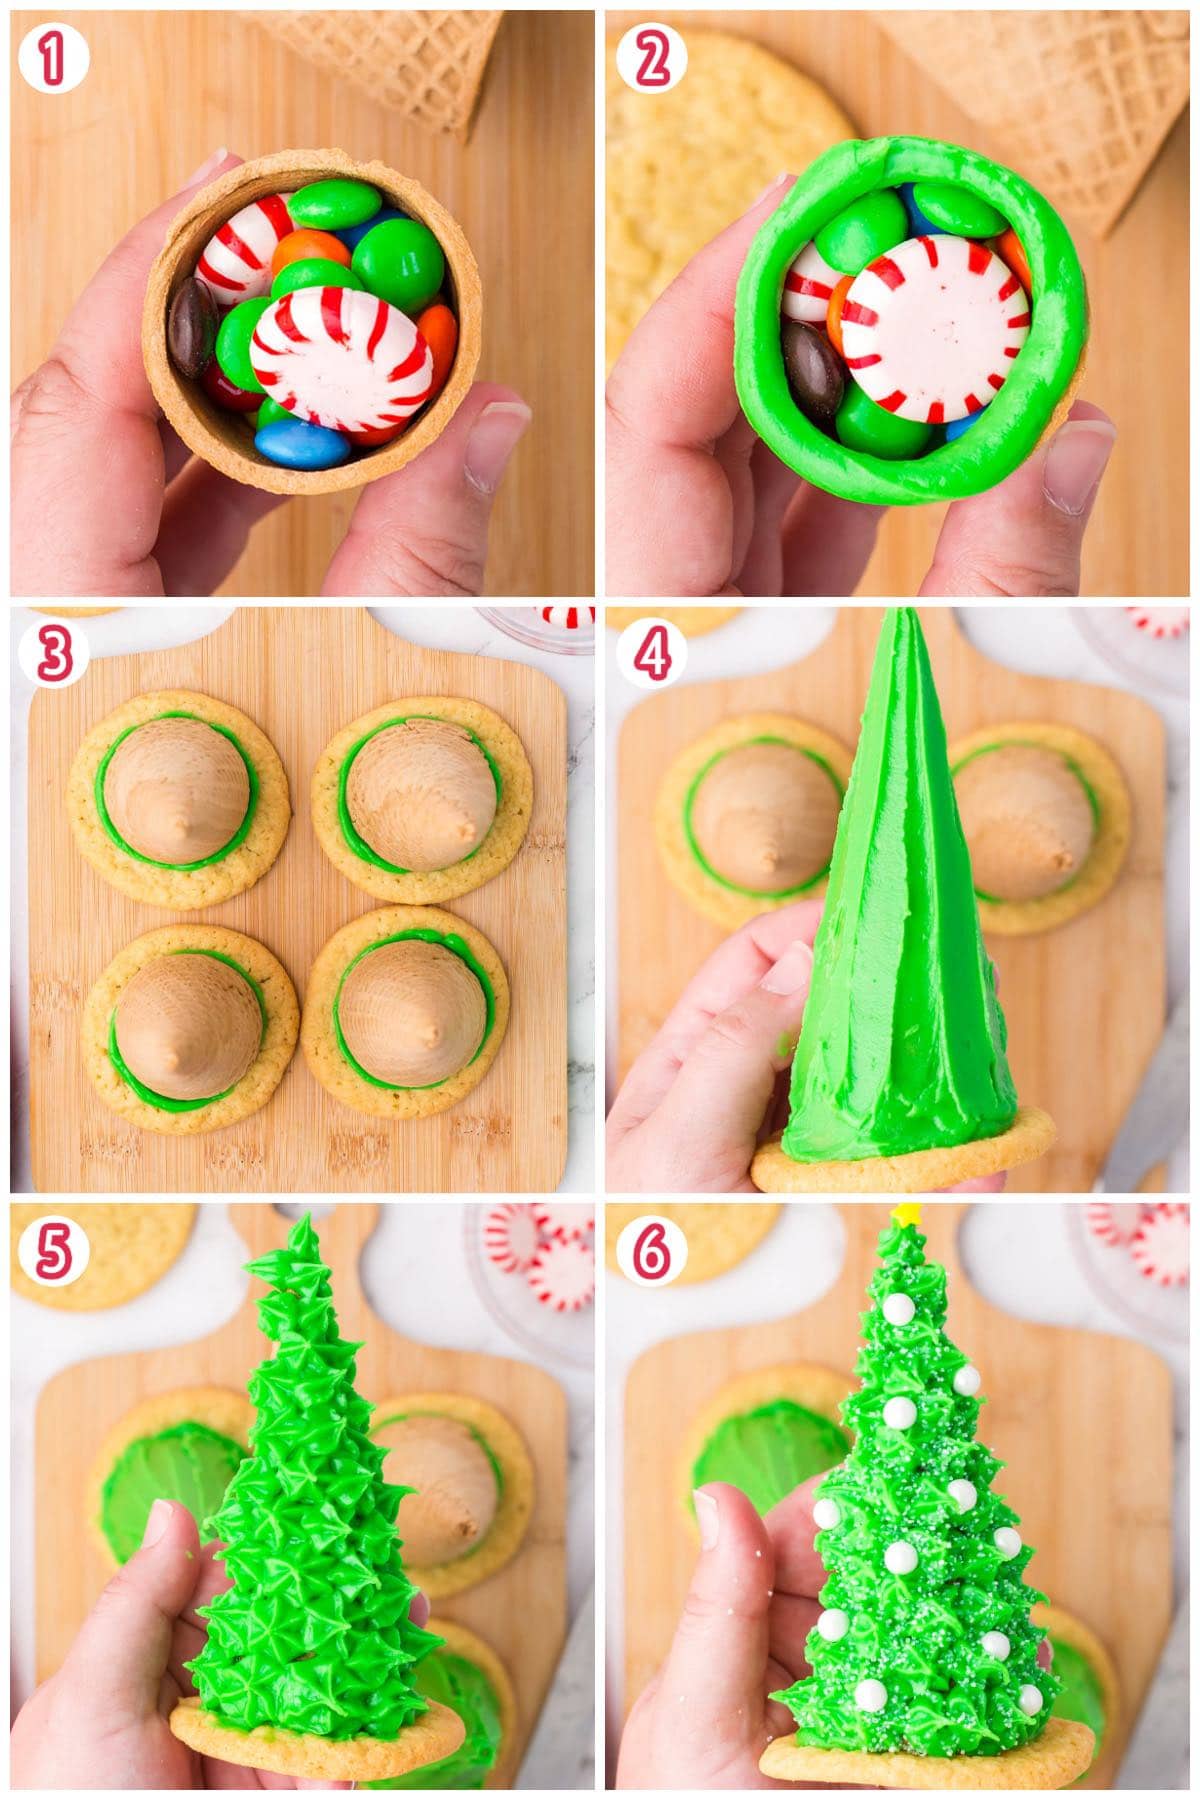
- Fill: Fill each sugar cone with assorted candy.
- Add A Base To The Bottom: Ice the bottom edge of the sugar cone and place a cookie on top. Set in the refrigerator for about 5 minutes to allow the icing to harden.
- Frost: Use the green icing to frost a smooth tree or a spikey tree.
- Decorate: Decorate with assorted candies and sprinkles and then chill in the refrigerator for 10 minutes or until firm.
- Serve: Keep chilled until ready to eat. Enjoy!
Tip From Our Recipe Developer
- Feel free to eliminate the sugar cookie base and candy filling and simply make the decorated trees.
- You can substitute the sugar cones with chocolate-covered sugar cones.
- You can use any variety of small candy for filling the trees and also for decorating them.
Storage
- To Store: These Candy filled Christmas Trees are best stored in an airtight container in a refrigerator for up to 5 days.

Other Easy Christmas Desserts
- Peppermint Bark
- Reindeer Pretzel Rods
- Reindeer Chow Chex Mix
- Christmas Tree Rice Krispie Treats
- Grinch Pretzels
- Peanut Butter Cup Hot Chocolate Cookie Cups
- Candy Christmas Trees

Ice Cream Cone Christmas Trees
Ingredients
- 4 sugar cones
- 1½ cups green icing
- 4 sugar cookies
- 4 candy star sprinkles
- 2 tablespoons white sugar sprinkles
- Assortment of other sprinkles and decorations such as m&ms, nonpareils, and sprinkles
- Assorted candy for filling such as peppermints, M&Ms, and Skittles
Instructions
- Fill each sugar cone with assorted candy.
- Use green icing to ice the bottom edge of the sugar cone and then place a sugar cookie, bottom side up, over the icing. Press down gently being careful not to break the cookie. Set them in a refrigerator for about 5 minutes to allow the icing to harden before continuing.
- To ice a smooth tree, place a spot of icing on the cone and smooth it out in small sections the full length of the tree. As you turn the tree to ice all sides, use the cookie to gently hold the tree without getting icing on your hands. Be careful not the hold too tight or the cookie may crack.
- To ice a spikey tree, place your green icing into a piping bag or a zip lock bag with a 6-point tip attached. Start at the bottom of the tree and move upward, squeeze a small amount of icing out onto the sugar cone and then lift the 6-point tip straight up off of the spot of icing. Continue this pattern until the whole tree is covered.
- Decorate your trees using assorted candies and sprinkles and then chill them in your refrigerator for about 10 minutes or until firm.
- Keep chilled until ready to enjoy.
Jenn’s Notes
- Feel free to eliminate the sugar cookie base and candy filling and simply make the decorated trees.
- You can substitute the sugar cones with chocolate-covered sugar cones.
- You can use any variety of small candy for filling the trees and also for decorating them.


We will be doing this as a craft during our line dance Christmas party. I know they will enjoy making these & seeing how each one comes out looking unique! Love your ideas, thanks for sharing !
Hi Robin! That is awesome! Love this!
I wanted to share how much fun these were to make during my line dance Xmas party. Everyone enjoyed making these so much ! Thank you for sharing this fun craft. I wanted to share a photo but couldn’t find a way too. Looking forward to the next craft we do that you have shared ! Thank you for helping to make our party a hit !
Awwwww thank you Robin. This made my day!
My 4 y o grandson had a really fun time making these today! They are going to be place setting markers!