This post may contain affiliate links. Please read our disclosure policy.
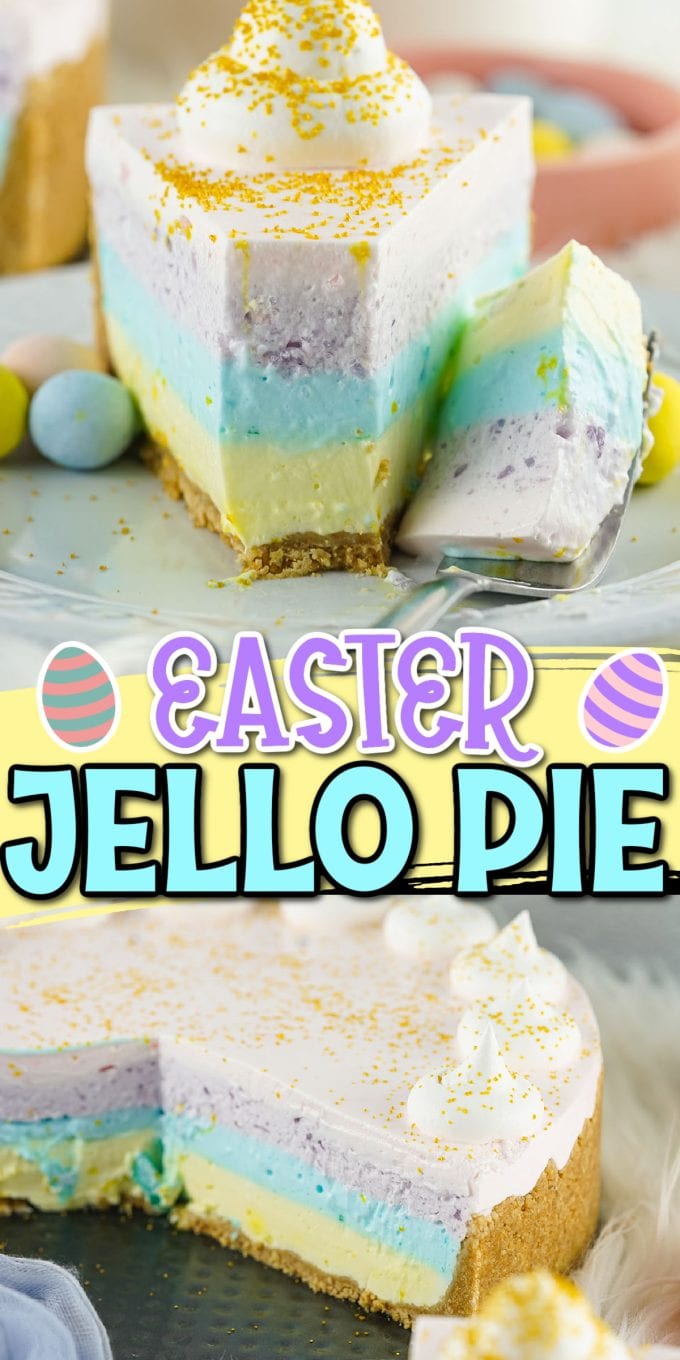
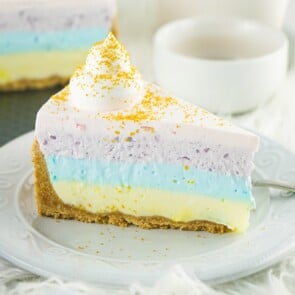
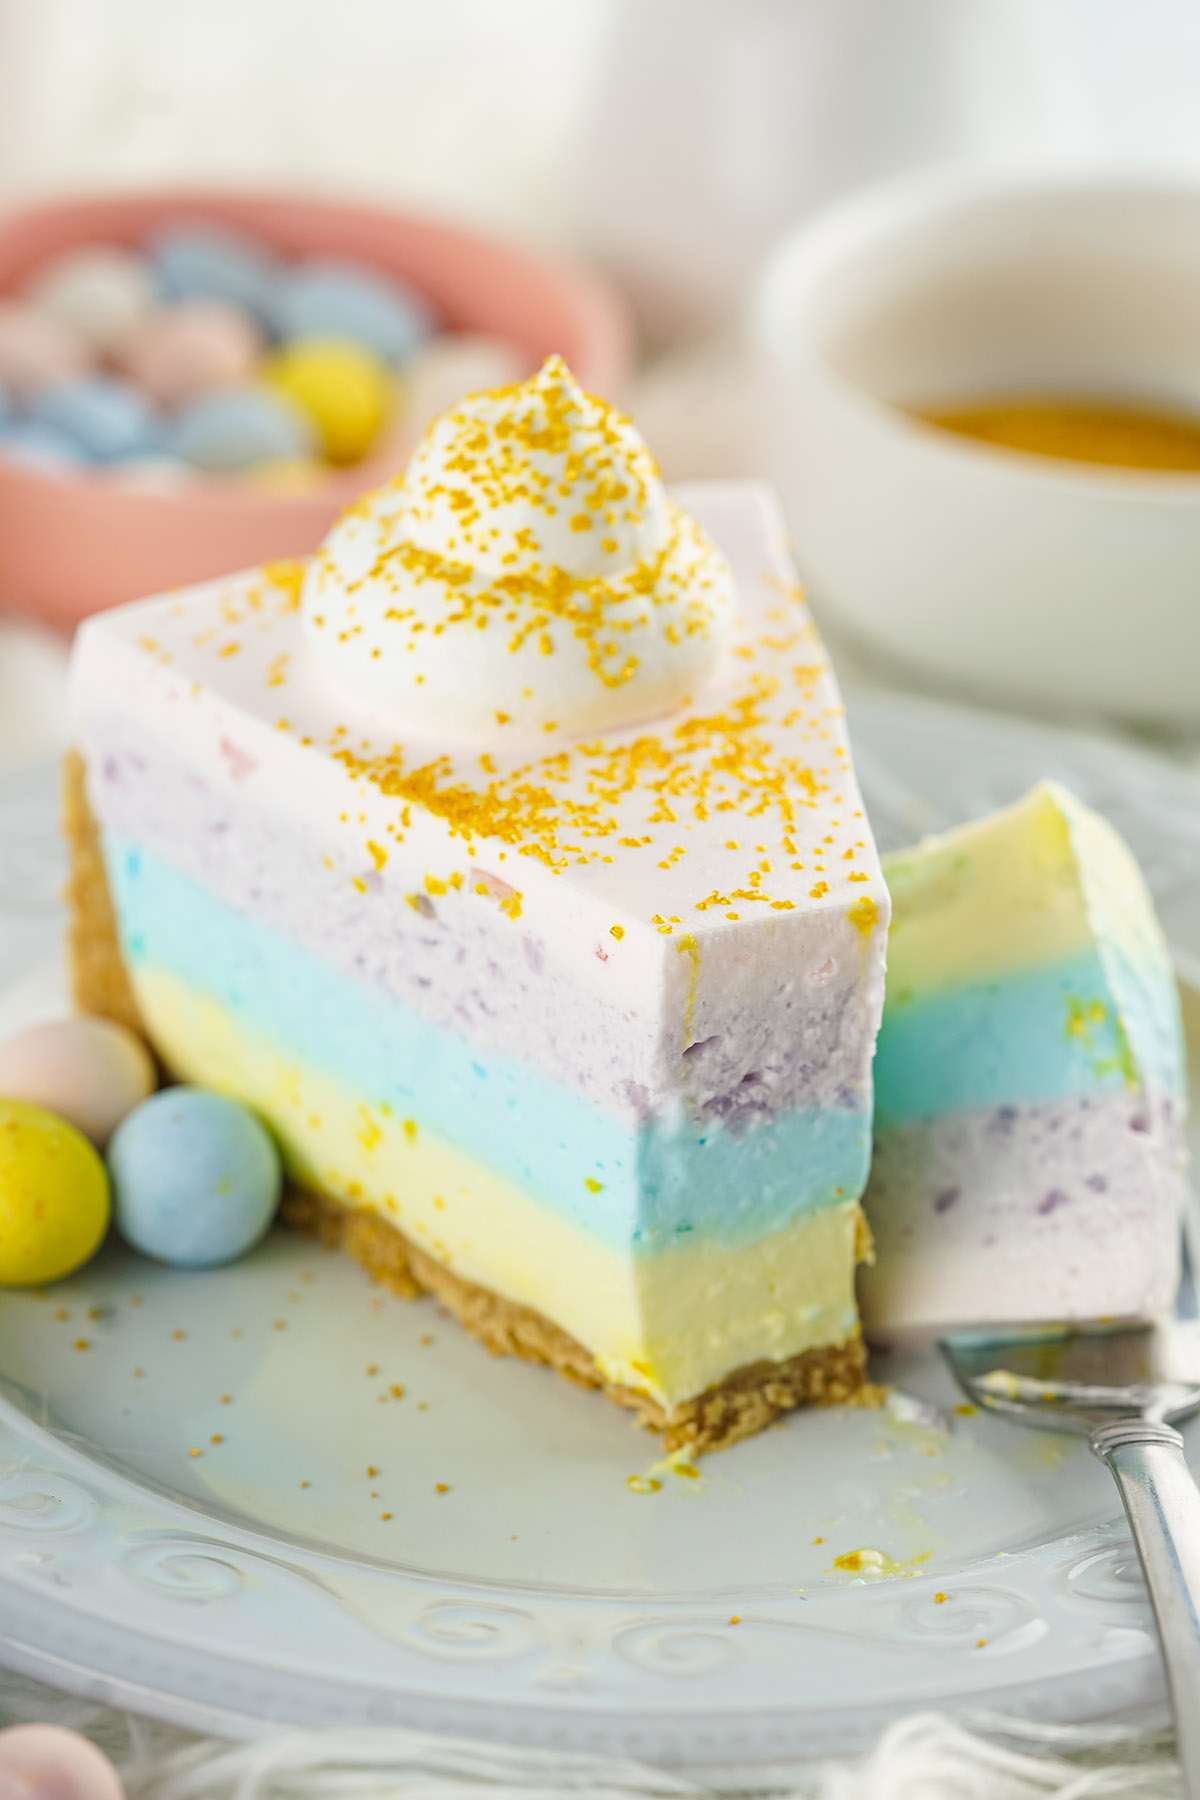
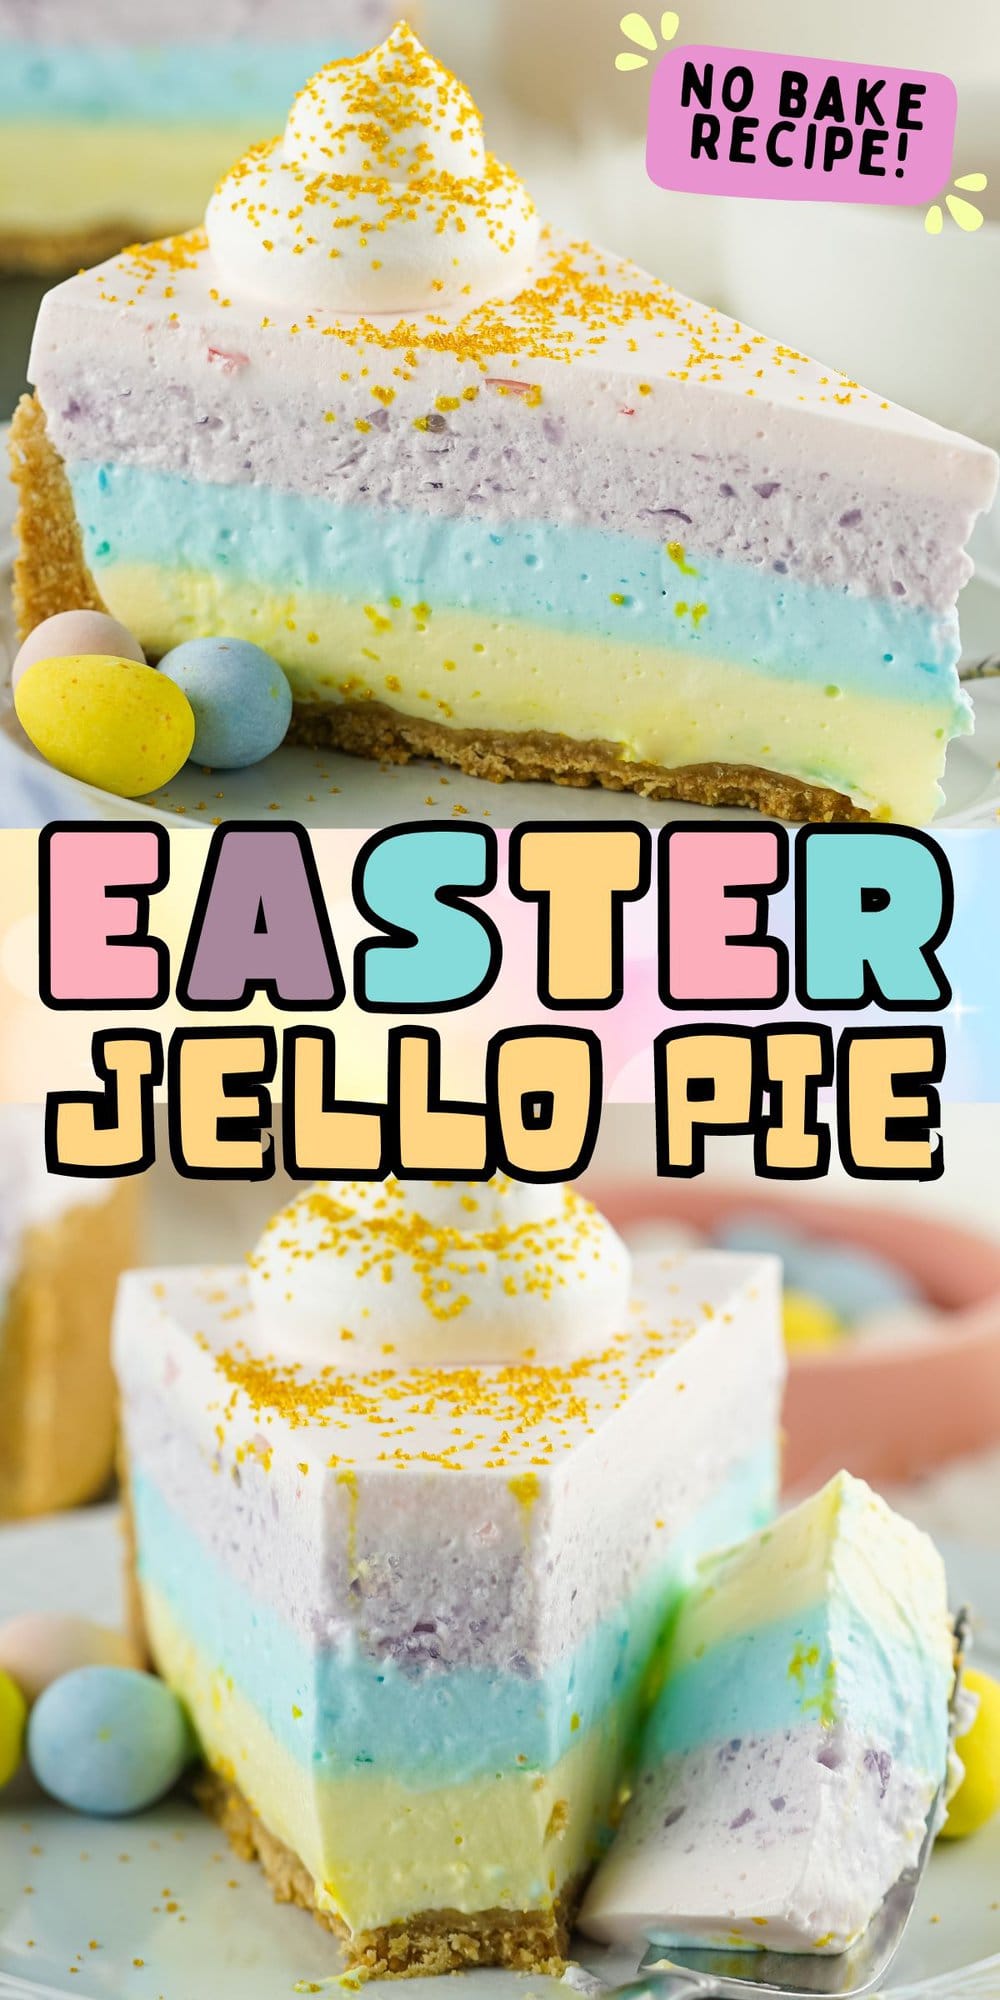
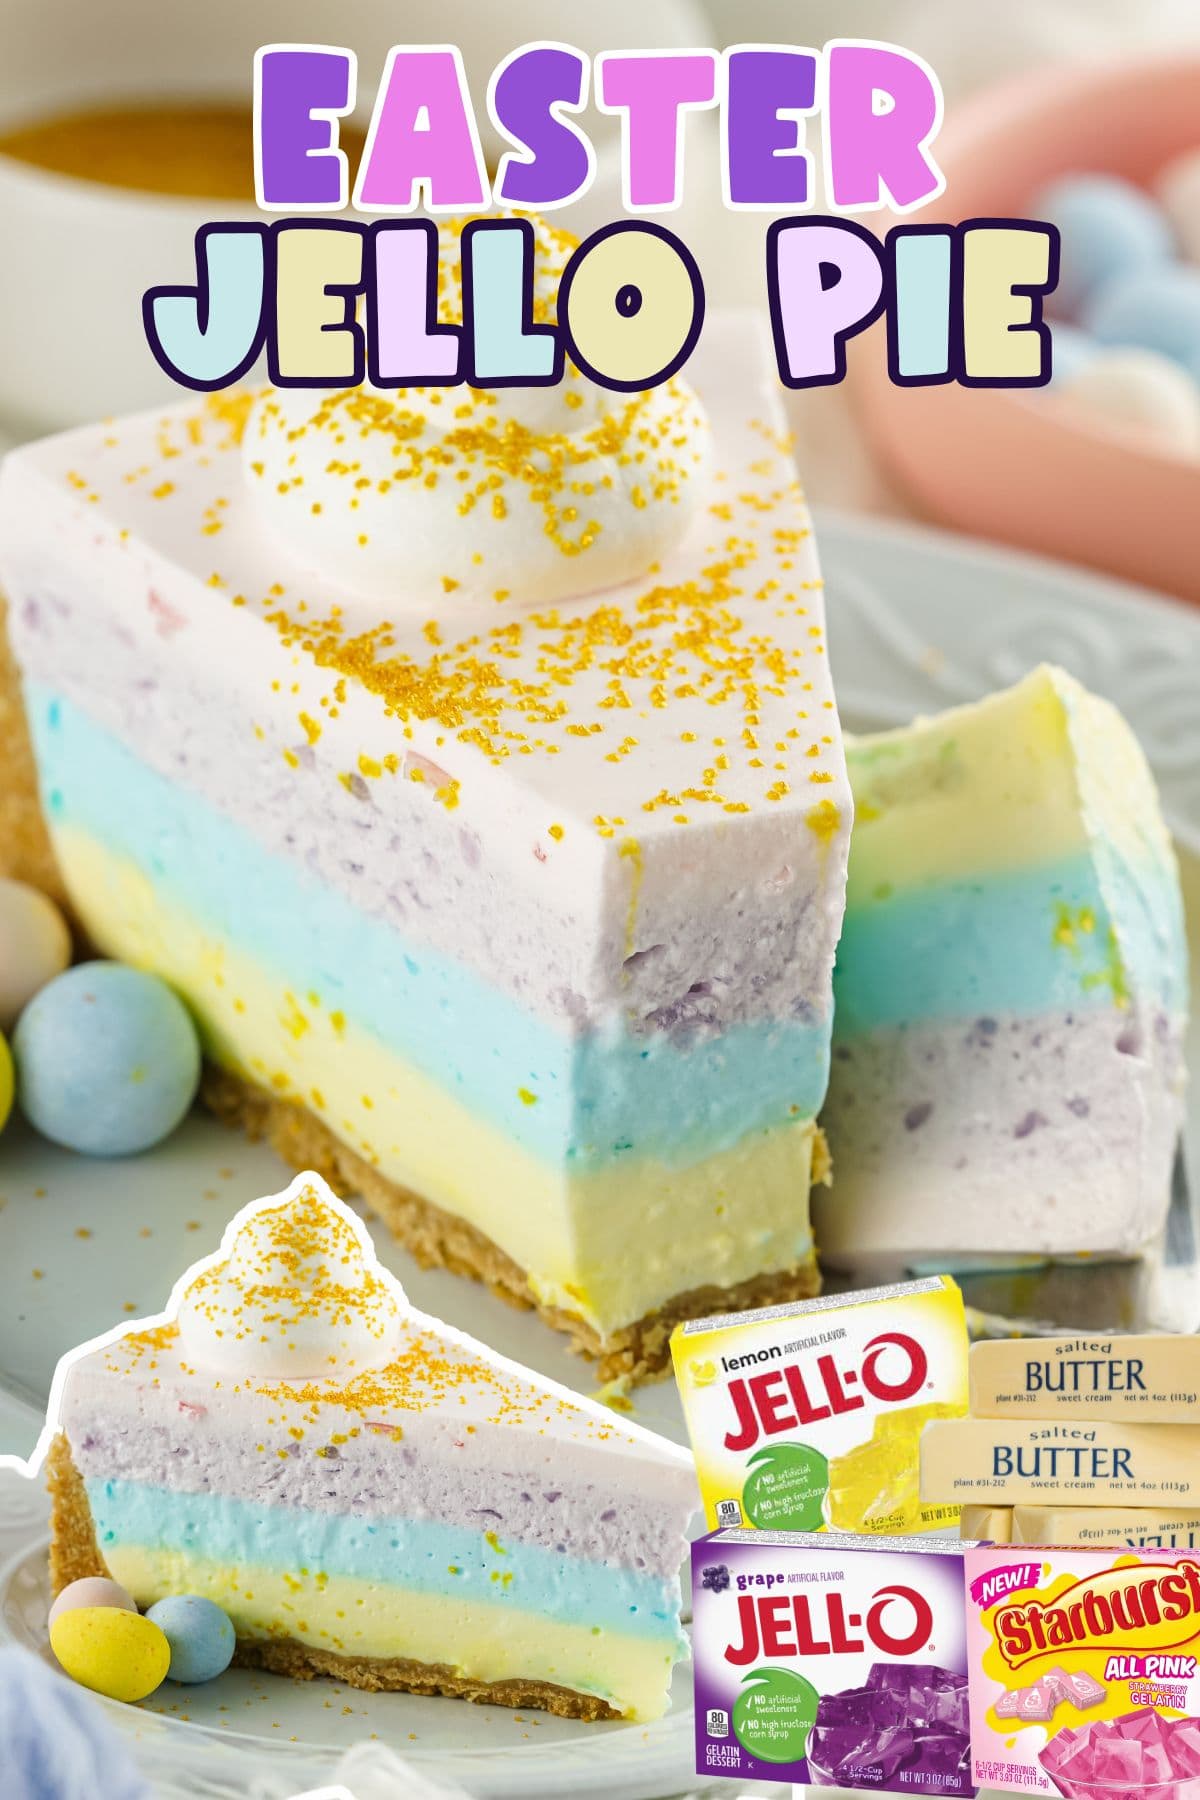
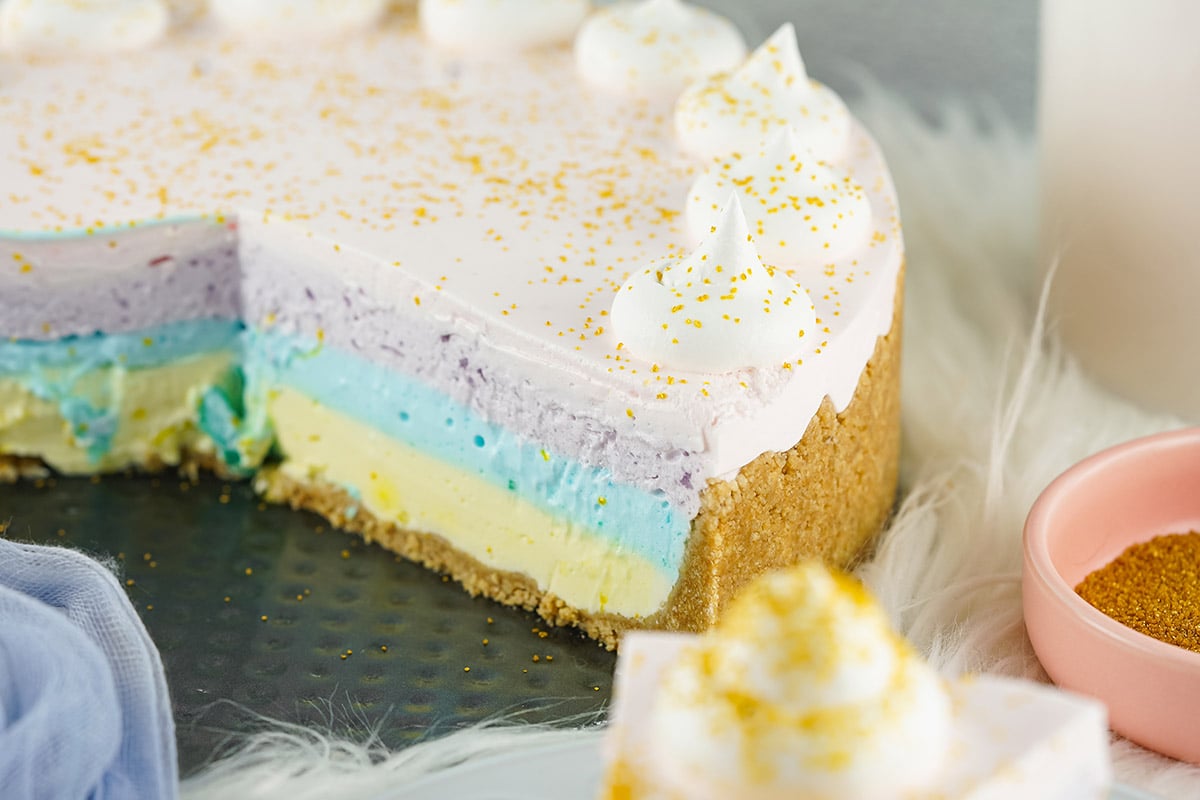
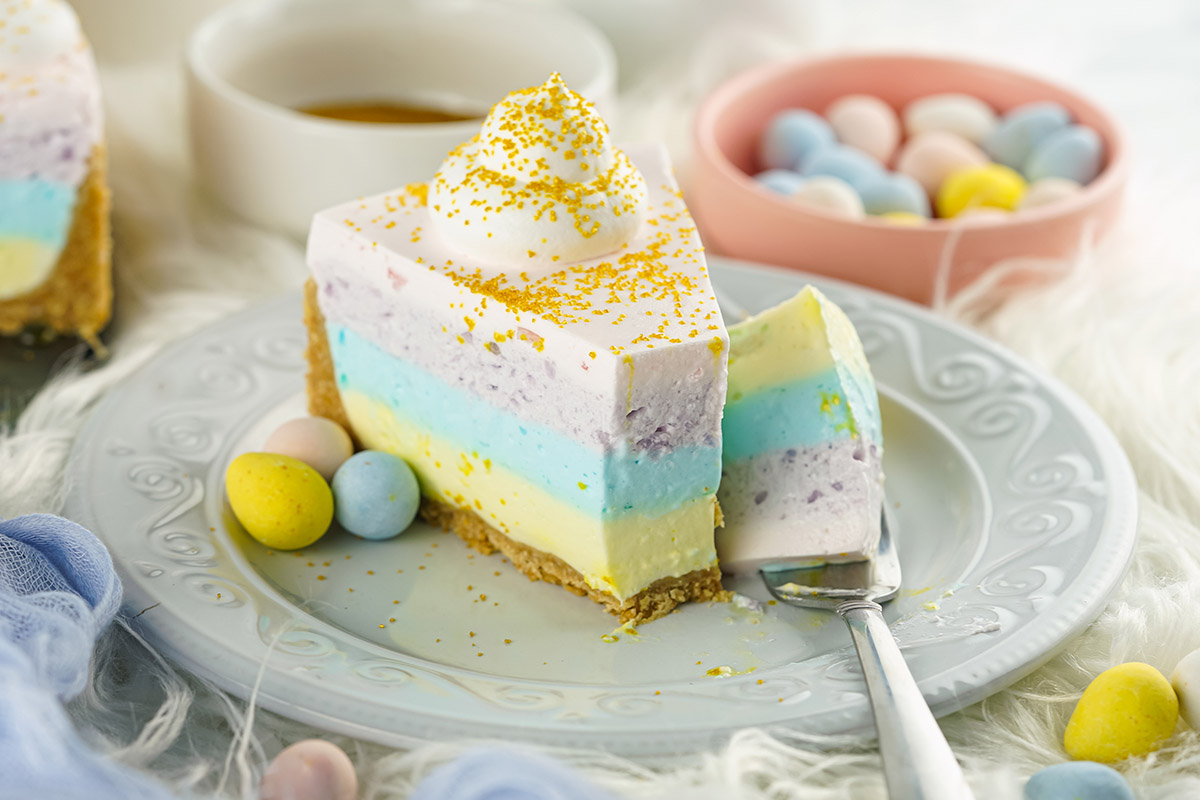
This no-bake easy-to-make Easter Jello-Pie is a light and refreshing way to layer pretty pastel colors in a graham cracker crust. It takes only 15 minutes to prepare the pie filling, simply using 4 flavors of fruity jello, cool whip, and water that pile high into a buttery crumb crust.

Easy Jell-O Pie
This Easter Jello-Pie recipe makes it so quick and easy to turn a boring bowl of jello into a fluffy, flavorful, fun-to-eat treat.
Simply mix your cool whip into your favorite festive, multi-flavored jello and stack the fruity layers of creamy filling atop a homemade buttery graham cracker crust. It tastes great and is a perfectly striped pastel pie for Easter and a delicious dessert all year round.
For more delicious no-bake Jell-O desserts, check out my simple Strawberry Cool Whip Pie and Orange Creamsicle Pie recipes.
Why We Love This Easter Jell-O Pie Recipe
- Quick and easy to make, especially because it is no-bake.
- Uses a few simple ingredients to create a multi-layered sweet treat.
- A fluffy, fruity filling is so pretty when piled into a graham cracker crust.
- Delicious dessert that can be customized with your favorite flavored gelatin.
- Creamy, cool, and refreshing.
- Perfect pie for Easter or a summertime picnic or potluck.
If you love a make-ahead pie as much as I do, take a look through all my easy pie recipes for more.
Ingredients
- ½ package Pink Starburst Jell-O (a little under 2 ounces)
- 1½ ounces Blue Jell-O (½ Package)
- 1½ ounces Yellow Jell-O (½ Package)
- 1½ ounces Purple Jell-O (½ Package)
- 16 ounces Whipped Cream
- 3 cups Boiling Water
- 1⅓ cup Cold Water
- Yellow Food Dye (optional)
- Pink Food Dye (optional)
Substitutions and Additions
- Tasty Toppings: Top your pie with fresh berries, jelly beans, mini chocolate easter eggs, colorful sprinkles, fresh strawberries, fresh fruit or extra whipped cream.
- Cookie Crust: You can use crushed chocolate graham crackers, Vanilla Wafers, or Golden Oreos instead of honey graham crackers to create your homemade crust.
- Garnish with Gold: Add some gold sanding sugar to match this layered look!

Recommended Tools
- 9-91/2-Inch Springform Pan
- Mixing bowls
- Measuring tools
SEE FULL PRINTABLE RECIPE CARD BELOW
How to Make Jello Pie
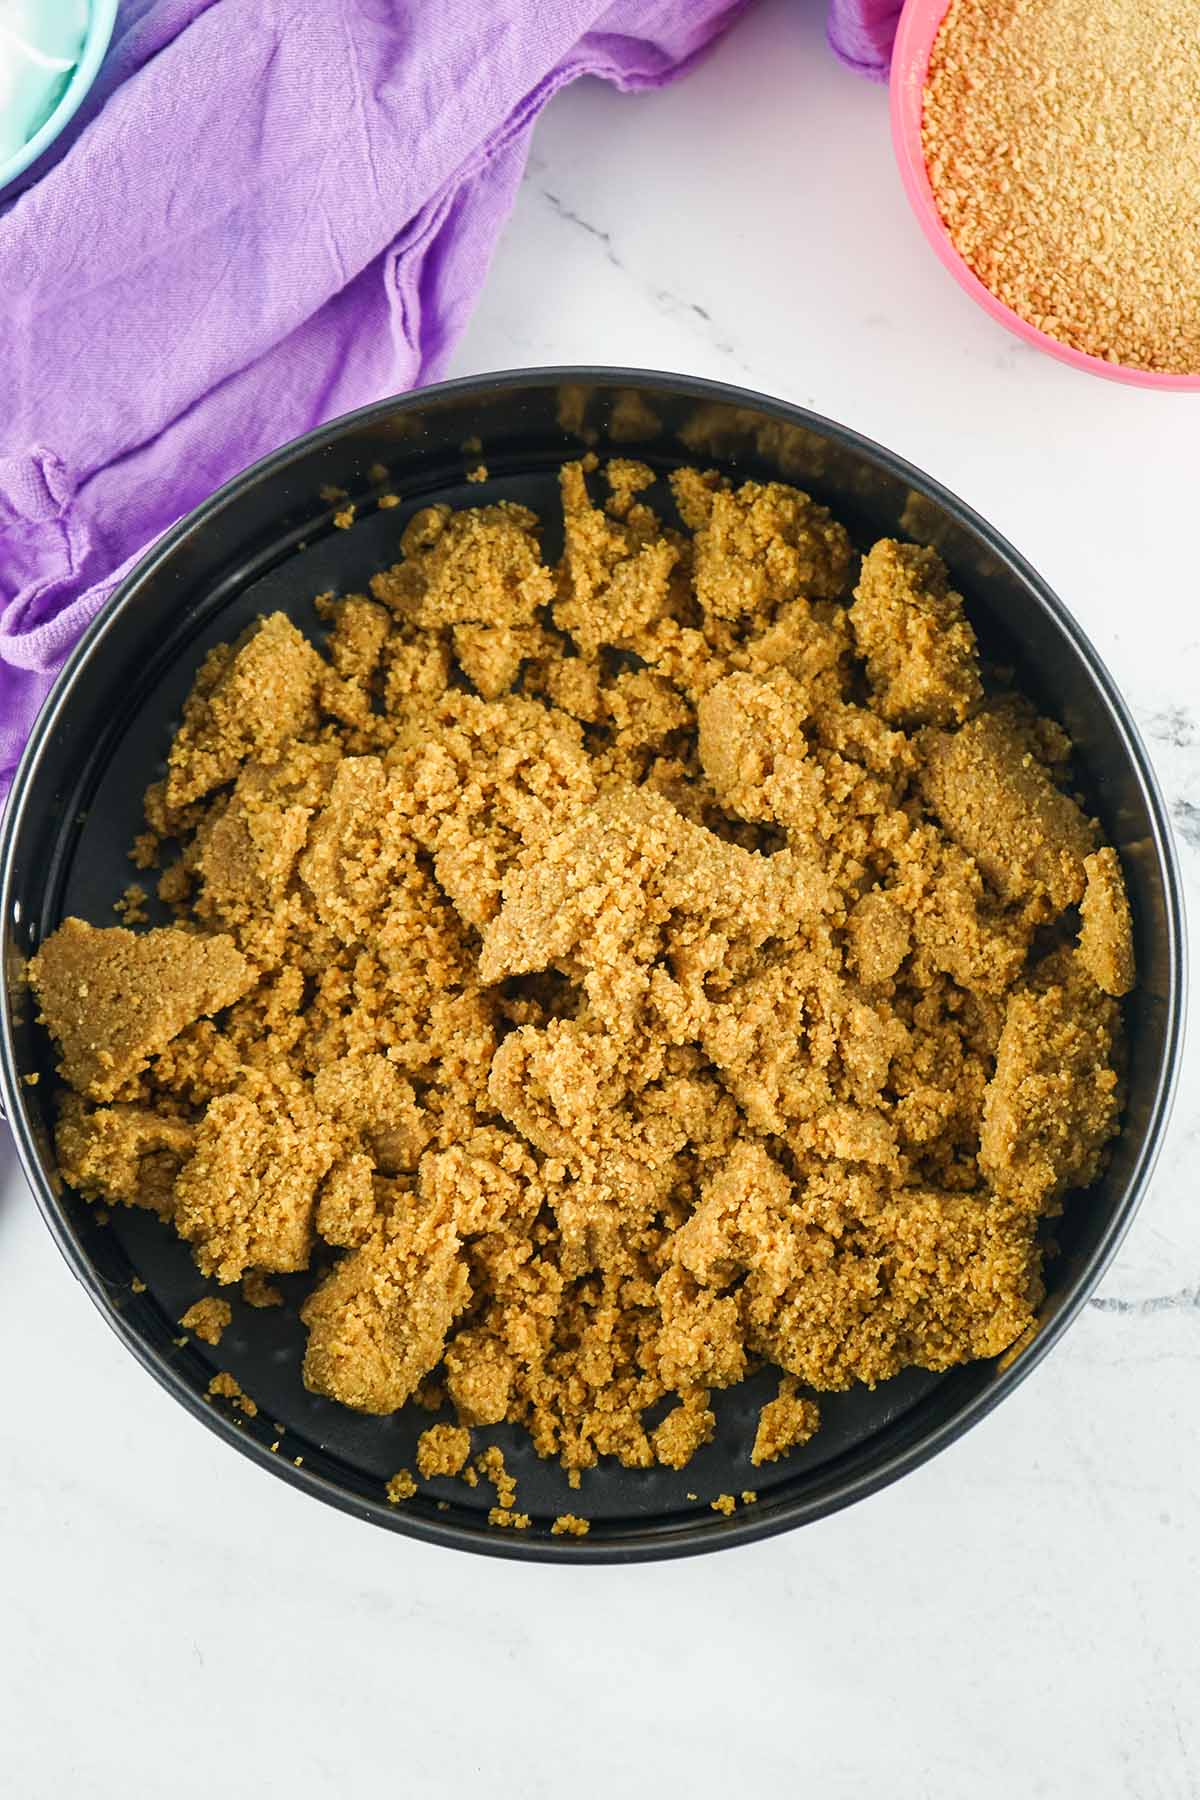
- Microwave the butter until it’s fully melted and liquified.
- Add graham cracker crumbs and mix to form a thick, sand texture.
Pro-Tip: You can add the graham cracker crumbs and melted butter to a food processor to mix it. This makes things a touch quicker and more thorough.
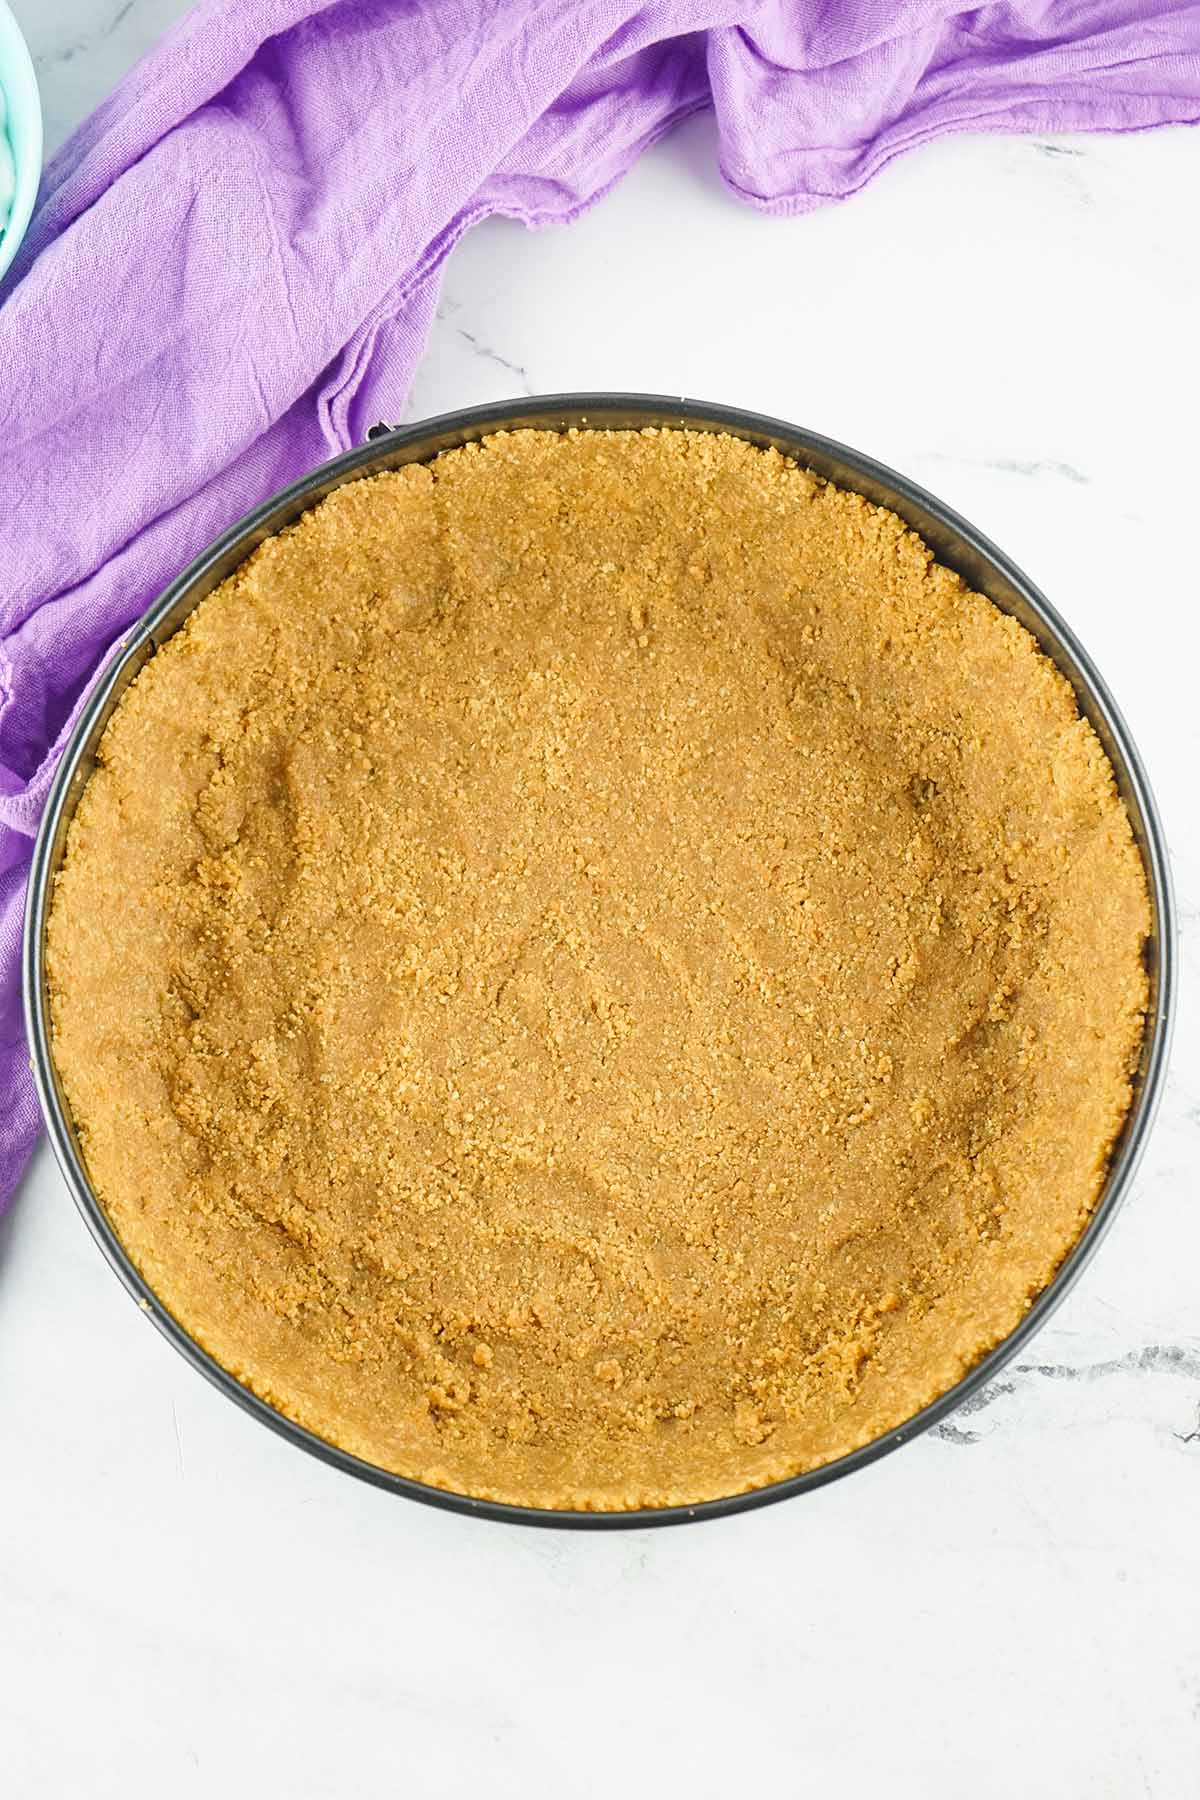
- Spread the mixture across the bottom of a springform pan and up the sides, pressing it down so it packs in.
Pro-Tip: I used a normal springform pan and not a deep dish one. However, you’re welcome to use a deeper option, it just won’t fill up the pan as much as the regular option will. - Place the crust in the freezer until you’re ready to add layers.
- Place each color of Jell-O powder in its own bowl, add boiling water, and stir until no graininess remains on the bottom of the bowl. (it may take a few minutes until completely dissolved). Place ⅓ cup cold water in each bowl and stir once more.
- Place the bowls of Jell-O in the fridge for about 20-30 minutes.
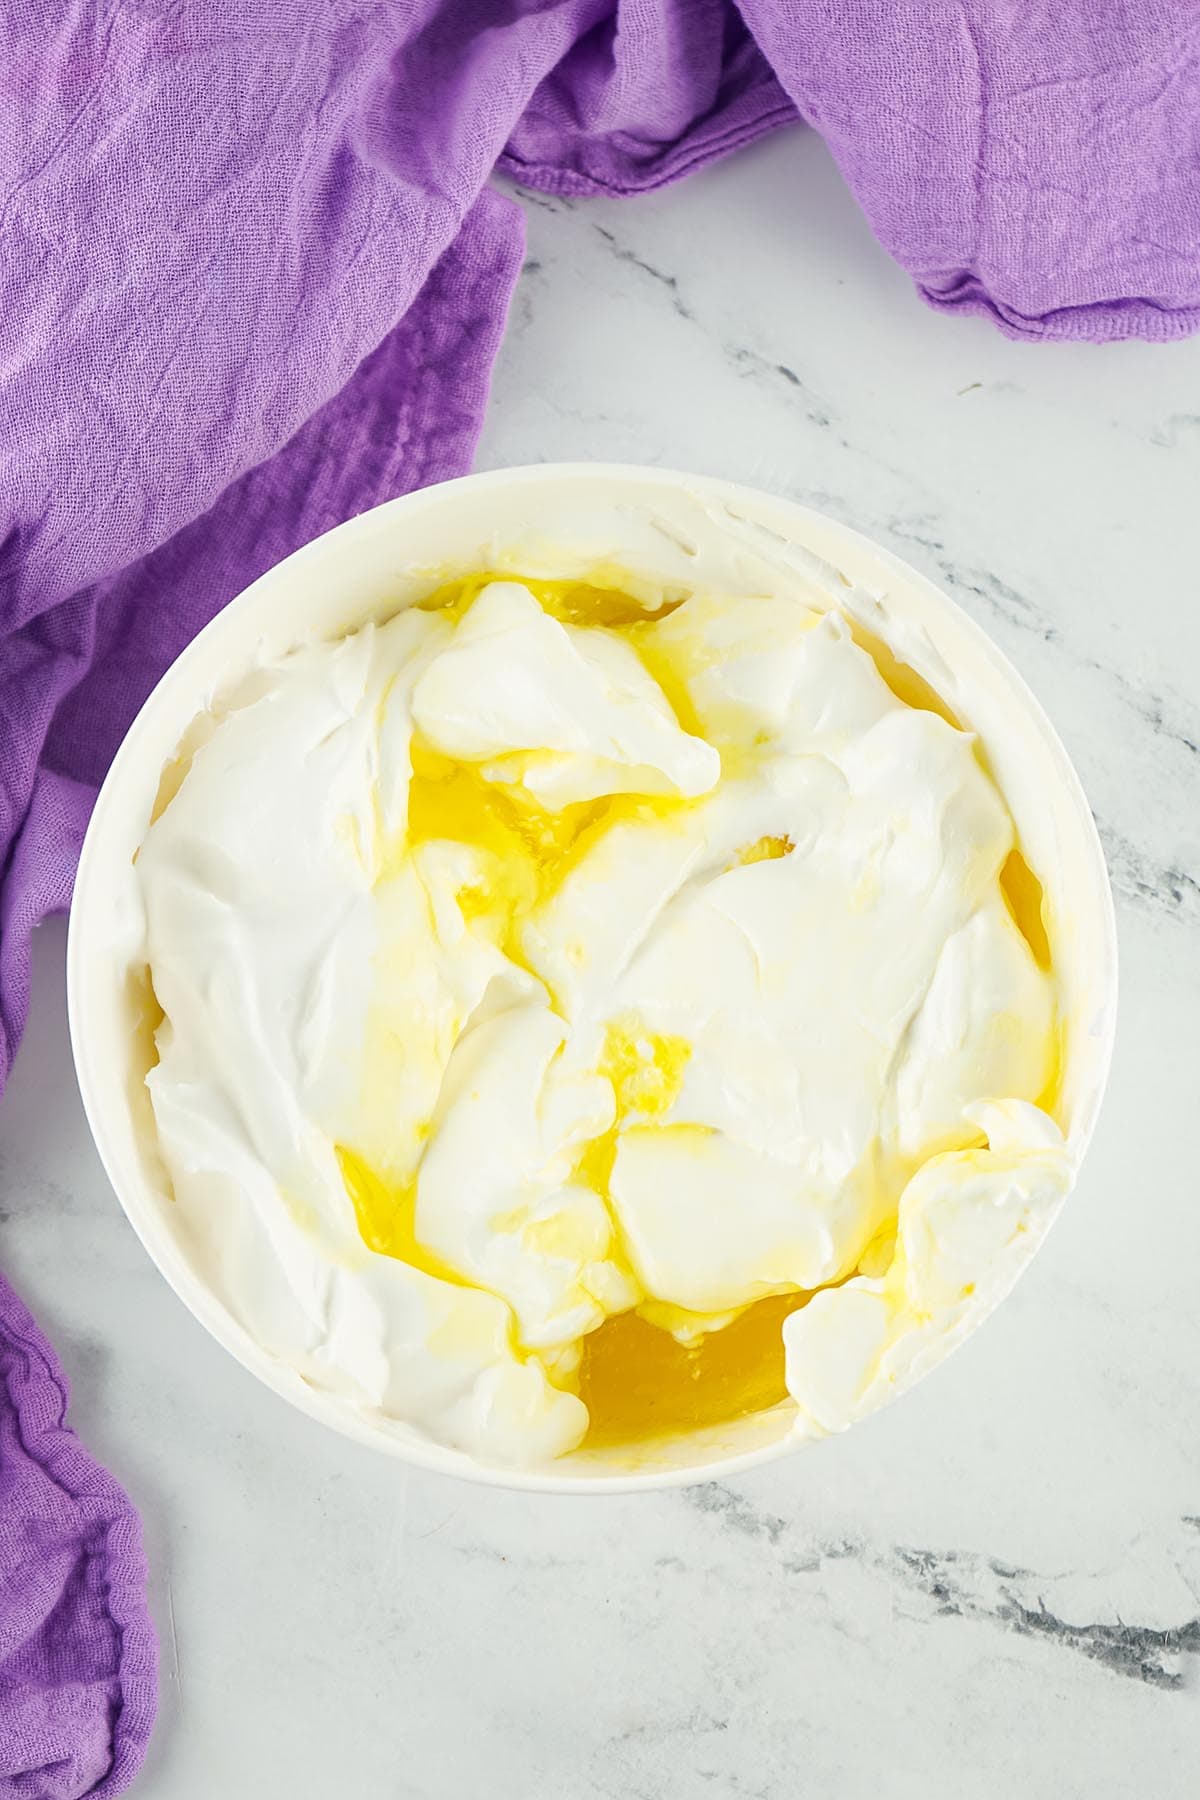
Pro Tip: You don’t want it to be solidified, just thickened. - Add 4 ounces of whipped cream to each Jell-O bowl and vigorously mix until fully combined.
Pro Tip: This may take a minute or two, per bowl. - You can add food dye to brighten the yellow and pink Jell-O (optional).
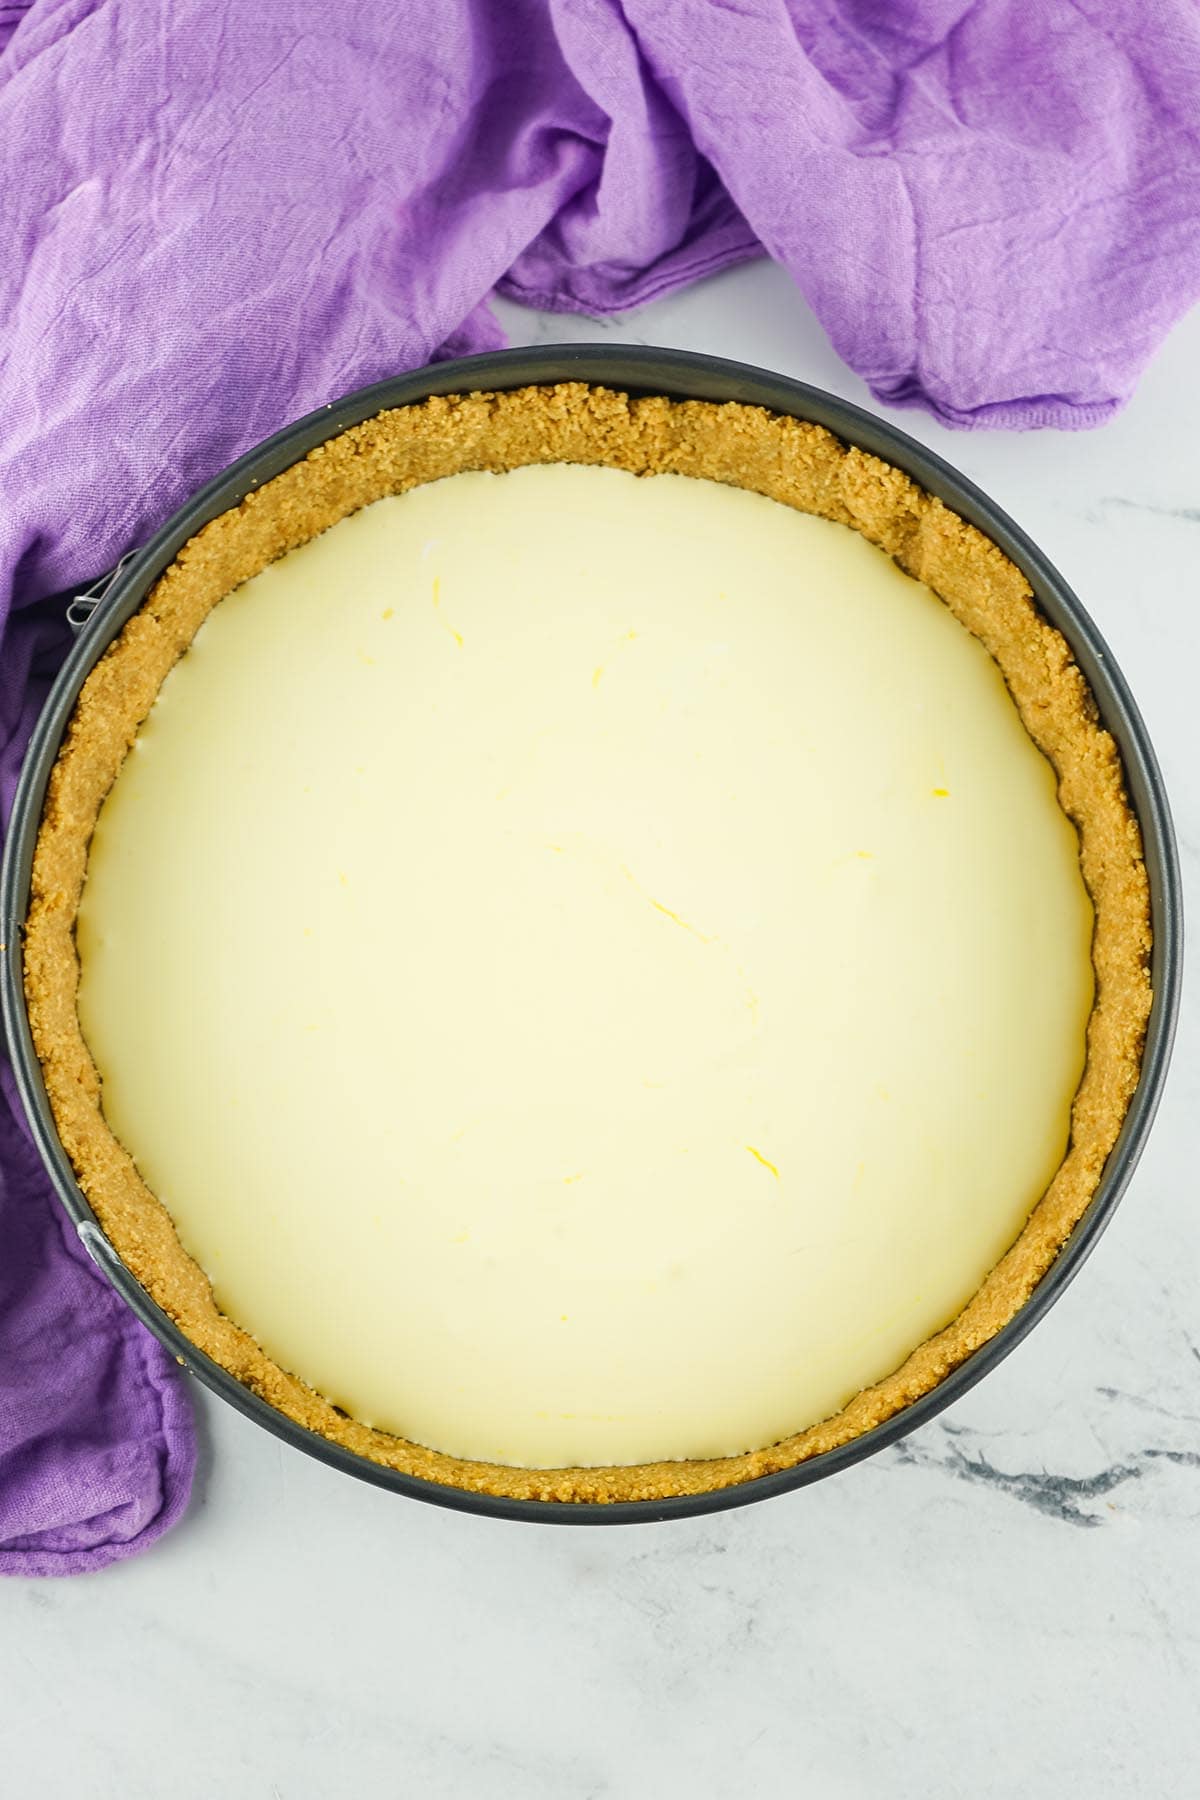
Pro Tip: Add until no color streaks appear and you’ve reached your desired shades of color. - Add the first Jell-O color (I used yellow, but you can do your own color order) to the pie crust, spread evenly, and place the pie back in the freezer for 5 minutes.
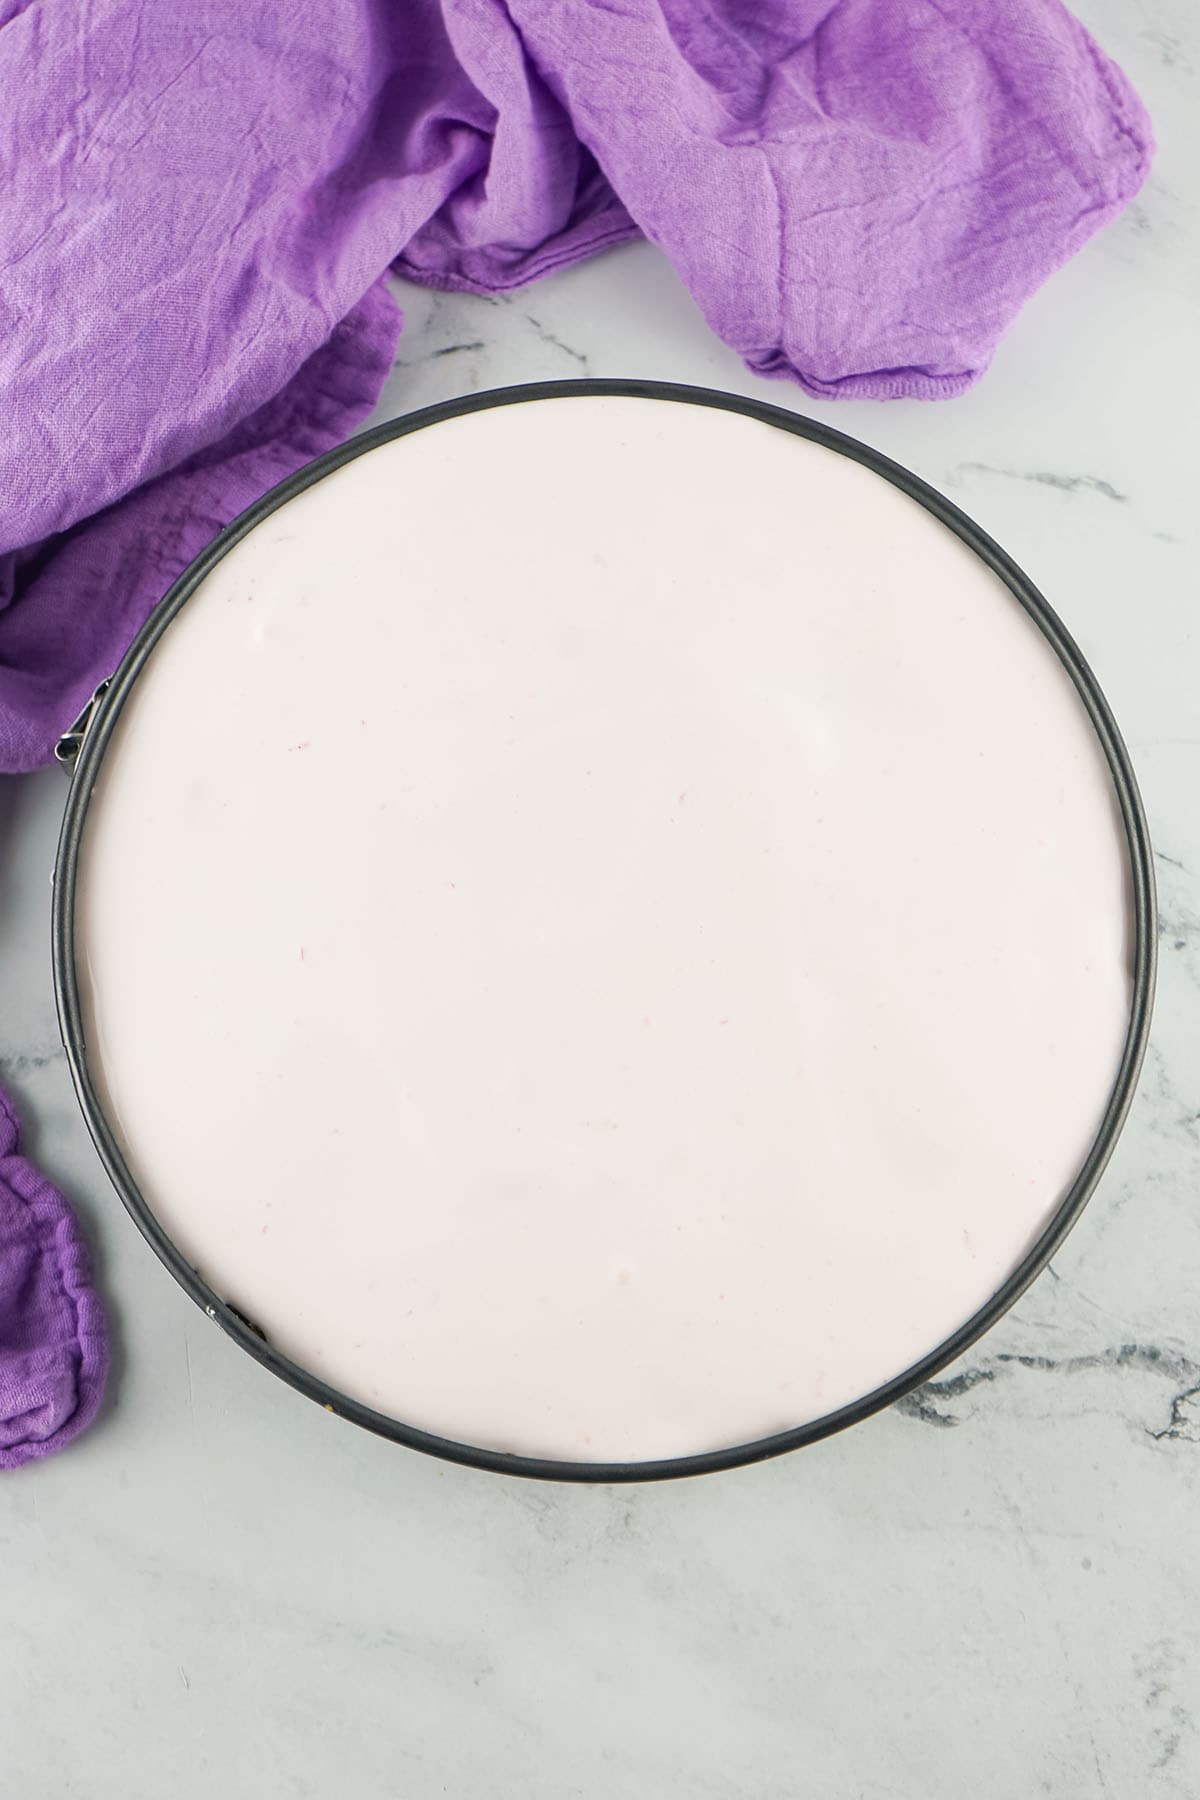
- Top with the next color and place back in the freezer for 5 minutes.
- Repeat this process until all 4 colors have been added.
- Leave the pie in the freezer for 3-4 hours or until completely solidified all the way through.
- Top with a dollop of whipped cream, if desired, and enjoy!
Tips
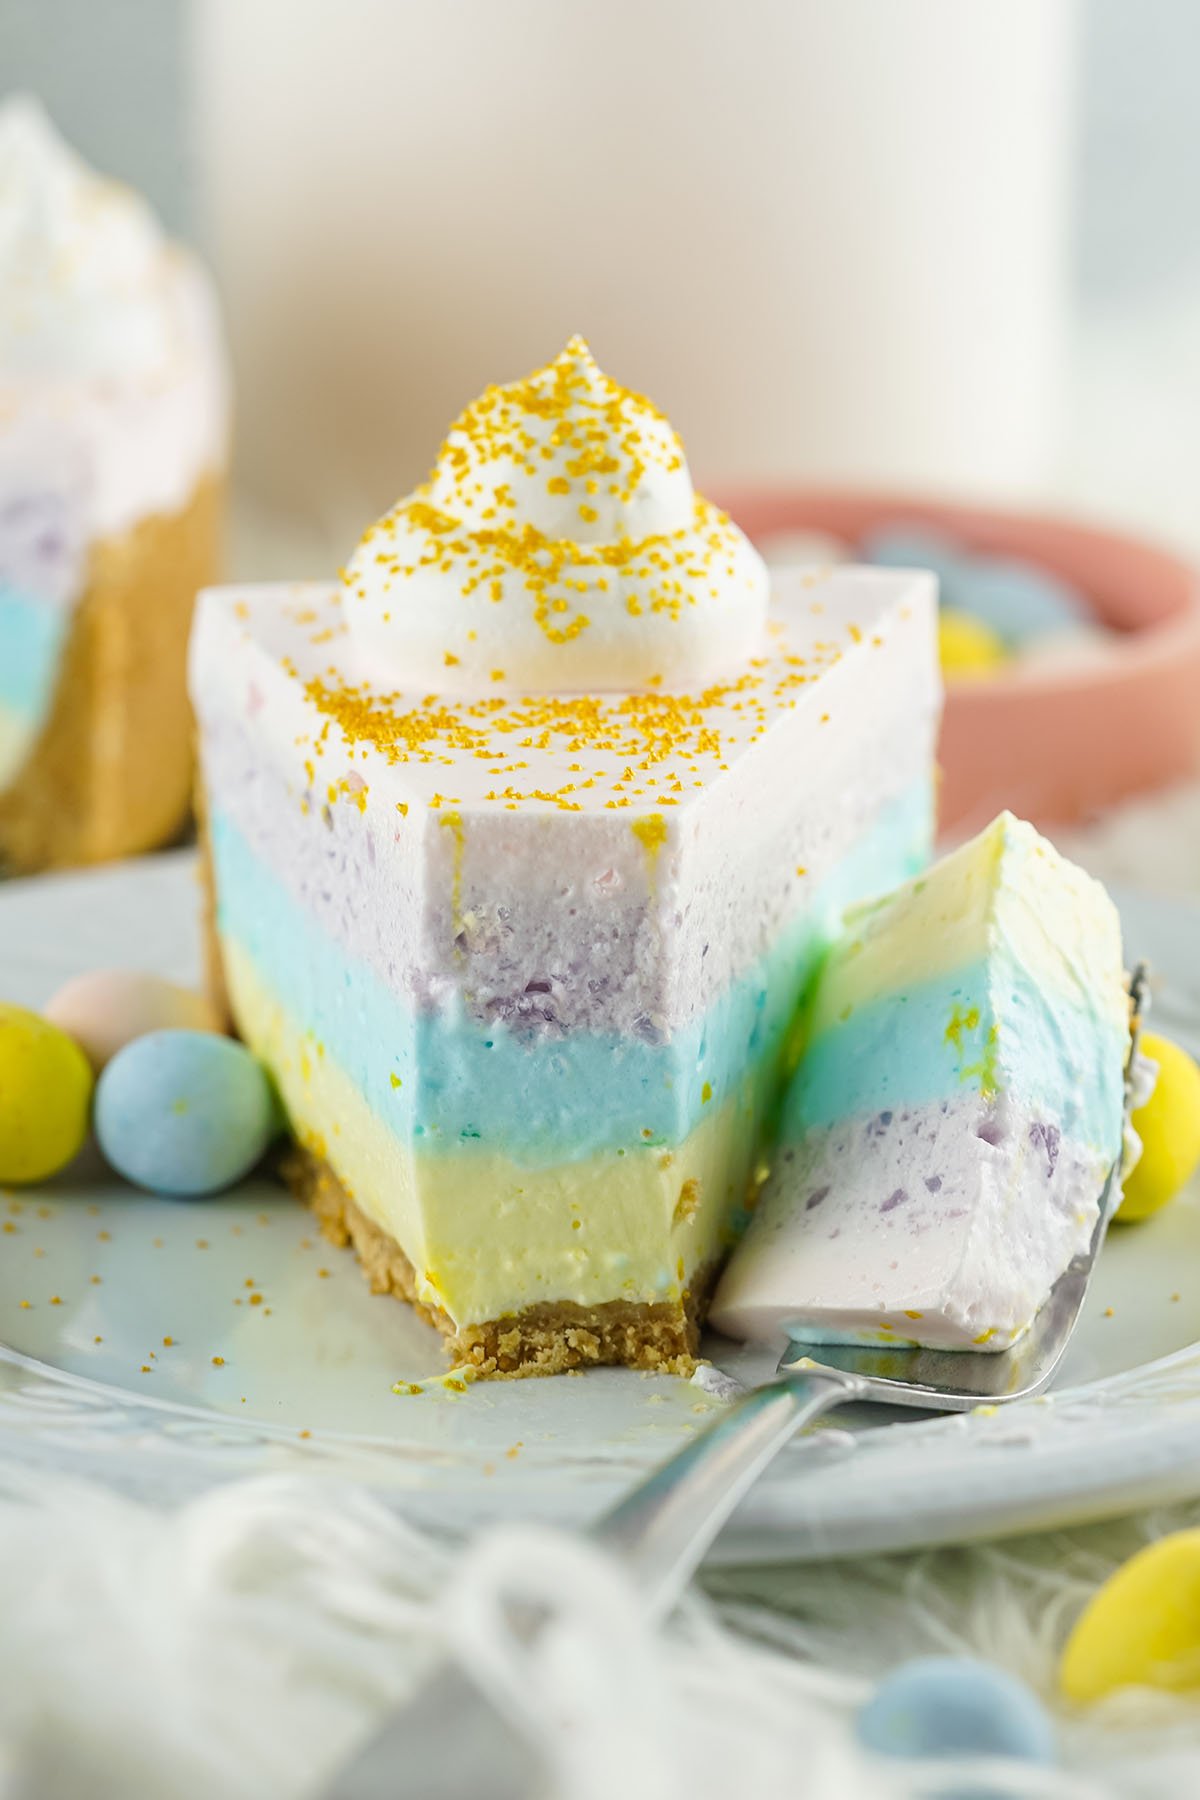
- The yellow and pink Jell-O turns out really light. I like to add a bit of dye so the colors pop more. My pink could have used a touch more pop, but you can choose your shade of pink and yellow.
- Layer your colors wisely. As you can see, pink doesn’t pop well when placed on top or against the purple. So, I suggest avoiding that mistake in order to get the best pop from each color possible.
- It’s ok if your Jell-O layers go beyond the top of where your crust ends. It won’t stick to the pan.
Storage Tips
- To Store: Store any leftovers covered in the refrigerator for up to 4 days.
- To Freeze: I do not recommend freezing this dessert. The gelatin doesn’t freeze well and the texture and consistency will change once thawed.
Frequently Asked Questions
Yes, you can definitely buy a pre-made crust. I chose to make my own graham cracker crust, but if you don’t have time or prefer not to make your own, you can certainly buy a ready-made graham cracker crumb crust instead.
Yes, you can replace the Cool Whip with homemade whipped cream.
If you do not have your own recipe, you can use 1 cup of heavy cream, 1 1/2 tbsp of powdered sugar (confectioners sugar) and 1/2 tsp of vanilla extract. Combine them all in a bowl and whip them on a high setting.
You’ll know it is done when you see high peaks form or see my recipe for homemade cool whip here!
You do not want to leave your Jell-O in the fridge for longer than 30 minutes before mixing in the whipped cream. It will leave large chunks of Jell-O that won’t mix in and will cause messy cutting later on.
If there are large Jell-O chunks, remove them before adding the layers. You can also try using a hand mixer to break them up as much as possible.
If your crust isn’t packing well and crumbling too much, you’ll want to add a bit more melted butter at a time until it packs well. You’ll get a slight crumble, but you don’t want major crumbles.
Other Easy Pie Recipes
- Strawberry Cool Whip Pie
- Reese’s Peanut Butter Cup Pie
- No-Bake Peanut Butter Pie
- Oreo Cream Pie
- Kool Aid Pie
- Sloppy Joe Pie
- Buckeye Pie

Easter Jello-O Pie
Ingredients
Filling:
- ½ package Pink Starburst Jell-O (a little under 2 ounces)
- 1½ ounces Blue Jell-O (½ Package)
- 1½ ounces Yellow Jell-O (½ Package)
- 1½ ounces Purple Jell-O (½ Package)
- 16 ounces Whipped Cream divided
- 3 cups Boiling Water
- 1⅓ cup Cold Water divided
- Yellow Food Dye (optional)
- Pink Food Dye (optional)
Crust:
- 2½ cups Graham Cracker Crumbs
- 12 tbsp Butter (1 ½ sticks)
Instructions
- Melt your butter in the microwave until it’s fully liquified.
- Combine the graham cracker crumbs and melted butter in a medium bowl and mix until a thick, sand texture occurs.
- Place the mixture in your springform pan and spread it across the bottom and up the sides, pressing it down so it packs in.
- Place the crust in the freezer until you’re ready to add layers.
- Place each color of Jell-O powder in its own small bowl. Place ¾ cup boiling water in each bowl and stir until no graininess remains on the bottom of the bowl.
- Place ⅓ cup cold water in each bowl and stir once more.
- Place the bowls of Jell-O in the fridge for about 20-30 minutes. You don’t want it to be solidified, just thickened.
- Add 4 ounces of whipped cream to each Jell-O bowl and vigorously mix until fully combined. This may take a minute or two, per bowl.
- If you’re using food dye to add more color to the yellow and pink, add that at this point and turn until no color streaks appear and you’ve reached your desired shades of color.
- Place the first color (I used yellow, but you can do your own color order) in the crust and spread even. Place the pie back in the freezer for 5 minutes, then add the next color, then back in the freezer for 5 minutes. Repeat this process until all 4 colors have been added.
- Leave the pie in the freezer for 3-4 hours or until completely solidified all the way through.
- Top with whipped cream, if desired, and enjoy!
Jenn’s Notes
- To Store: Store any leftovers covered in the refrigerator for up to 4 days.
- To Freeze: I do not recommend freezing this dessert. The gelatin doesn’t freeze well and the texture and consistency will change once thawed.
- The yellow and pink Jell-O turns out really light. I like to add a bit of dye so the colors pop more. My pink could have used a touch more pop, but you can choose your shade of pink and yellow.
- Layer your colors wisely. As you can see, pink doesn’t pop well when placed on top or against the purple. So, I suggest avoiding that mistake in order to get the best pop from each color possible.
- You can add the graham cracker crumbs and melted butter to a food processor to mix it. This makes things a touch quicker and more thorough.
- It’s ok if your Jell-O layers go beyond the top of where your crust ends. It won’t stick to the pan.
- I used a normal springform pan and not a deep dish one. However, you’re welcome to use a deeper option, it just won’t fill up the pan as much as the regular option will.


Do you use cool whip or actual homemade whipped cream? Just want to make sure
You can use either – but I used cool whip
Would this work with sugarfree jello
I make a WW pie like this all the time with sugar free and also use light cool whip and it turns out great !
you say not to freeze dessert, but then in your directions it says to put into freezer for 3 or 5 hrs to set. So if you make this dessert the day prior to your event how do you store it?
Wondering the same thing
Just keep it stored in the fridge in something like a cake keeper 🙂
Do you use whipped cream or Cool Whip? You mention both.
I used cool whip
Can Ligth Cool Whip instead of cream, less calories
I used a pre-made crust and I feel it was too thin. Definitely make your own per this recipe. I also chose to use cherry instead of pink. My purple cooled for too long, but otherwise everything came out as expected. I just forgot I don’t care for gelatin. I will be making this again for Easter pot lucks and family gatherings. It’s a fun, pretty treat that kids like. I am considering doing this out of unflavored vegetarian gel dessert, and just custom mixing colors with one overall flavor, but we will see. I may do this with alcohol for St. Patrick’s Day, with different shades of green. Possibilities with this recipe are great.
Can you use sugar free jello
Hi I was wondering if sugar free jello would turn out the same? I’m on keto
I make a WW pie with sugar free jello and also use light cool whip and it turns out great !
So the entire pie is whipped cream no cream cheese ? Just wondering as it states to add whipped cream on top if you desire ..:
It is a Jello pie. Jello and whipped cream. This is not a cheesecake.
Hi, would you get the same results with a pre-made graham cracker crust?
Could you clarify something for me —you indicate that you don’t recommend freezing this pie, but the recipe calls for it to be put in the freezer for 3-4 hours. Wouldn’t it be frozen after 4 hours in the freezer?
If it’s stored in the freezer long term, it will secrete water.
Food look good yummy