This post may contain affiliate links. Please read our disclosure policy.
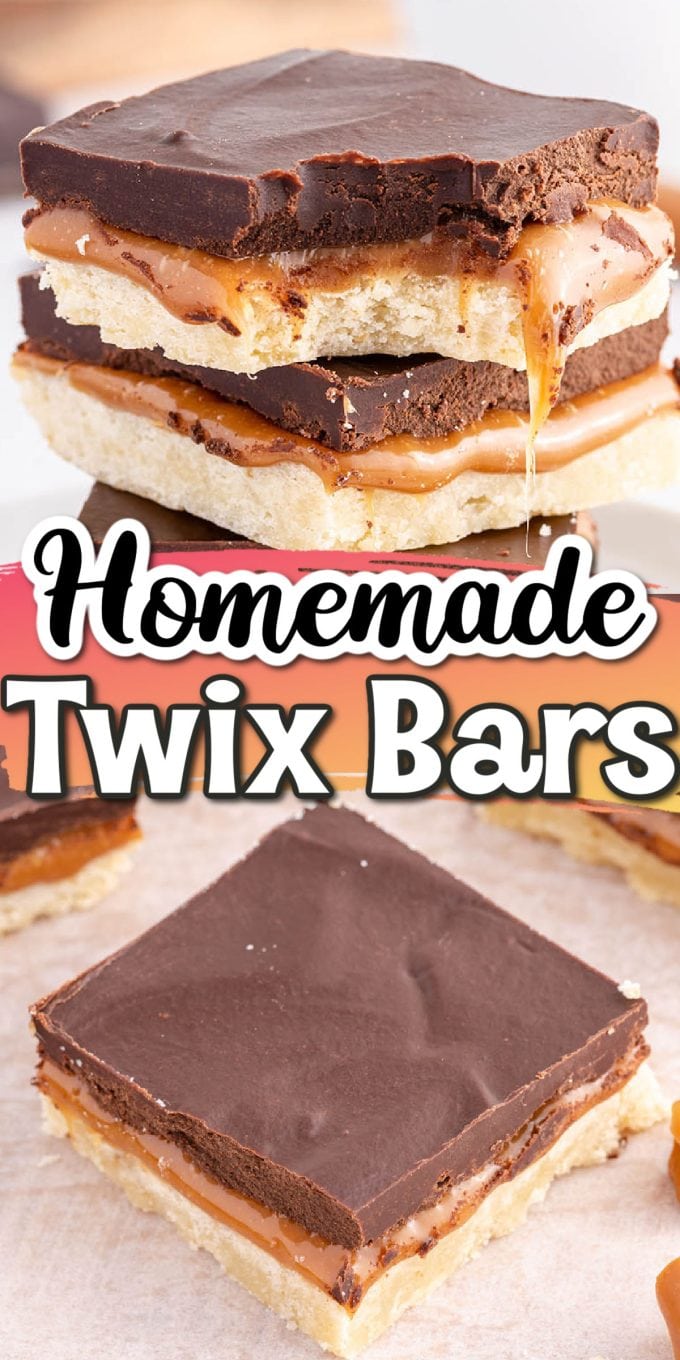
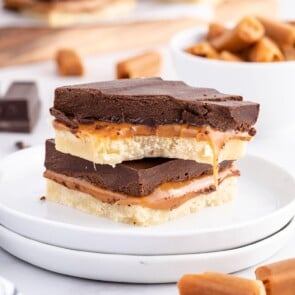
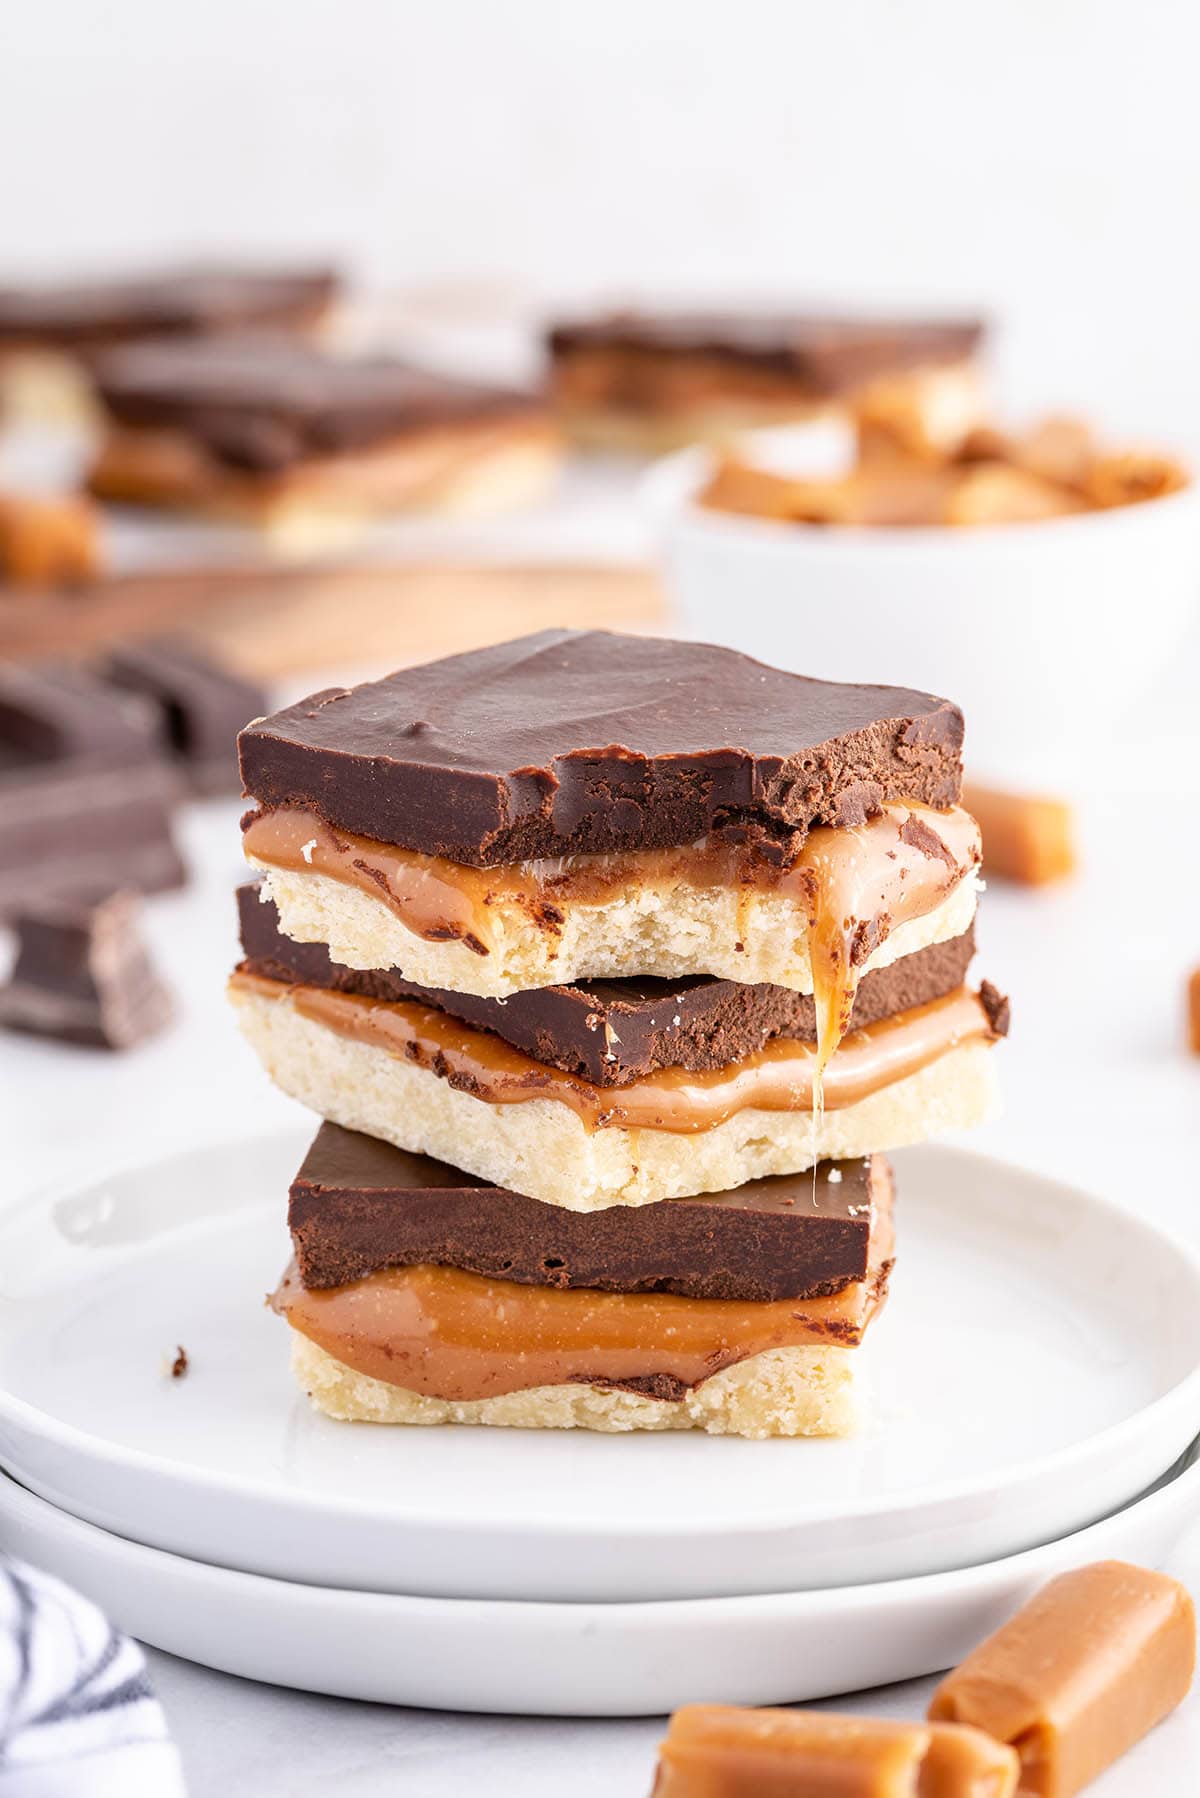
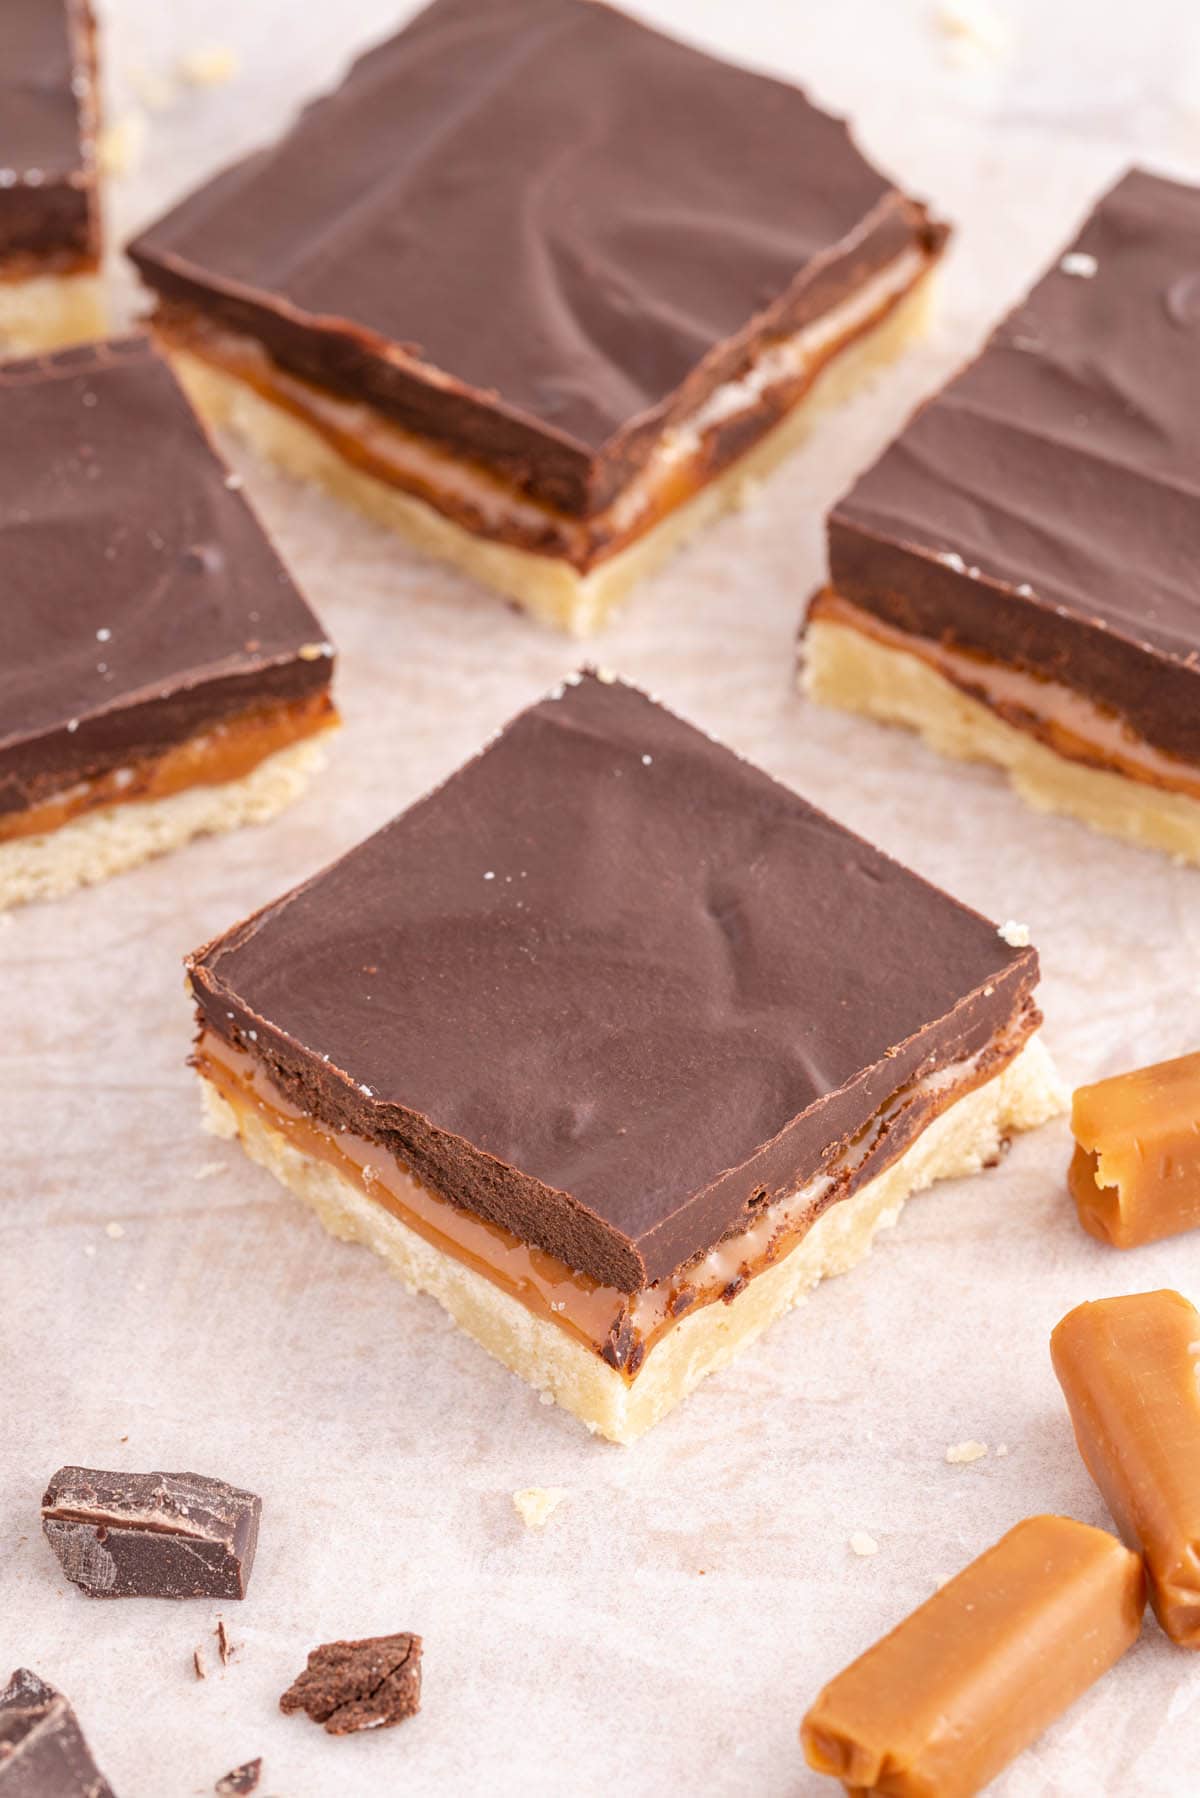
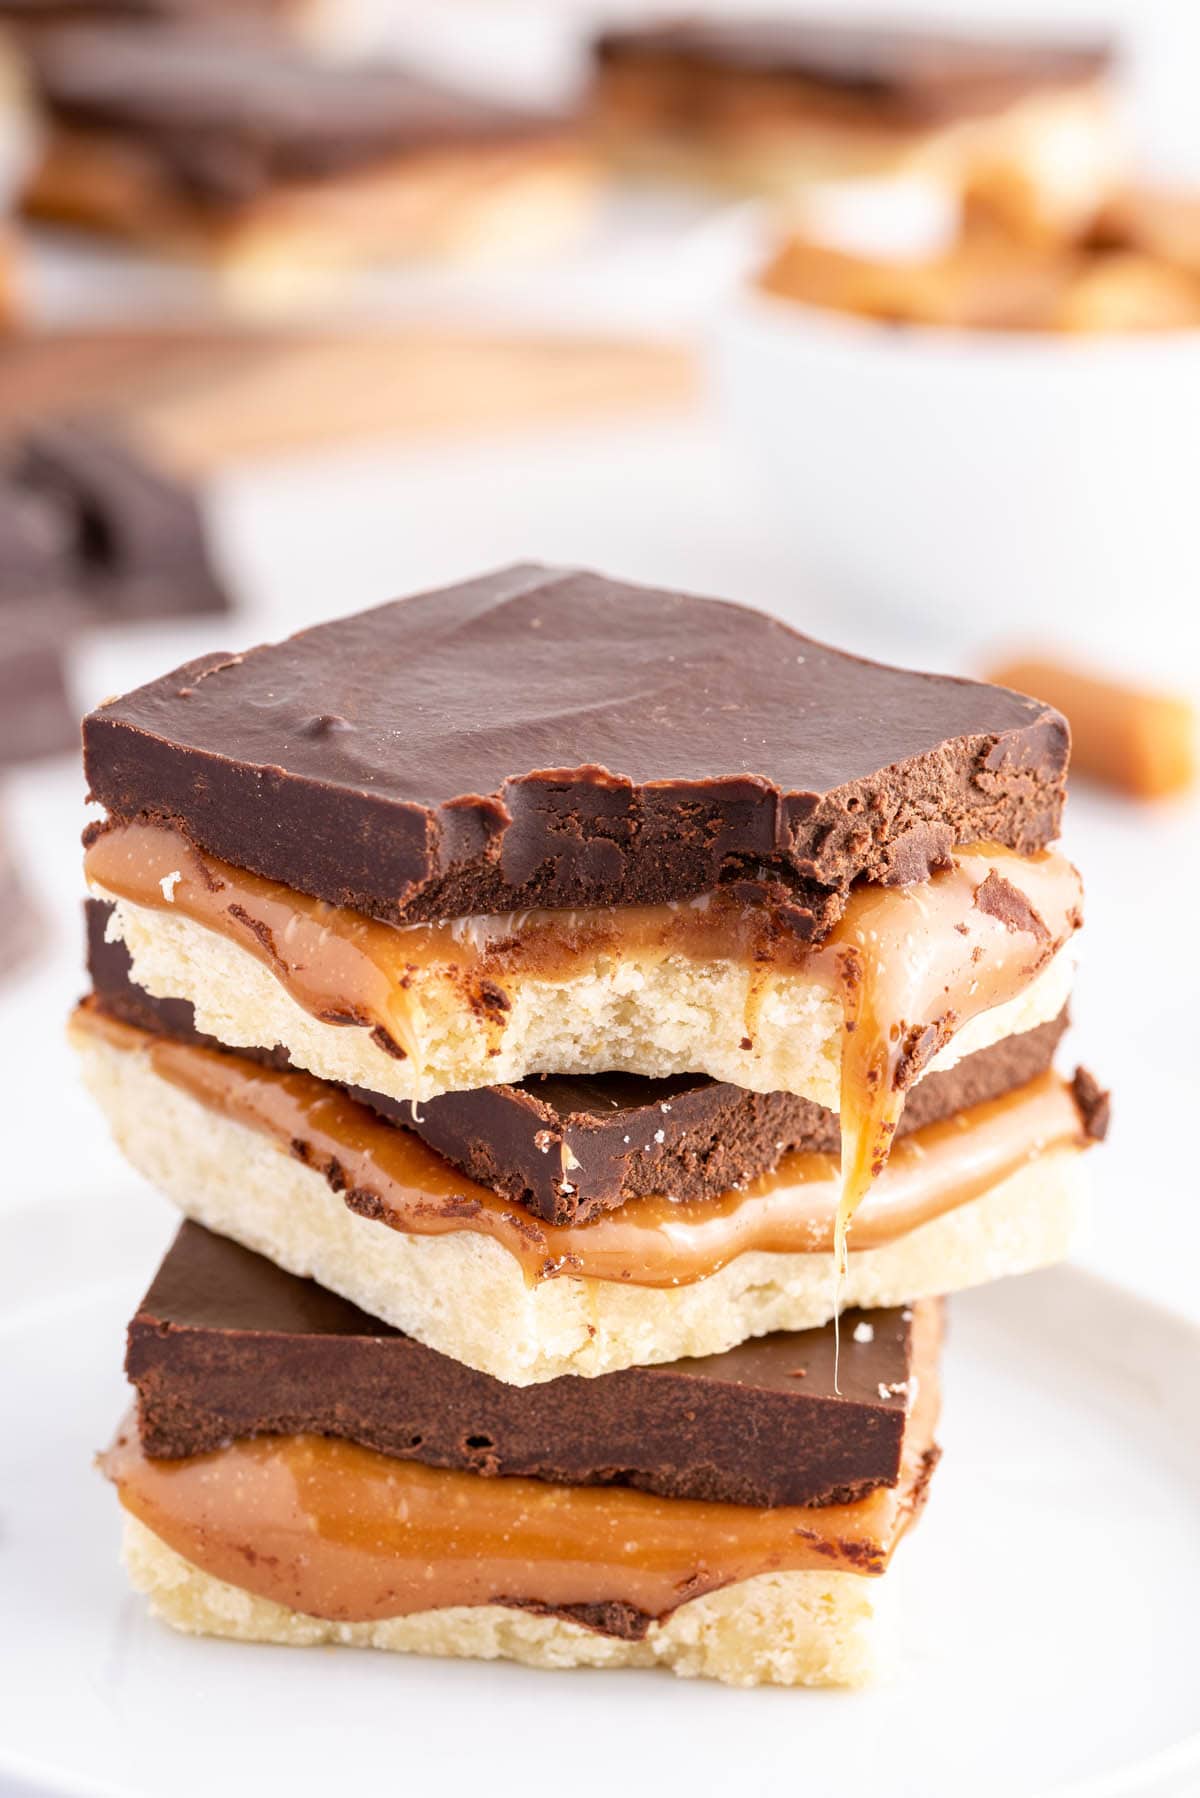
Craving a sweet and crunchy snack? Look no further than these homemade Twix bars! Made with a buttery shortbread base, chewy caramel center, and a layer of chocolate on top, these bars are the perfect blend of textures and flavors.
With just a few simple ingredients, you can whip up a batch of these delicious treats in no time.
About Homemade Twix Bars
Homemade Twix bars are a game changer when it comes to satisfying your sweet tooth. Not only are they easy to make with just a few simple ingredients, but they are also better than store-bought candy in so many ways.
For starters, you have control over the quality of ingredients used, ensuring they are fresh and of a higher quality. Additionally, making them at home allows you to adjust the sweetness and flavor to your liking.
And let’s not forget, the satisfaction of biting into a warm and gooey homemade Twix bar beats the packaged version any day. So ditch the store-bought candy and try making these delicious copycat homemade candy bar at home. Your taste buds will thank you!
Why We Love This Twix Bars Recipe
- Quick and easy to assemble at home using simple ingredients.
- Copycat recipe of a Twix candy bar that tastes like the real thing!
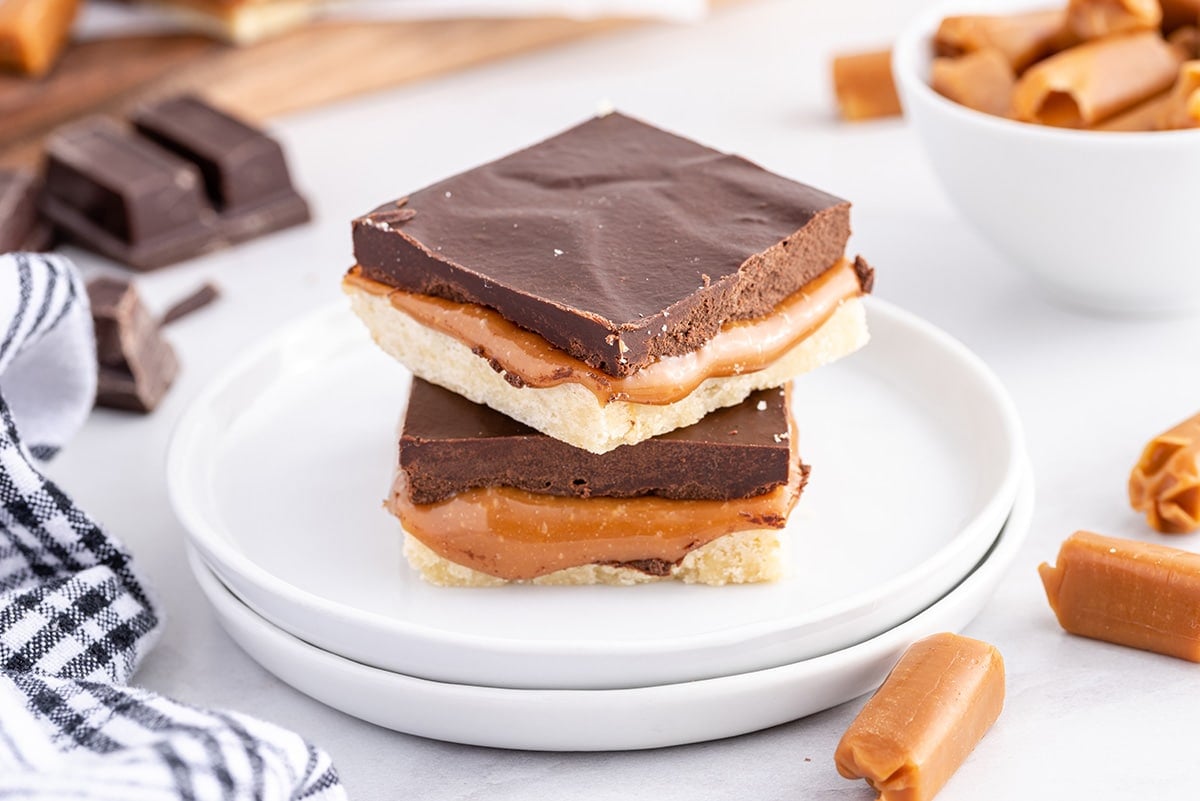
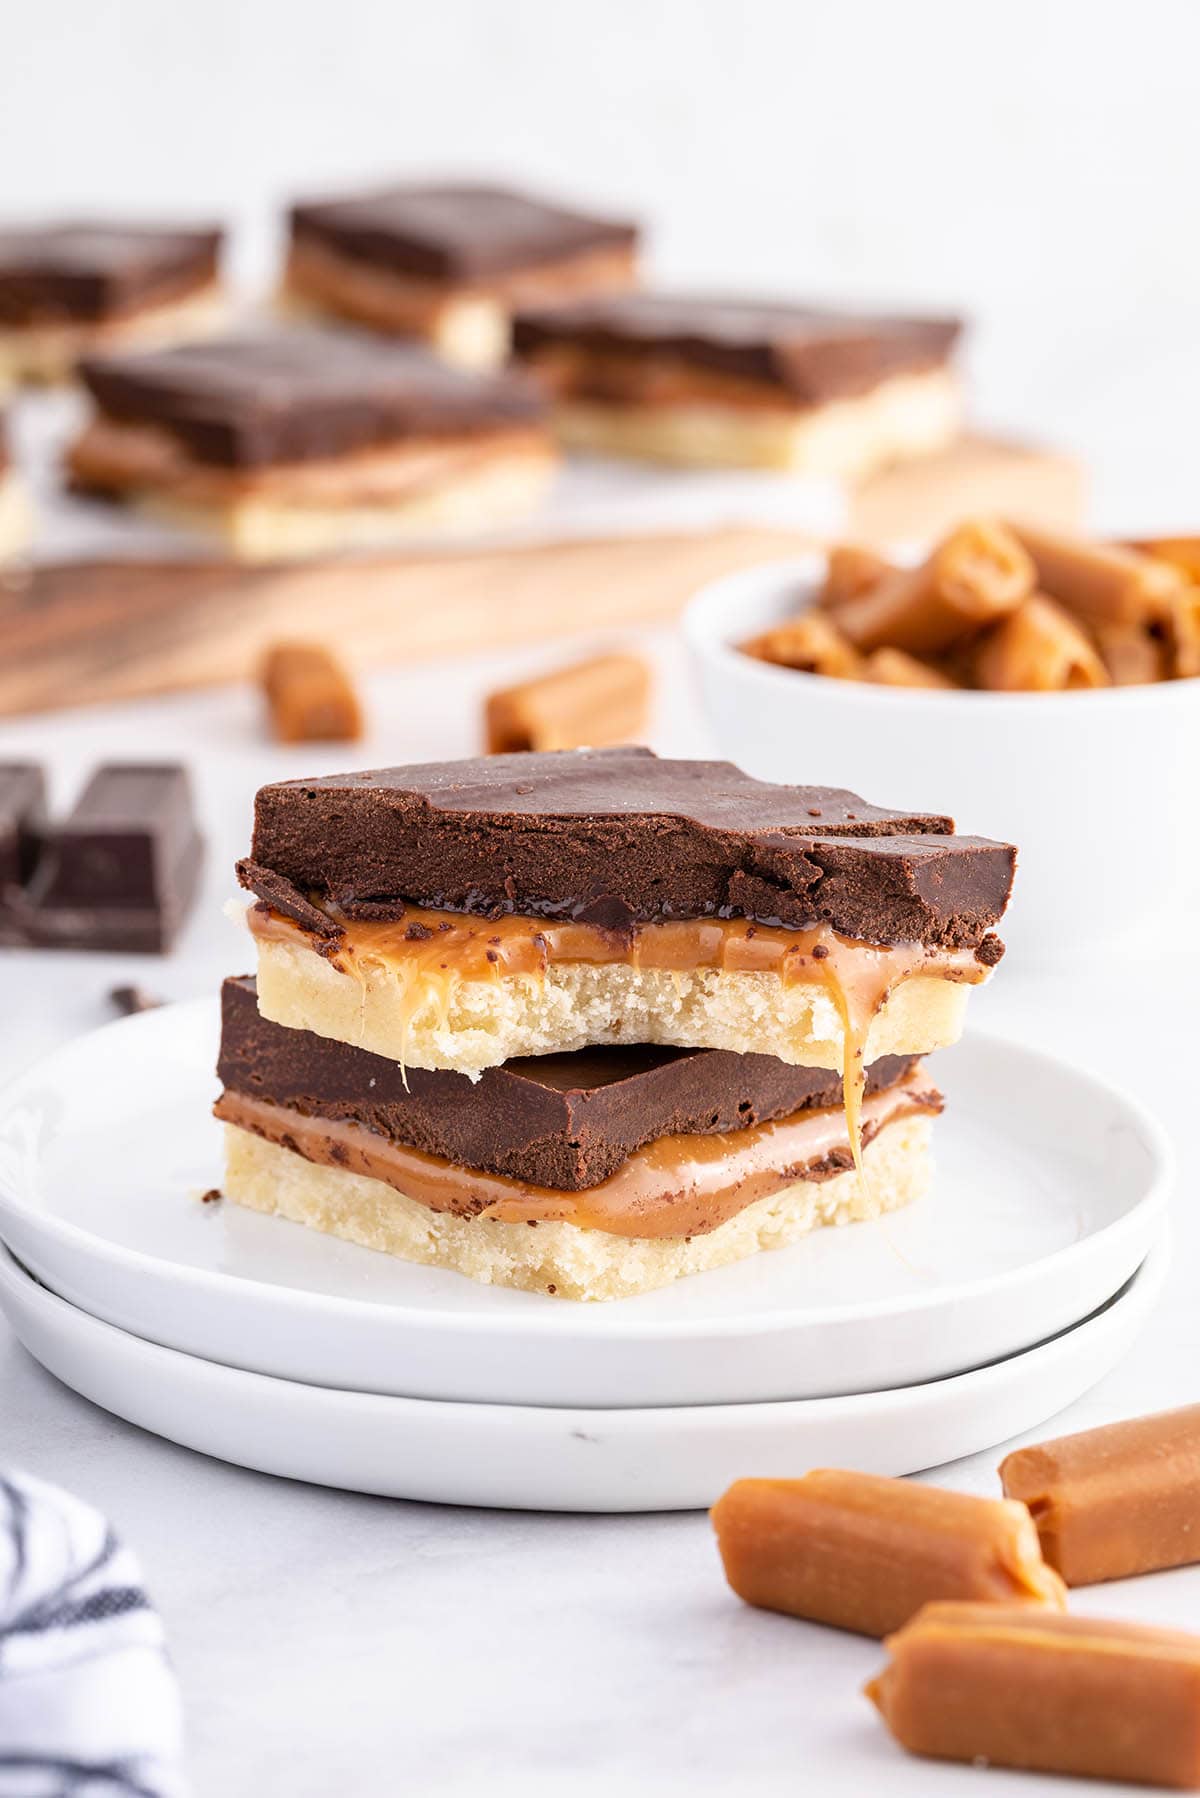
- Crispy, crunchy shortbread crust with a soft caramel center and decadent chocolate ganache topping.
- Classic combination of cookie, caramel, and chocolate in every delicious bite.
- Thick, chewy, chocolatey sweet treat that’s better than your favorite candy bar.
- Perfect for a party, holidays, or after dinner dessert.
Twix Ingredients
- All-purpose flour
- Unsalted butter
- Granulated sugar
- Vanilla extract
- Salt
- Caramel candies: I used Werther’s Original chewy caramel brand.
- Heavy cream
- Semi-sweet chocolate baking bars: I used the Ghirardelli brand.
Substitutions and Additions
- Choose Your Chocolate: Milk chocolate baking bars would be a great substitution for the semi-sweet, however, I would not use dark chocolate, bittersweet, or unsweetened variety in this recipe. You can use a good quality chocolate chip brand (a standard 11.5 oz. bag), but your heat times may be a little longer. You will want to heat in 30-second increments, stirring in between, because the chips can have a tendency to burn or separate if not heated properly.
- Sprinkle With Salt: Feel free to add a sprinkle of sea salt on top of your Twix.
- Gluten-Free Flour: Swap the all-purpose flour with gluten-free flour, or try using almond flour instead (the crust may turn out more dense with the almond flour). Another option is to use hazelnut flour for part of the all-purpose flour if you prefer (and if you can find it).
Recommended Tools
- 8×8 baking pan
- Parchment paper (or wax paper)
- Handheld mixer
- Liquid measuring cup with a pour spout
- Offset spatula
How to Make the Homemade Twix Bars
- Cream the butter and sugar with a mixer on medium speed for 1-2 minutes or until completely incorporated. Add the flour, vanilla extract, and salt to the butter mixture and mix for another 1 minute.
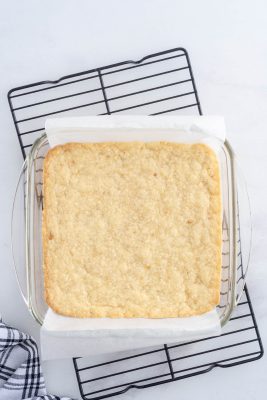
- Press the crust mixture into the bottom of the parchment-lined 8×8 pan and bake for 15 minutes at 350°F.
Pro Tip: You can lightly wet your fingertips with cold water to help press the crust into an even layer. The damp fingertips help keep the shortbread crust from sticking to your fingers while you press it into place. - Cool the shortbread crust on the counter for 10 minutes before adding the caramel layer.
- Microwave the caramel candies and heavy cream on high for 1 minute, stir, and then microwave for another 1 minute.
Pro-Tip: When making caramel sauce, I highly suggest using a good quality soft caramel candy. That will ensure that you have the best flavor in your final product. If your caramel candies are a little harder (NOT hard candies), then you may need to add an additional 1 tablespoon heavy cream to get a nice smooth caramel sauce when heated. - Add the salt and, if needed, microwave for an additional 30 seconds to completely melt the caramel candies. Your caramel should be smooth and pourable.
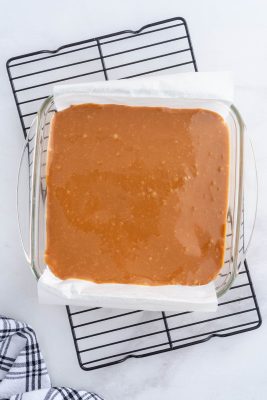
- Pour the caramel sauce over the top of the shortbread crust and smooth it into an even layer.
Pro Tip: Allow the crust and caramel to cool on the counter for 20 minutes before adding the chocolate layer. This ensures that your chocolate and caramel layers stay separated. - Place the broken-up pieces of semi-sweet chocolate baking bars in a bowl.
- Microwave the heavy cream for 1 minute and then pour it over the top of the chocolate pieces, so that all the chocolate is covered. Allow the chocolate to sit for 3 minutes before stirring. (Make sure to melt the chocolate completely before moving to the next step)
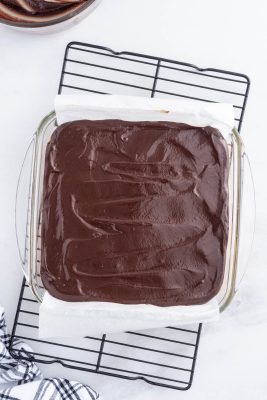
Pro Tip: If needed, you can microwave your chocolate mixture for 30 seconds to get the chocolate completely smooth and the heavy cream completely incorporated. - Slowly pour the chocolate mixture over the top of the caramel layer and spread the chocolate with an offset spatula to get a smooth top layer for your Twix bars.
Pro Tip: You do not want to disturb the caramel layer so your final product has nice separate layers. - Place the pan of Twix bars in the refrigerator to chill for 1 hour 30 minutes, or until the chocolate ganache layer has firmed up before cutting them into squares.
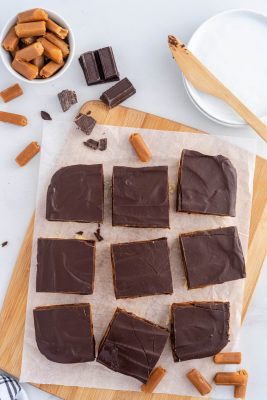
- Cut, serve, and enjoy!
Tips for Making the BEst Twix Bars!
- These Twix bars may be tricky to cut. I recommend using a hot knife (you can run a steak or sharp metal knife under hot water, then pat it dry with a towel), and carefully slice through the Twix bars.
- You can cut the bars in either long narrow rectangles, similar to actual Twix candy bars, or in squares like you would cut a typical dessert bar recipe.
- You can allow your Twix bars to cool completely on the counter before slicing if your room is not extremely warm or humid. I put mine in the refrigerator to help the chocolate ganache layer to set up quicker. Remember that if you allow them to chill overnight in the refrigerator before slicing that you may need to allow them to come to room temperature before slicing them as the caramel layer will be very firm if kept in the refrigerator for that amount of time.
How to Store Twix Squares
- To Store: Your Twix bars can be stored in a covered container, in the refrigerator, for up to 1 week.
This is one of my favorite homemade candy recipes, and there are many more here.
Other Easy Copycat Recipes

Twix Bars
Ingredients
Shortbread crust layer
- 1 cup all-purpose flour
- ½ cup unsalted butter
- ⅓ cup granulated sugar
- ½ tsp vanilla extract
- ¼ tsp salt
Caramel layer
- 10 oz (2 5-oz.) bag soft caramel candies unwrapped, I used Werther’s Original chewy caramels brand
- 2 tbsp heavy cream
- ¼ tsp salt
Chocolate layer
- 12 oz (3 4-oz.) bars semi-sweet chocolate baking bars I used Ghirardelli brand, broken into small pieces
- ½ heavy cream
Instructions
- Preheat oven to 350°F. Line an 8×8 baking pan with parchment paper. Set aside.
- In a large mixing bowl, with a handheld mixer on medium speed, cream the butter and sugar for 1-2 minutes or until completely incorporated. Add the all-purpose flour, vanilla extract, salt and mix for another 1 minute.
- Press the crust mixture into the bottom of the parchment-lined 8×8 pan. You can lightly wet your fingertips with cold water to help press the crust into an even layer. The damp fingertips help keep the shortbread crust from sticking to your fingers while you press it into place. Bake for 15 minutes.
- Allow your cooked shortbread crust to cool on the counter for 10 minutes before adding the caramel layer.
- To a medium-sized, microwave-safe, bowl add the unwrapped soft caramel candies and the 2 tablespoons heavy cream. Microwave on high for 1 minute, stir, then microwave for another 1 minute. Add the ¼ teaspoon salt and, if needed, microwave for an additional 30 seconds to completely melt the caramel candies. Your caramel should be smooth and pourable.
- Very carefully pour the caramel sauce over the top of the shortbread crust and smooth it into an even layer. Allow the crust and caramel to cool on the counter for 20 minutes before moving forward with adding the chocolate layer. This ensures that your chocolate and caramel layers stay separated.
- In a medium-sized bowl, add your broken-up pieces of semi-sweet chocolate baking bars.
- In a microwave-safe, liquid measuring cup with a pour spout, add the ½ cup heavy cream. Microwave for 1 minute. Slowly pour the hot cream over the top of the chocolate pieces, ensuring that all the chocolate is covered. Allow the chocolate to sit for 3 minutes before stirring. If needed, you can microwave your chocolate mixture for 30 seconds to get the chocolate completely smooth and the heavy cream completely incorporated.
- Slowly pour the chocolate mixture over the top of the caramel layer. You do not want to disturb the caramel layer so that your final product has nice separate layers. Spread your chocolate with an offset spatula to get a nice smooth top layer for your Twix bars.
- Place your pan of Twix bars into the refrigerator to chill for 1 hour 30 minutes, or until the chocolate ganache layer has firmed up before cutting them into squares.
Jenn’s Notes
- To Store: Your Twix bars can be stored in a covered container, in the refrigerator, for up to 1 week.
- These Twix bars may be tricky to cut. I recommend using a hot knife (you can run a steak or sharp metal knife under hot water, then pat it dry with a towel), and carefully slice through the Twix bars.
- You can cut the bars in either long narrow rectangles, similar to actual Twix candy bars, or in squares like you would cut a typical dessert bar recipe.
- When making the caramel sauce, I highly suggest using a good quality soft caramel candy. That will ensure that you have the best flavor in your final product. If your caramel candies are a little harder (NOT hard candies), then you may need to add an additional 1 tablespoon heavy cream to get a nice smooth caramel sauce when heated.
- You can allow your Twix bars to cool completely on the counter before slicing if your room is not extremely warm or humid. I put mine in the refrigerator to help the chocolate ganache layer to set up quicker. Remember that if you allow them to chill overnight in the refrigerator before slicing that you may need to allow them to come to room temperature before slicing them as the caramel layer will be very firm if kept in the refrigerator for that amount of time.


Fantastic!
All of your recipes are amazing!
awwww thanks so much!