
This post may contain affiliate links. Please read our disclosure policy.

Spring Blossom Cookies are so quick and easy to make using classic sugar cookie ingredients, colored sanding sugar for coating, and chocolate candy kisses.
These simple soft and chewy cookies transform the traditional holiday confection into fun and festive Easter treats.

Easter Blossom Cookies
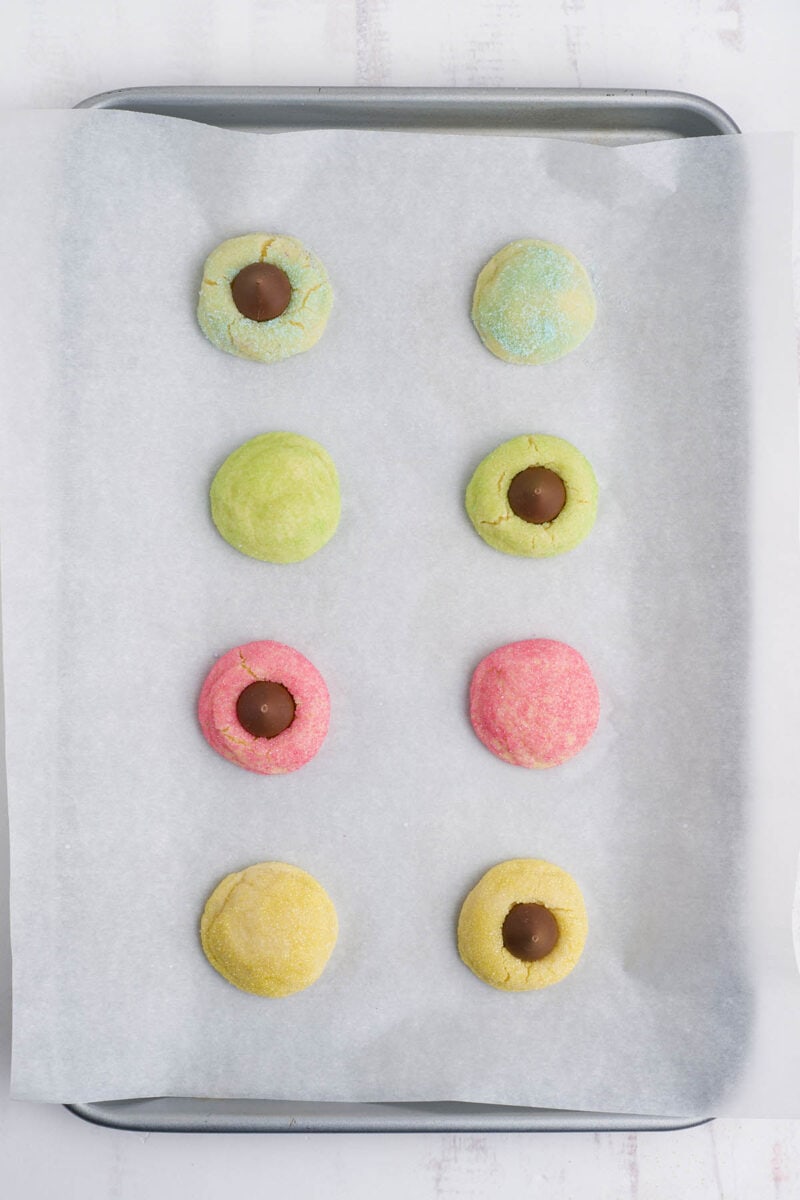
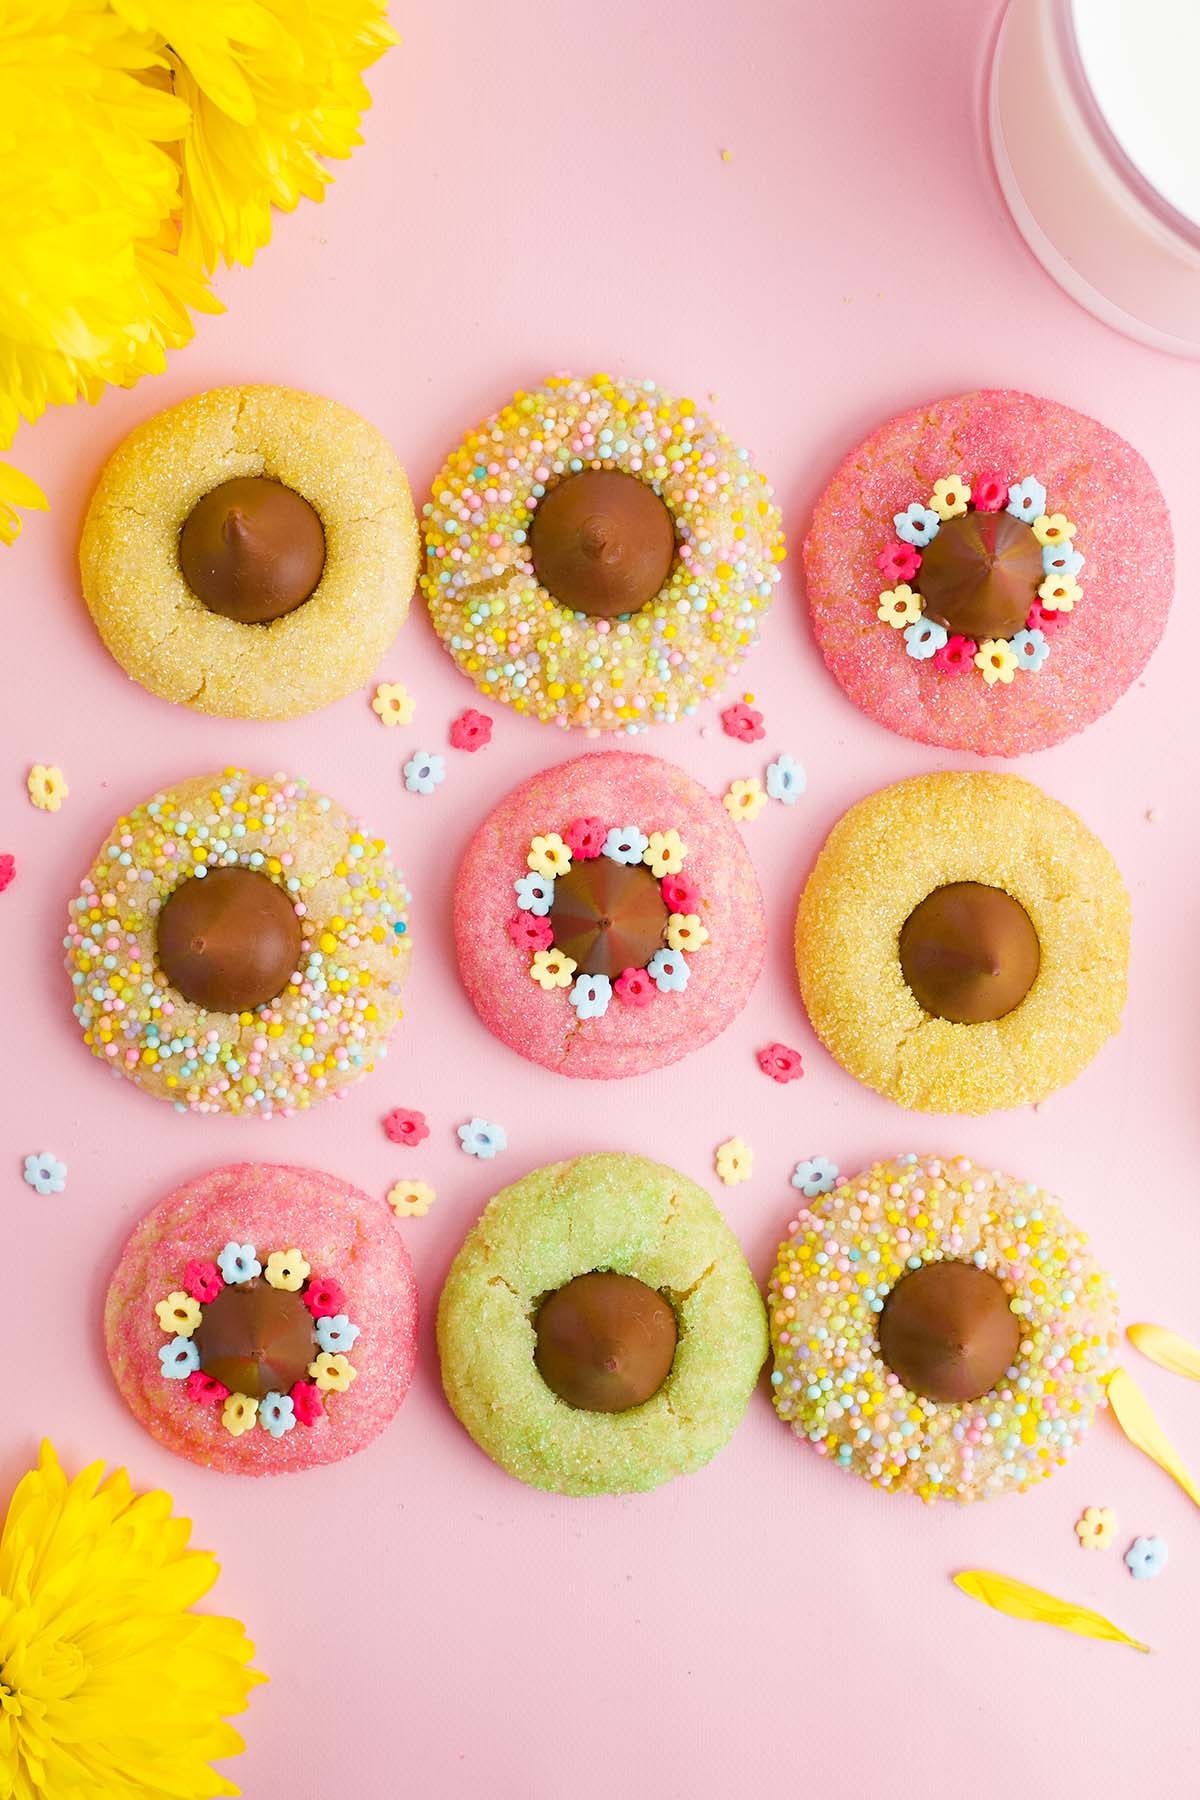
Our Spring Blossom Cookie recipe has a colorful, tasty twist to the classic peanut butter blossoms by forming the base from a simple sugar cookie dough and rolling them in sparkly sugar sprinkles before baking.
Once they’re out of the oven, a Hershey’s kiss is pressed into each middle so that the warm dough cradles the chocolate candy and holds it in place as it cools.
These Easter cookies are my favorite way to brighten up a basic sugar cookie; simply coated in colorful sprinkles, they’re the prettiest treat for both the palate and the dessert platter!
While the crunchy outside adds the perfect contrast to the soft cookie center, it’s the silky chocolate in the middle that makes these kiss cookies the most special spring sugar cookies.
Why We Love This Recipe for Spring Blossom Cookies
- Quick and easy to make.
- Uses a handful of simple ingredients.
- Sugar cookie blossoms dressed up in festive colors create the best Easter dessert.
- Festive, fun kiss cookies with a crisp sugar coating and a soft, chewy center.
- Perfect for the spring season, birthday parties, or Easter dessert platters.
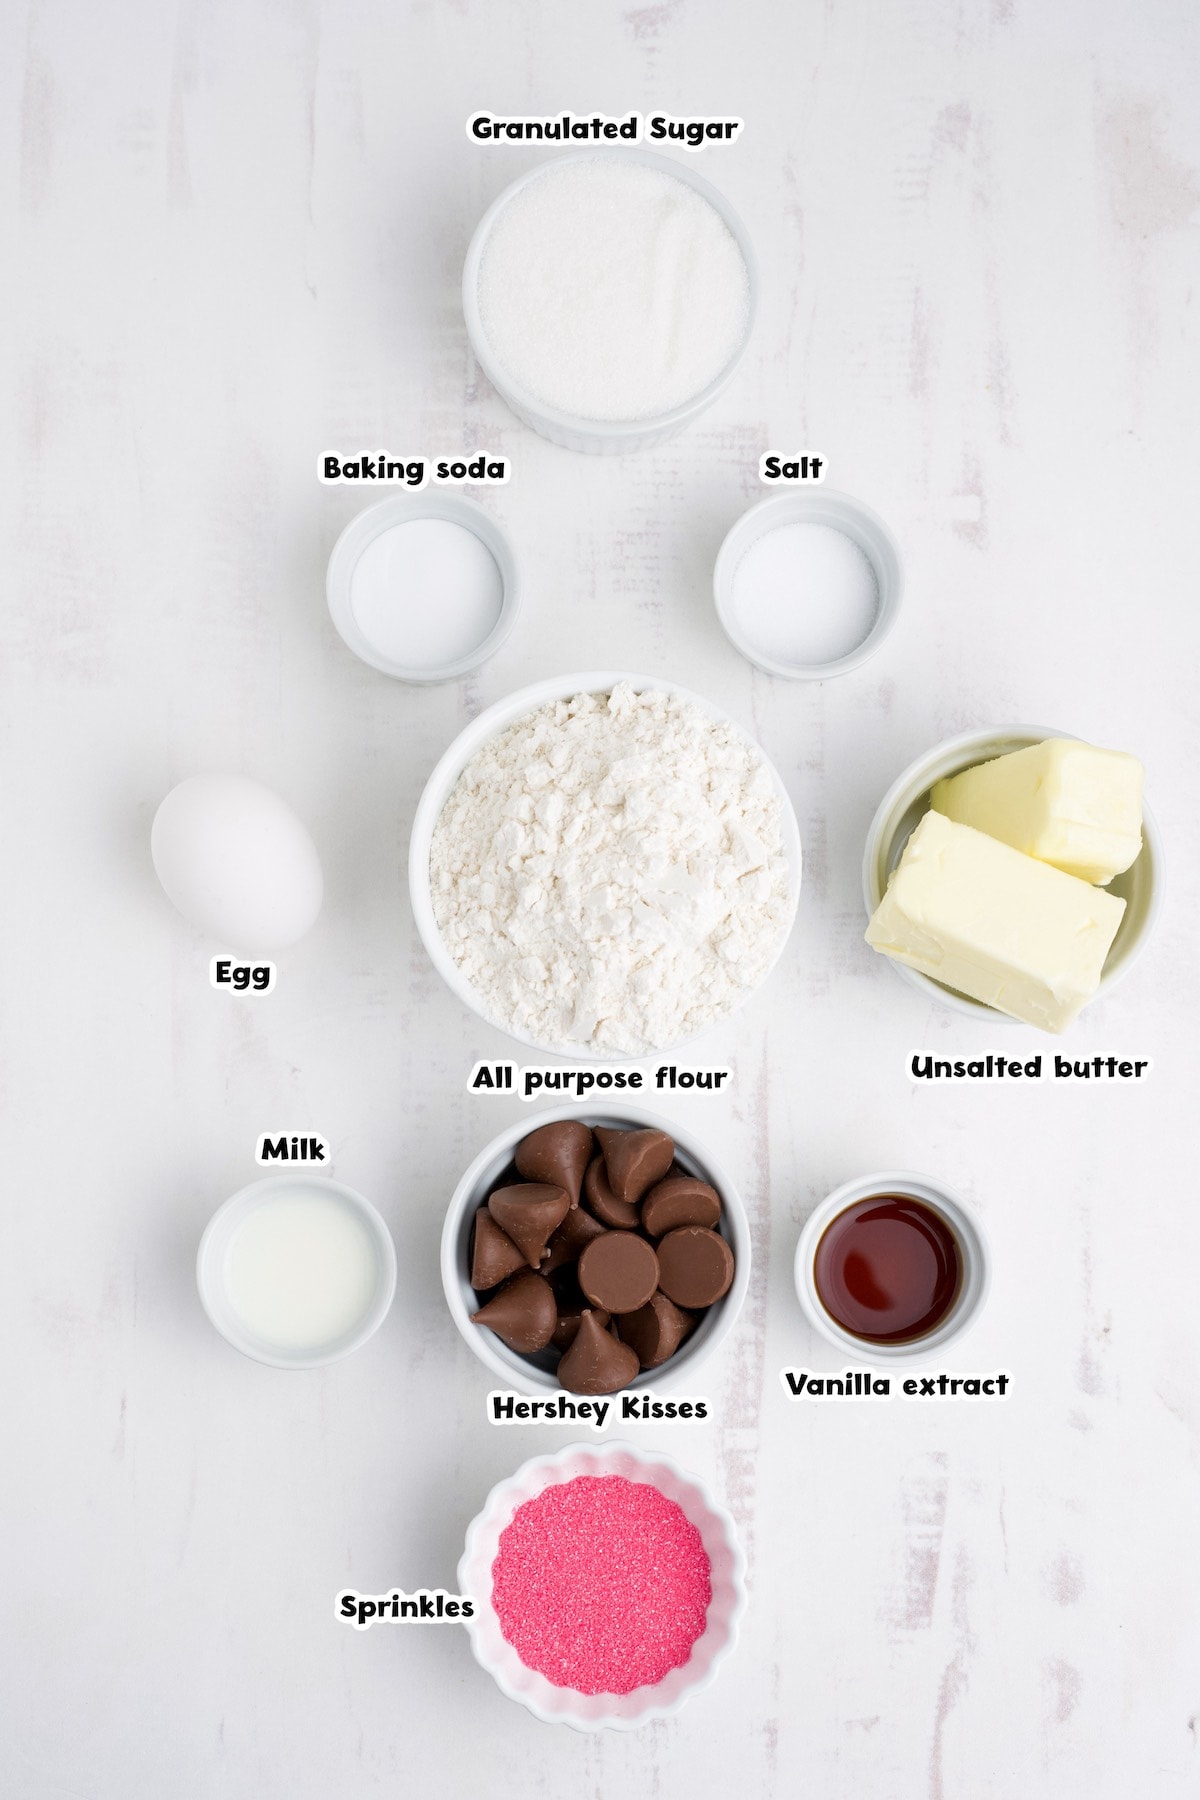
Spring Blossom Cookies Ingredients
- All purpose flour
- Baking soda
- Salt
- White granulated sugar
- Unsalted butter
- Egg
- Pure vanilla extract
- Milk (optional)
- Colored Sugar or sprinkles
- Hershey Kisses
Substitutions and Additions
- Choose Your Chocolate: You can use any flavor Hershey Kiss (milk, dark, white), Hershey’s Hugs, or even add a few mini Cadbury eggs in the middle of your holiday blossom cookies.
- Customize Your Colors: You can use any color of sanding sugar, sprinkles, or nonpareils for this recipe. I prefer using pastel-colored sugar to keep with the spring theme, but pink and white sugar will be pretty for Valentine’s Day, red and green will be great for Christmas, and multi-colored sprinkles will work well for birthdays.

Recommended Tools
- Parchment paper
- Whisk
- Electric mixer
- Cookie scoop
How to Make Spring Blossom Cookies
- Make The Flour Mixture: Whisk together the flour, baking soda, and salt. Set aside.
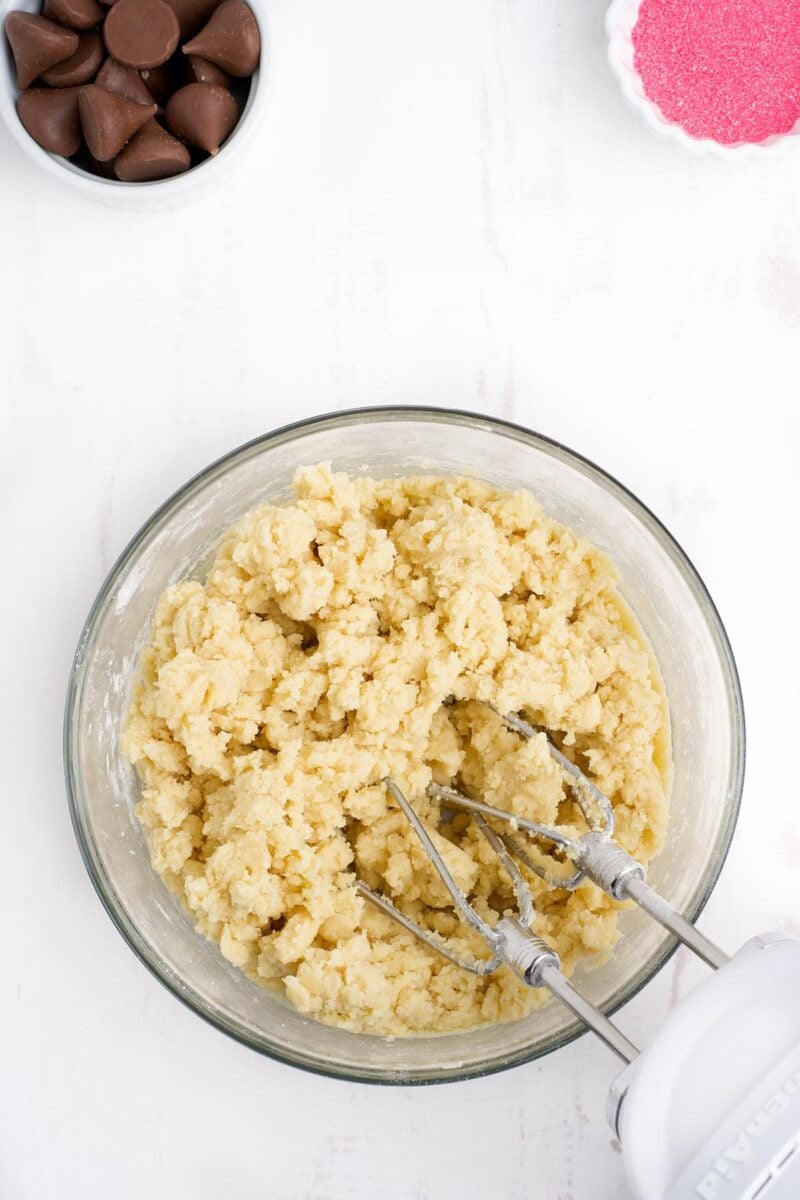
- Create The Cookie Dough: Mix together the sugar and butter until light and fluffy. Add the egg and vanilla extract and continue mixing. Mix in the flour mixture, ½ cup at a time until Fully incorporated.
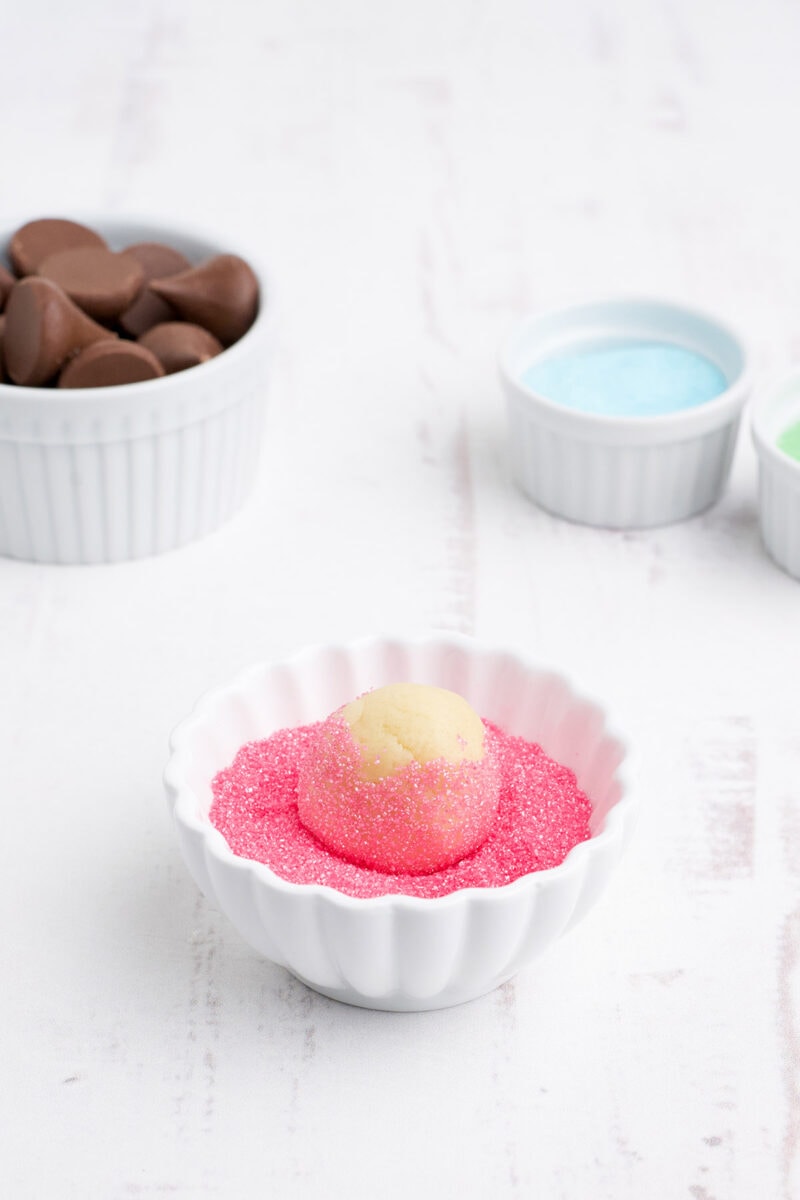
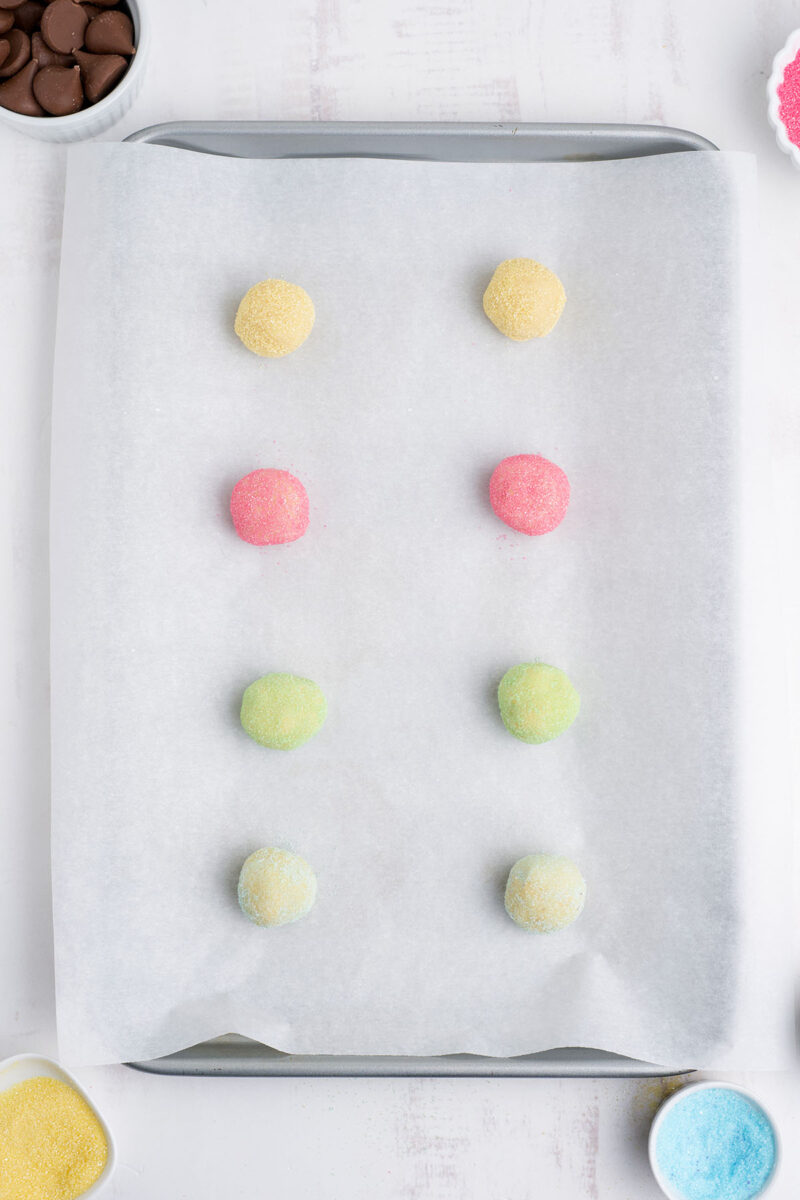
Pro Tip: The dough should have the consistency of play dough. Add optional milk or more flour to reach desired consistency. - Coat The Cookies: Scoop the dough into balls and roll them in colored sugar.
- Bake: Bake at 350 degrees Fahrenheit for 8-10 minutes or until the edges begin to turn light brown.
- Top With A Kiss: Place a Hershey Kiss in the center of each cookie.
- Serve: Cool and serve. Enjoy!
Melted Or Unmelted Middle?
Want your Hersey Kisses to stay super soft on the cookies? Simply add the cookies back into the oven for 30 seconds after placing the Hershey Kisses on top or try twisting the kisses as you press them in the cookie.
Tips For Making Spring Blossom Cookies
- The dough should have the consistency of playdough. You should be able to easily roll balls between your hands, without them sticking to your fingers.
- If the dough is too sticky to form balls, add 1-2 Tablespoons of flour until it can be handled.
- If the dough is too dry and you have to force dough balls together, add the optional 1-2 Tablespoons milk until desired consistency is reached.
- This recipe does not need chilling! However, you CAN chill ahead of time if preferred. It works either way!
- I recommend unwrapping your Hershey Kisses beforehand so you are ready to press them into cookies as soon as they are out of the oven.
- The cookies will still be soft when they come out of the oven and will firm up as they cool. That is why it is helpful to work on parchment paper for these cookies.
How to Store Spring Blossom Cookies
- To Store: Store your cooled cookies in an airtight container and keep them at room temperature for 3-4 days. You can also refrigerate them for a few weeks.
- To Freeze: Place the cooled cookies in a freezer-safe container and store them in the freezer for up to 6 months. Be aware that the temperature change might cause the chocolate kisses to “bloom.” It may not look pretty but it will still taste delicious.

More Easy Spring Recipes


More Easy Cookie Recipes

Spring Blossom Cookies
Ingredients
- 2 cups all purpose flour
- ½ teaspoon baking soda
- ¼ teaspoon salt
- 1 cup white granulated sugar
- ½ cup unsalted butter room temperature
- 1 egg
- 2 teaspoons pure vanilla extract
- 1 Tablespoon milk (optional)
- Colored Sugar/Sprinkles for rolling
- 24 Hershey Kisses
Instructions
- Preheat the oven to 350 degrees and prepare a baking sheet by lining with parchment paper. Set aside.
- In a medium bowl, whisk together the flour, baking soda and salt until well combined. Set aside.
- In a large bowl, use an electric mixer on medium low speed to combine the granulated sugar and butter until light and fluffy.
- Add the egg and vanilla extract and continue mixing until fully mixed.
- Slowly add the flour mixture, ½ cup at a time until everything is well incorporated. The dough should have the consistency of playdough. Add optional milk or more flour to reach desired consistency.
- Use a small cookie scoop to roll cookie dough balls.
- Roll the dough balls in colored sugar and place on the prepared baking sheet.
- Bake for 8-10 minutes or until the edges begin to turn light brown.
- Remove from the oven and place a Hershey Kiss in the center of each cookie.
- Allow to cool completely, then serve.
Jenn’s Notes
- To Store: Store your cooled cookies in an airtight container and keep them at room temperature for 3-4 days. You can also refrigerate them for a few weeks.
- To Freeze: Place the cooled cookies in a freezer-safe container and store them in the freezer for up to 6 months. Be aware that the temperature change might cause the chocolate kisses to “bloom.” It may not look pretty but it will still taste delicious.
- The dough should have the consistency of playdough. You should be able to easily roll balls between your hands, without them sticking to your fingers.
- If the dough is too sticky to form balls, add 1-2 Tablespoons flour until it can be handled.
- If the dough is too dry and you have to force dough balls together, add the optional 1-2 Tablespoons milk until desired consistency is reached.
- This recipe does not need chilling! However, you CAN chill ahead of time if preferred. It works either way!
- I recommend unwrapping your Hershey Kisses beforehand so you are ready to press them into cookies as soon as they are out of the oven.
- The cookies will still be soft when they come out of the oven and will firm up as they cool. That is why it is helpful to work on parchment paper for these cookies.
- How do I know my cookies are done? The edges should begin to get golden brown and the shine will be completely gone from the cookies


what brand of colored sugars do you use? Mine are so light I can barely tell that I had any on the cookies.
I used this brand. https://amzlink.to/az0zSVQHYVyCi
I can’t wait to try these cookies!
Just made these today! Came out perfect! Can’t wait to try the Birds Nest Cookies. Those are next!