This post may contain affiliate links. Please read our disclosure policy.
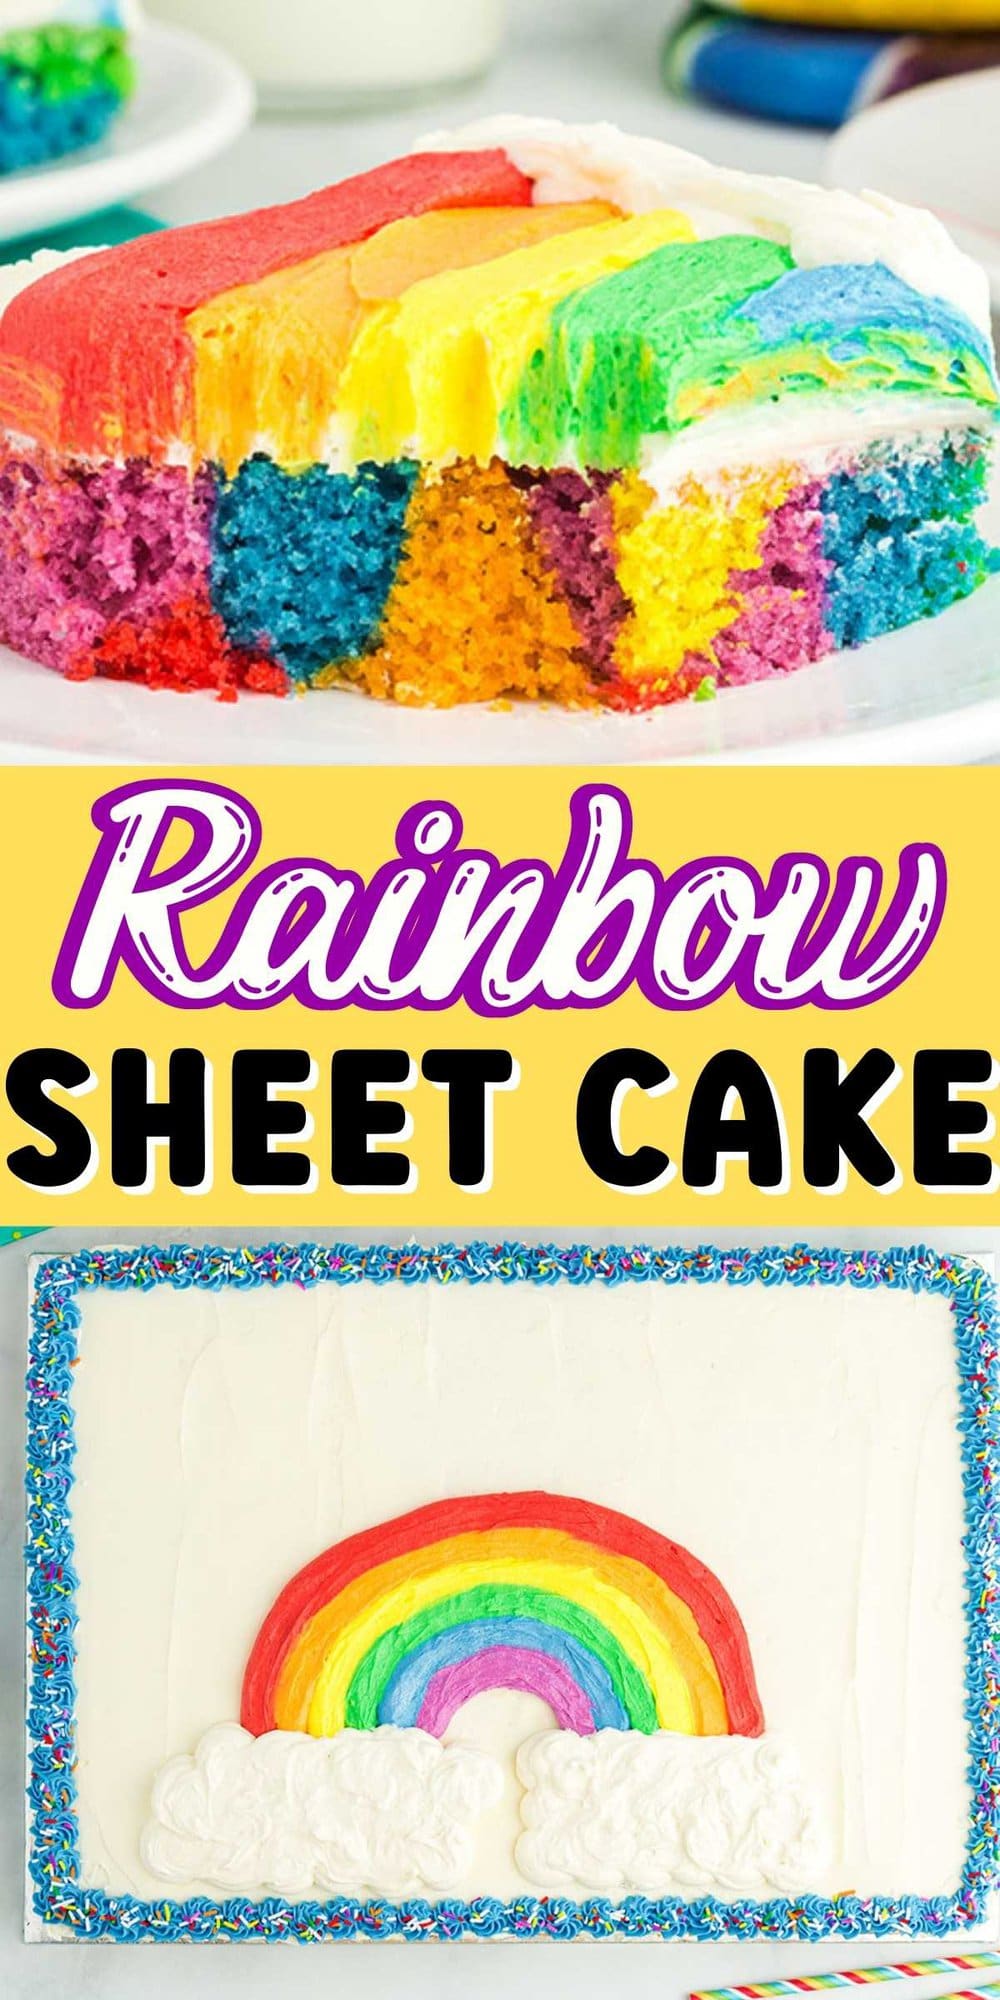
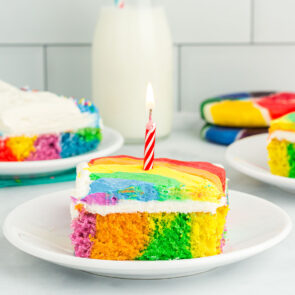
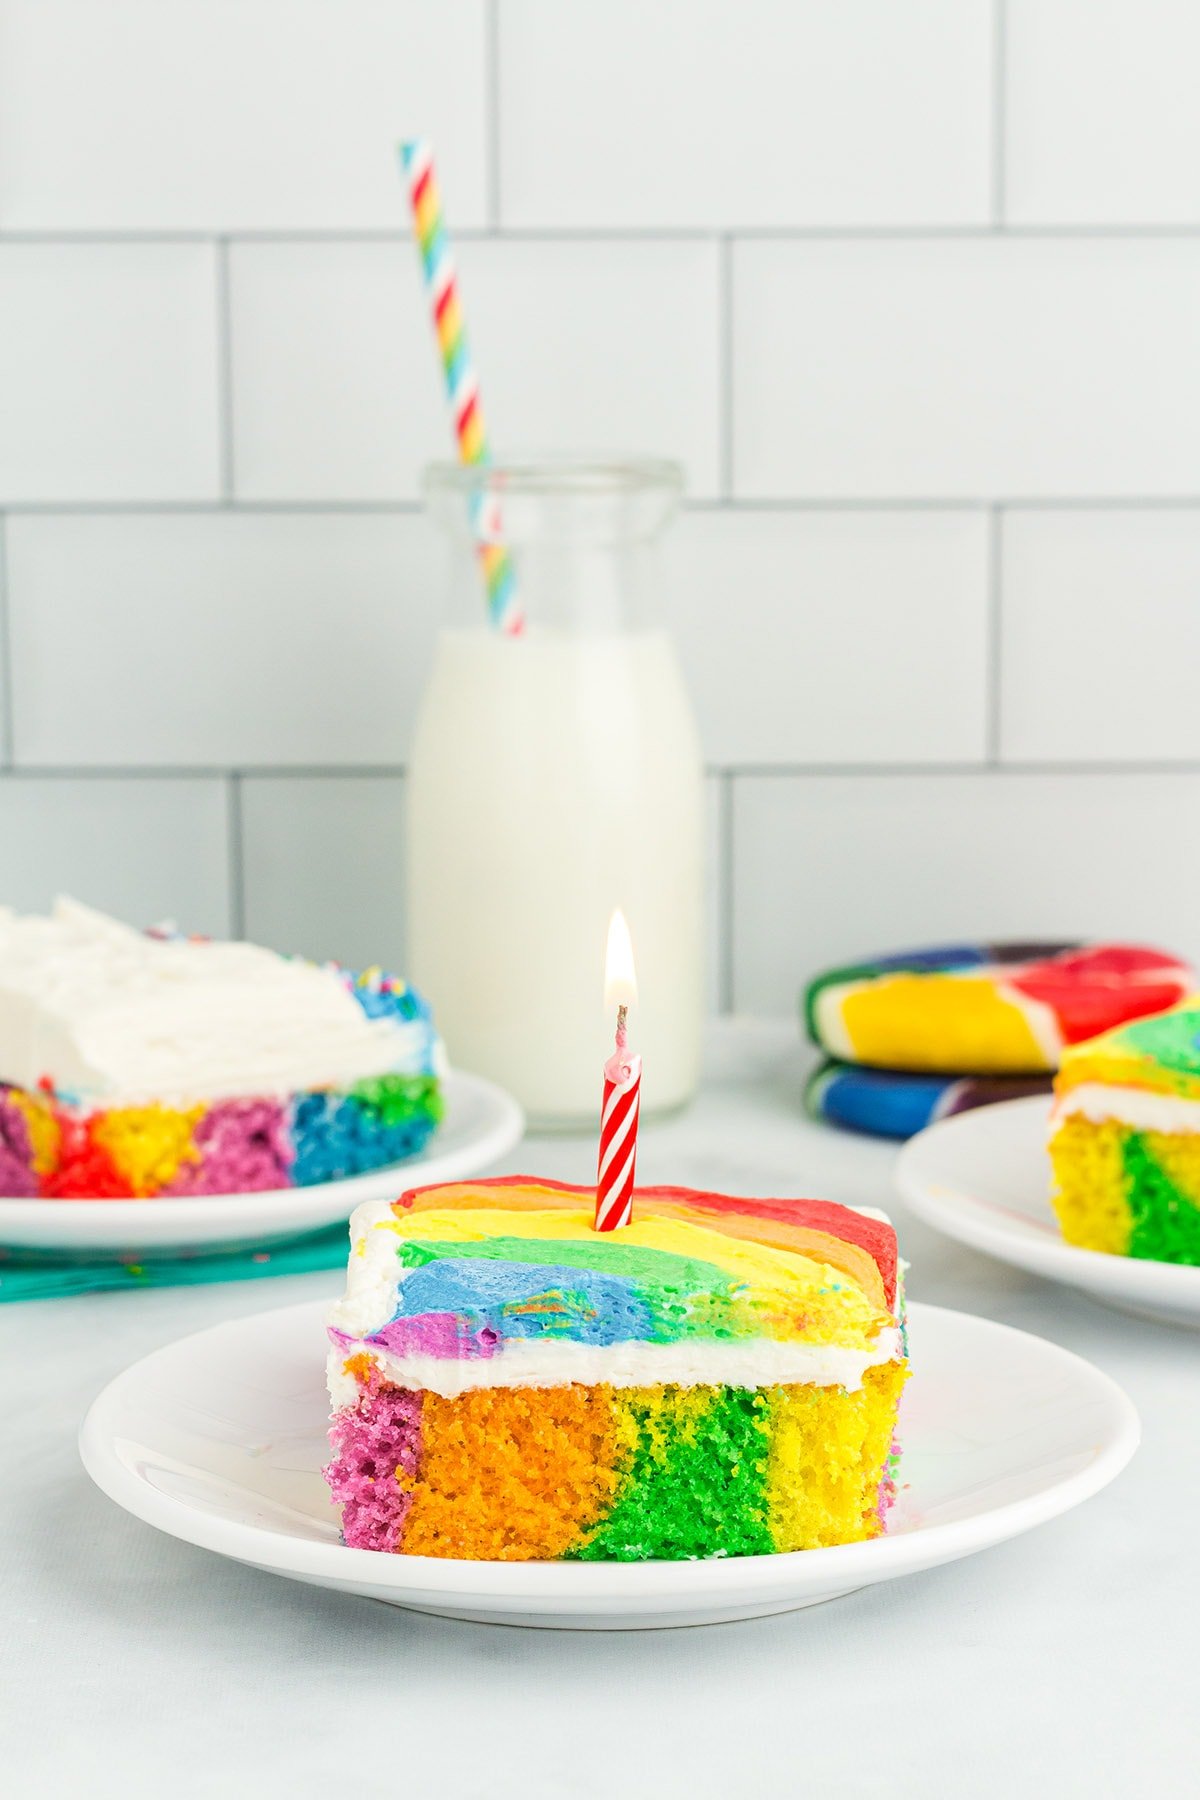
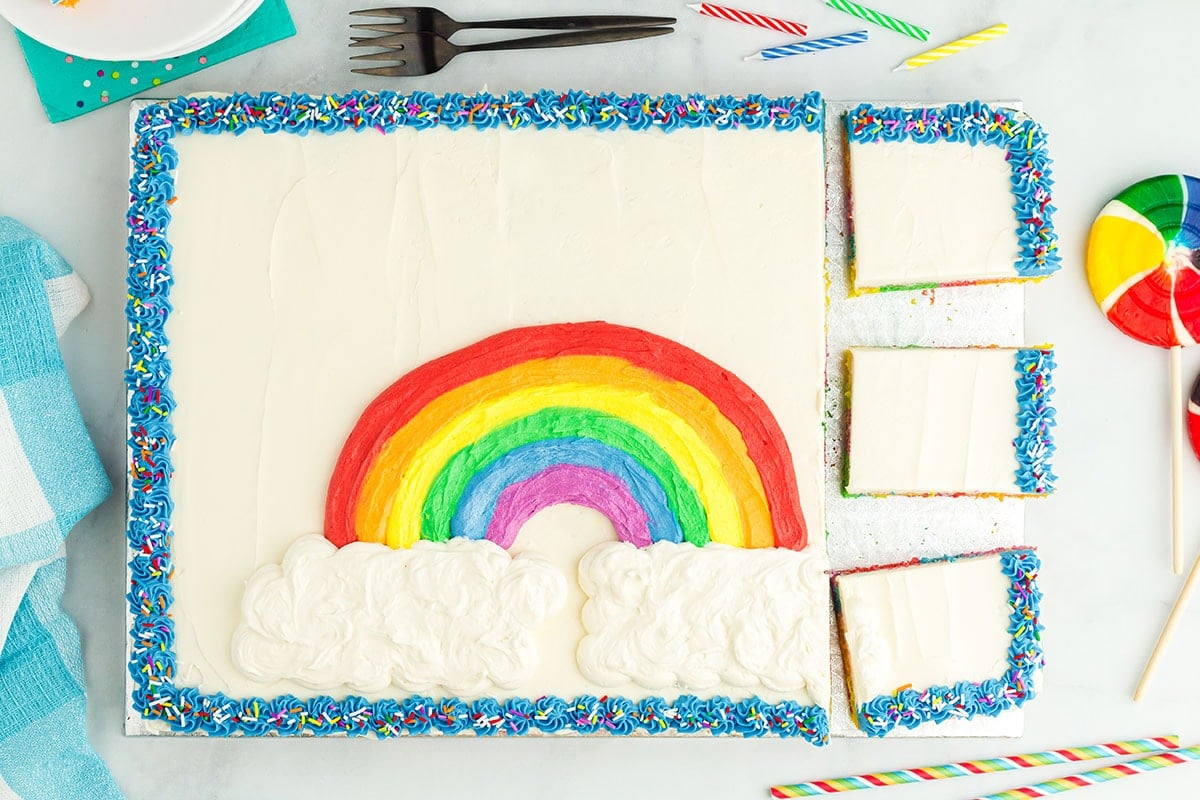
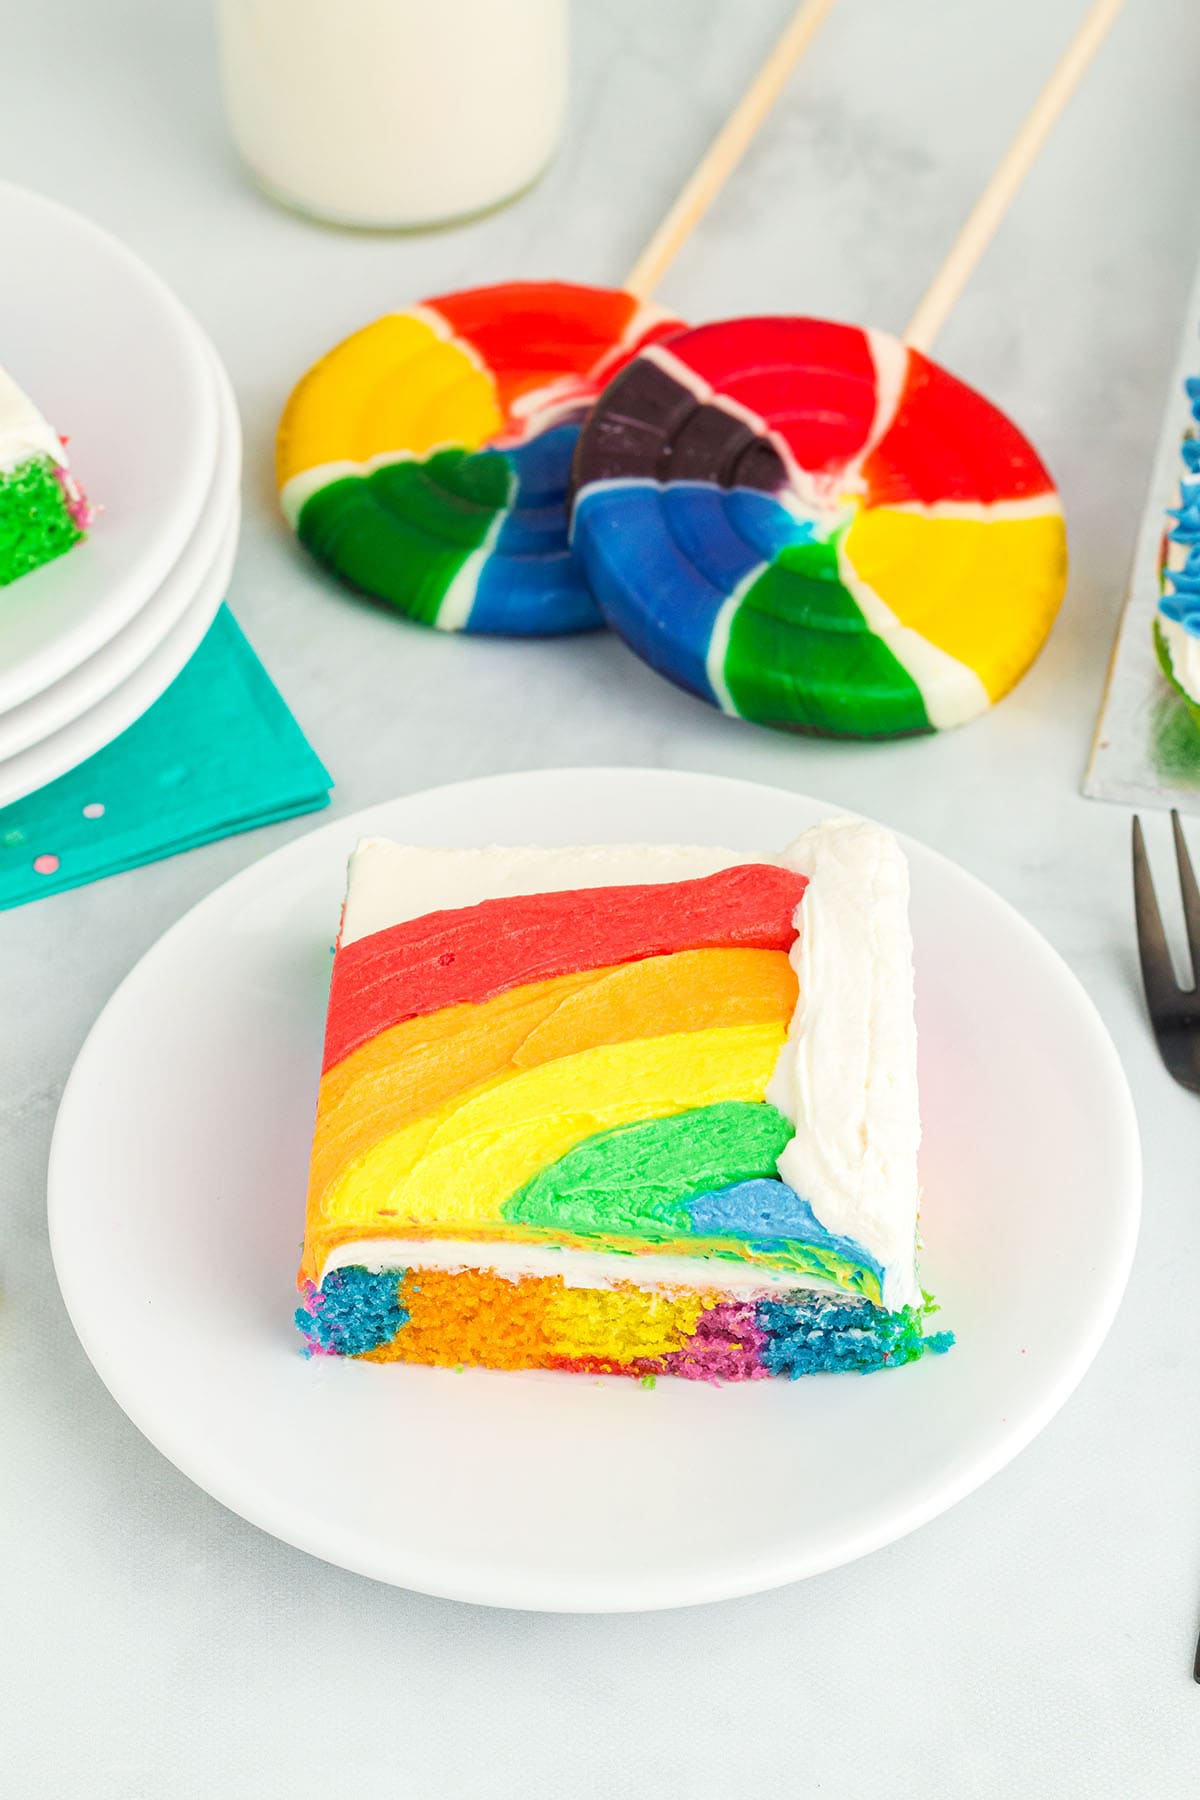
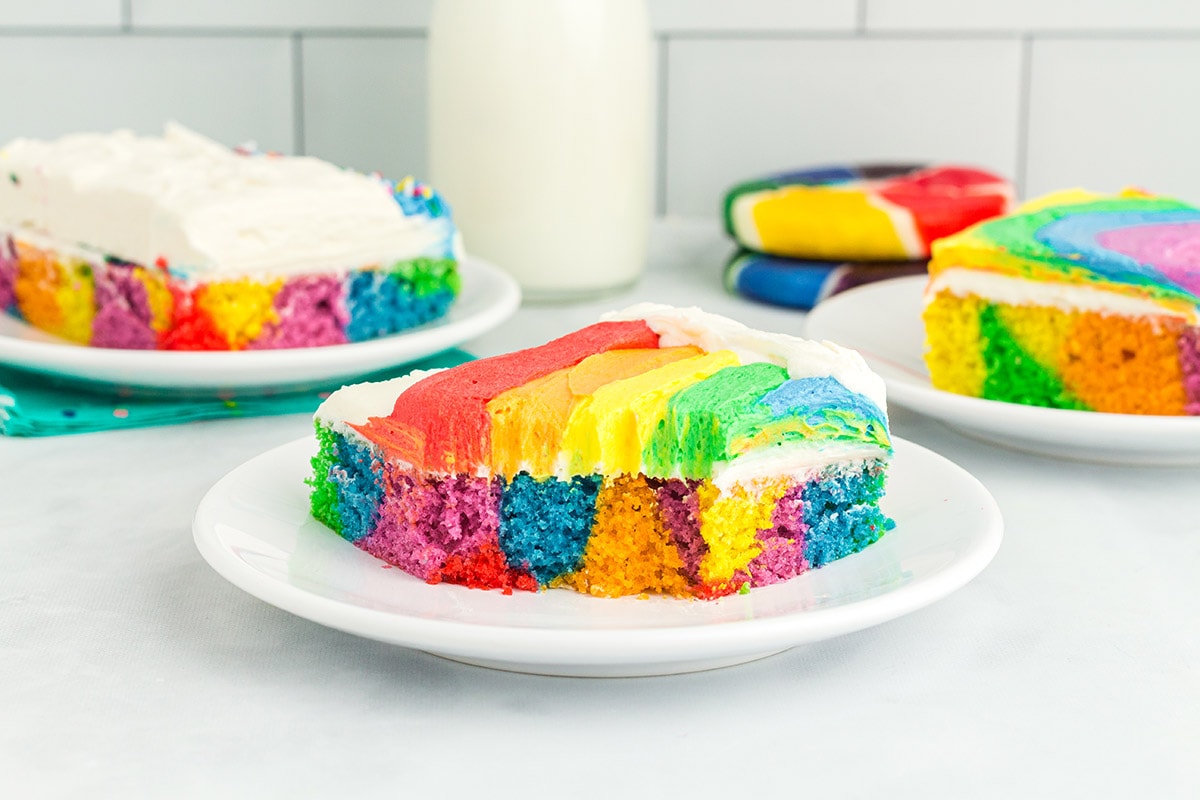
Get ready to surprise your guests with a multi-colored slice of homemade Rainbow Sheet Cake frosted with fluffy buttercream and decorated with a rainbow design.
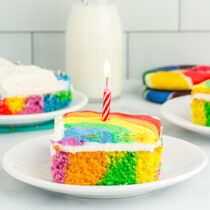
Rainbow Sheet Cake
Our easy Rainbow Sheet Cake recipe is a fun way to make a from-scratch colorful cake using a handful of kitchen staple ingredients for baking a vanilla cake and covering it with creamy frosting.
This recipe for rainbow cake takes no time to prepare; it’s as simple as coloring the cake batter in 6 different colors and randomly placing spoonfuls of the colored batter around the baking sheet.
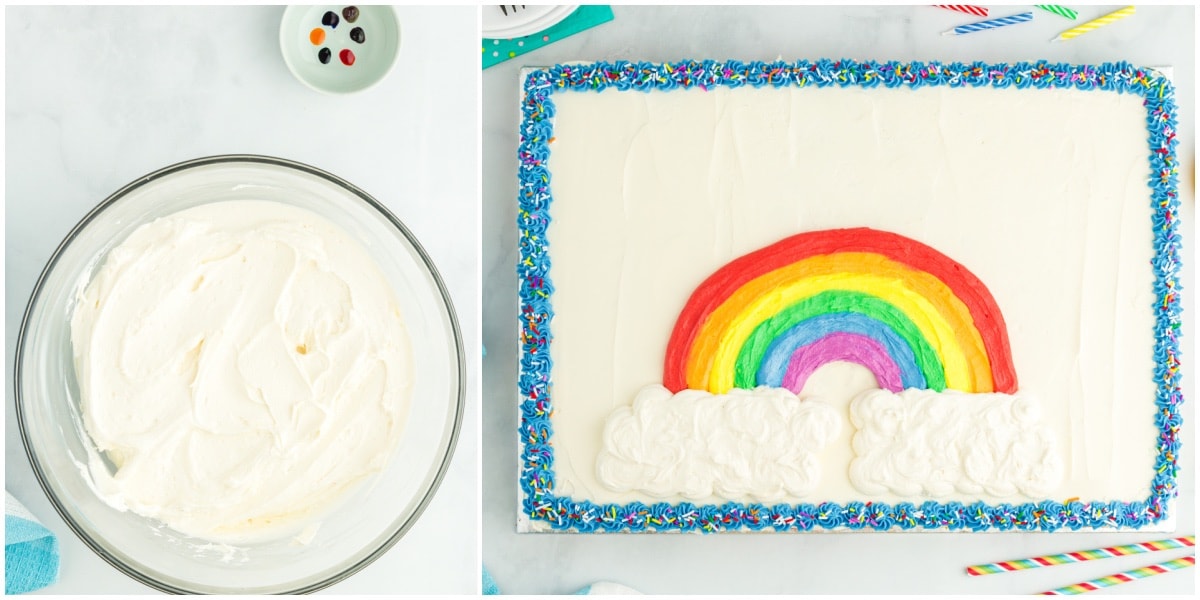
Bake your cake, smooth a layer of light whipped frosting on top, and decorate your dessert with rainbows, sprinkles, or pipe on any pretty pattern you desire.
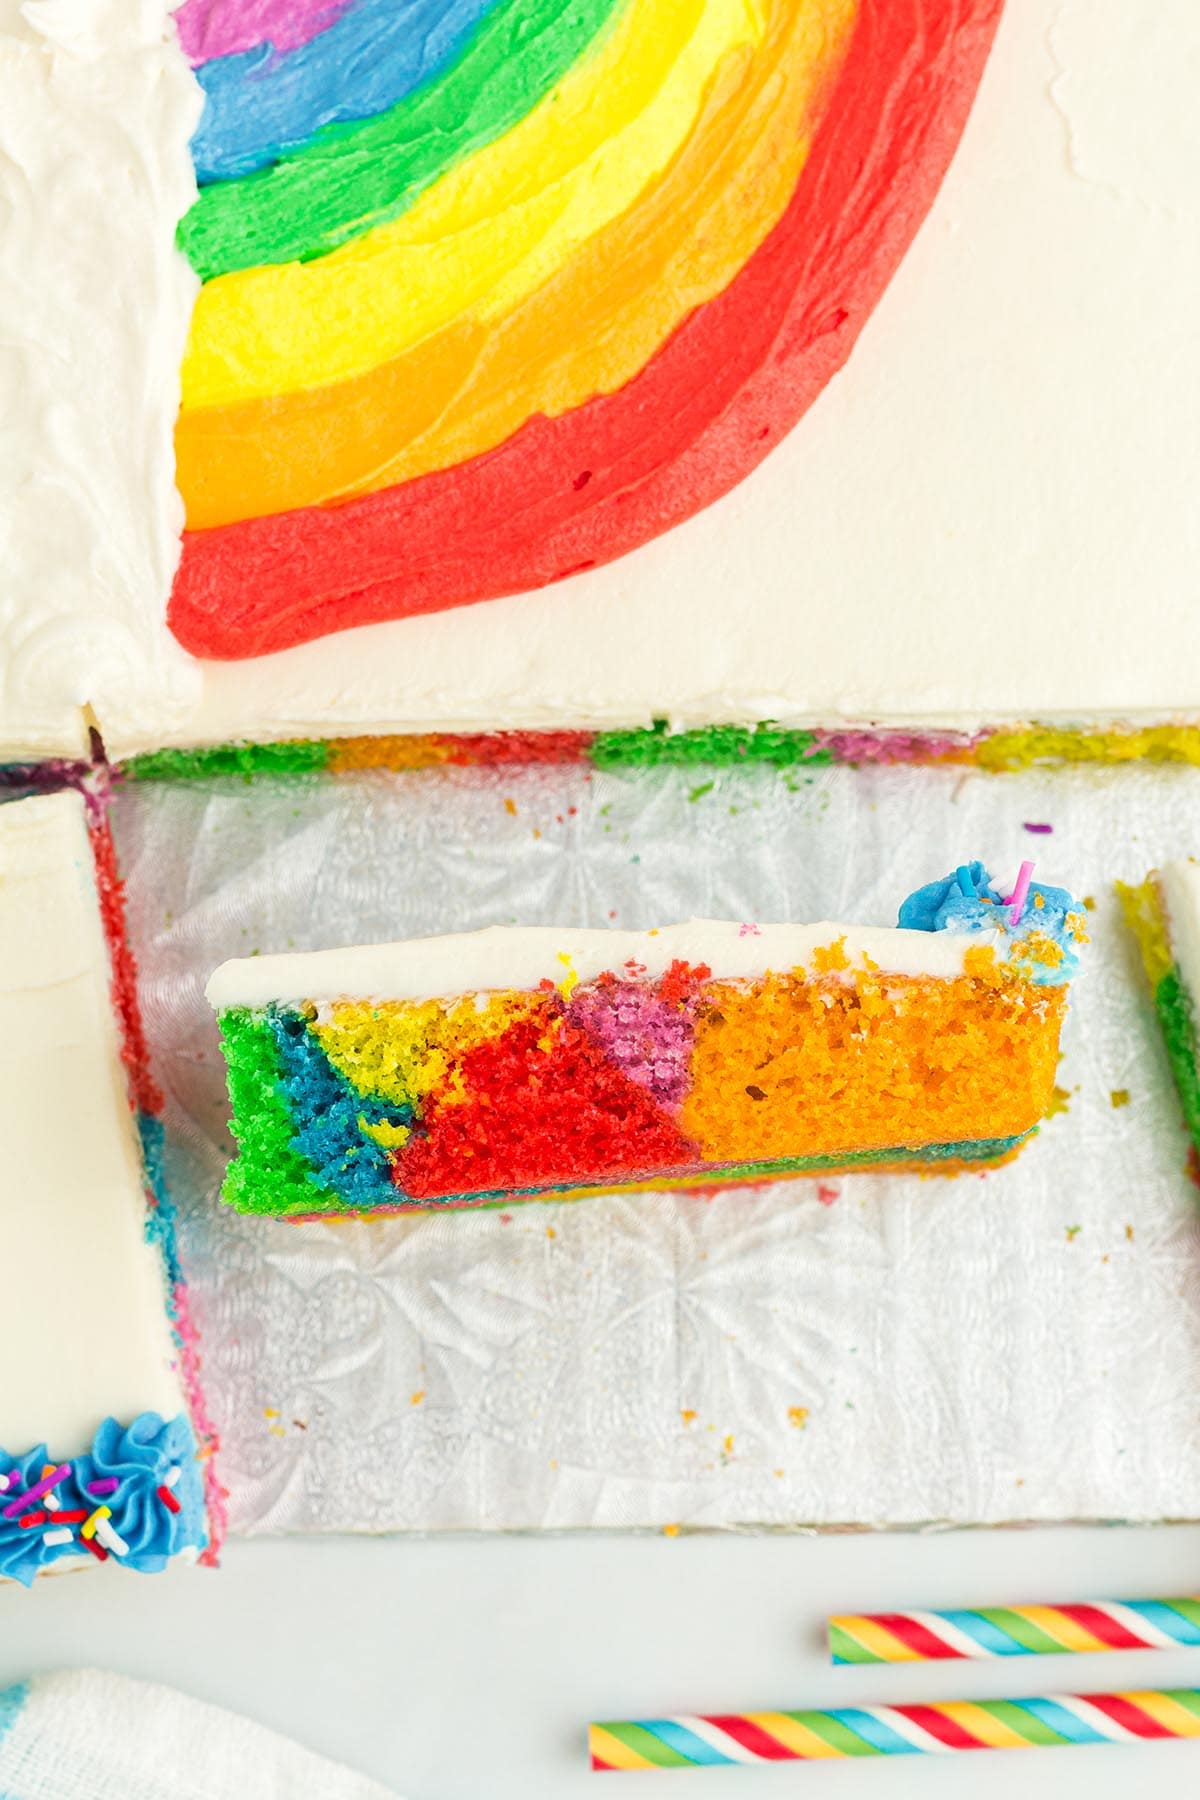
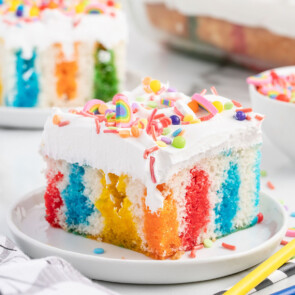
Slice a rainbow birthday sheet cake to add a pop of color to any party and reveal an array rainbow colors hidden beneath the buttercream.
Why We Love Rainbow Sheet Cakes
- Quick and easy to make in under 45 minutes from start to finish.
- Uses a handful of simple ingredients.
- Beautifully bright and bursting with vibrant colors.
- Customize your cake with a few colors or all the colors of the rainbow.
- Perfect for birthday parties, unicorn parties, Pride month, Easter and St. Patrick’s Day celebrations, or to make your day more colorful.
Recipe Name Ingredients
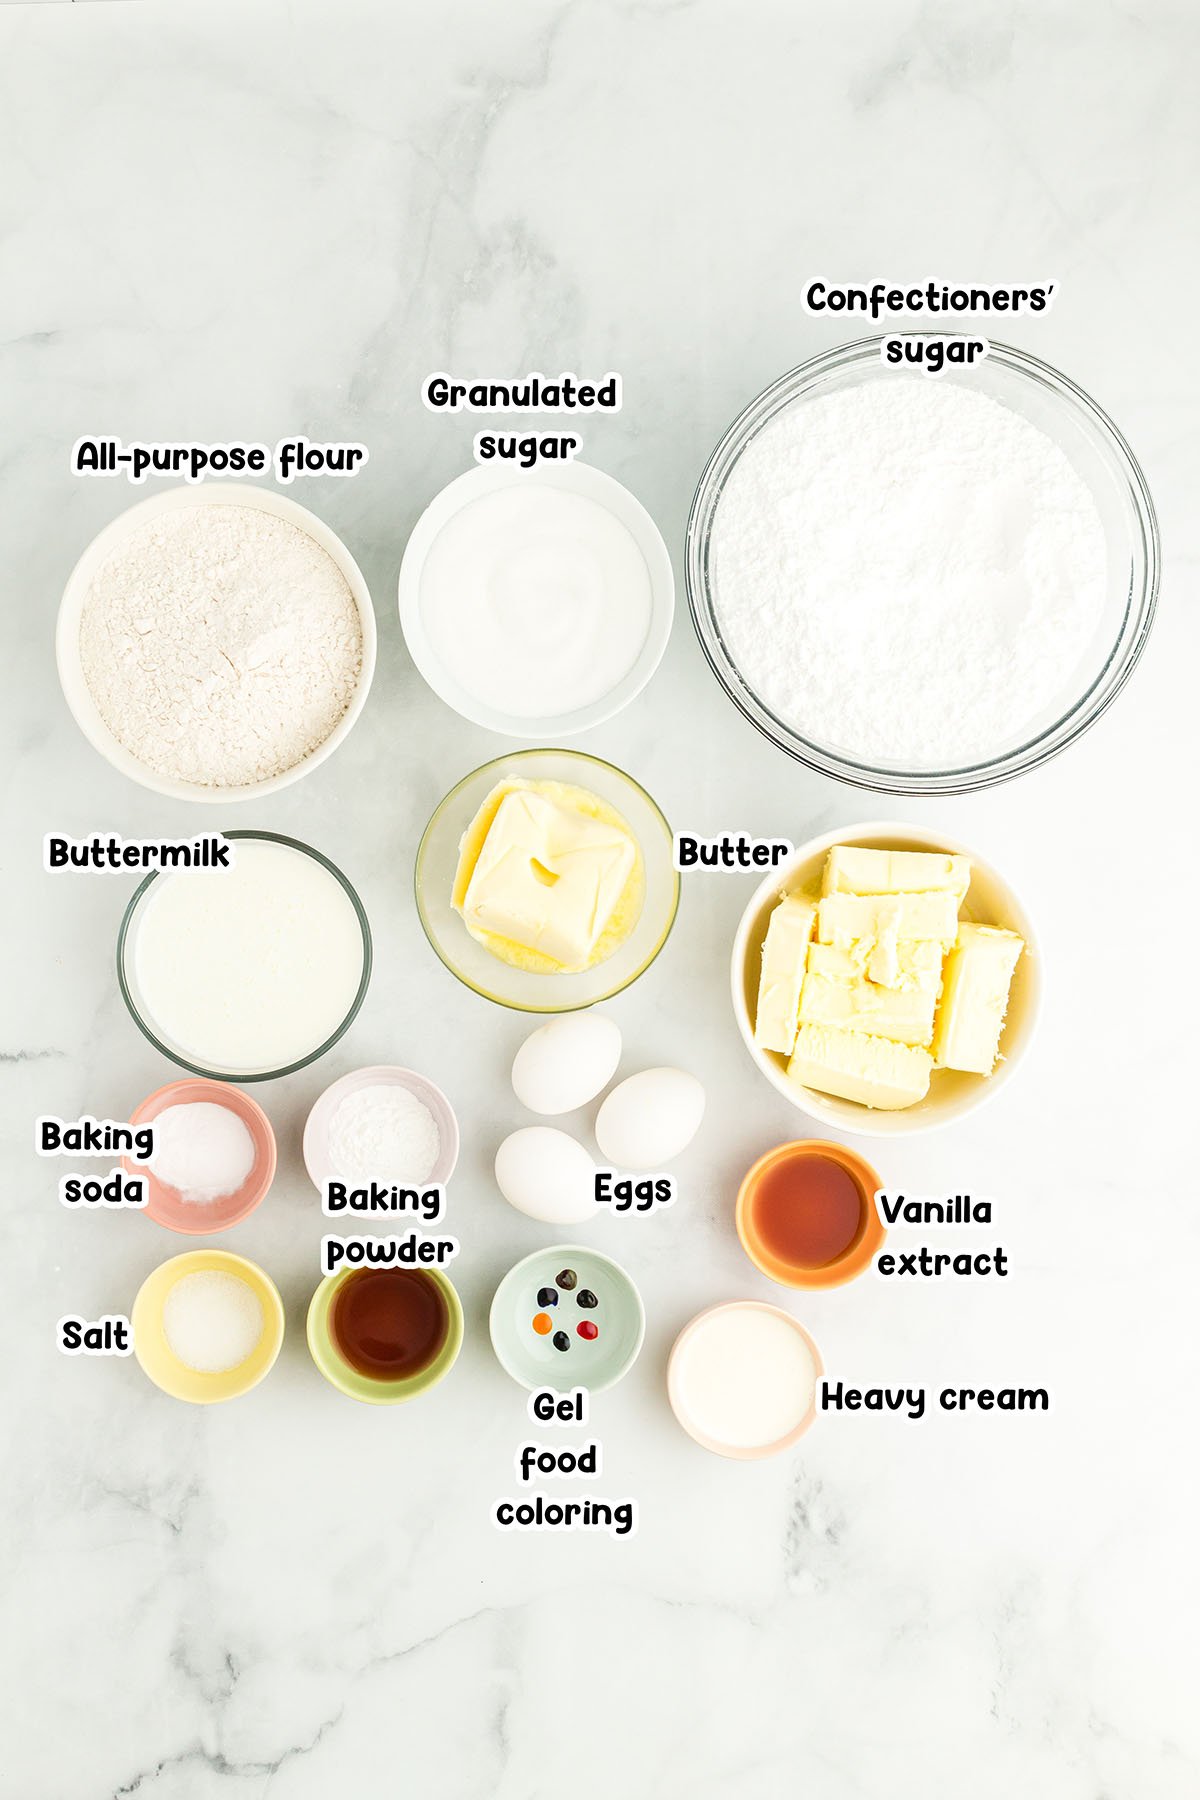
- All-purpose flour
- Baking powder
- Baking soda
- Salt
- Unsalted butter
- Granulated sugar
- Eggs
- Vanilla extract
- Buttermilk
- Confectioners’ sugar or powdered sugar
- Heavy cream
- Gel food coloring: red, orange, yellow, green, blue, purple
Substitutions and Additions
- Substitute With Store-Bought Frosting: Preparing this homemade frosting truly takes no time, but you can buy a buttercream frosting or fondant if you prefer.
- Customize Your Cake Colors: This recipe is easy to customize for any themed party or holiday. Simply switch up the gel food colors to match your celebration. Make yellow, brown, and orange cookies for Halloween, red, pink, and white for Valentine’s Day, or red, white, and blue for Fourth of July.
- Use A Cake Mix: There’s no shame in baking from a box! Feel free to use a white cake mix or French vanilla cake mix instead of making the cake from scratch.
Recommended Tools
- Measuring cups and measuring spoons
- Mixing bowls
- 18” x 13” sheet cake pan
- Parchment paper
- Non-stick cooking spray
- Spatula
- Electric mixer
- Icing piping bags
- Wilton icing tips 21 and 1A
How to Make Rainbow Sheet Cake
- Make The Dry Mixture: Whisk together the flour, baking powder, baking soda, and salt. Set aside.
- Make The Wet Mixture: Beat together the butter and sugar until creamy, scraping down the sides of bowl. Beat in the eggs and vanilla until light and fluffy, then mix in the buttermilk until combined.
Pro Tip: The mixture may look a bit curdled but it’s okay – it will all come together nicely in the end. - Create The Cake Batter: Beat the dry ingredients into the wet ingredients, using a spatula to scrape down the sides and bottom of the bowl.
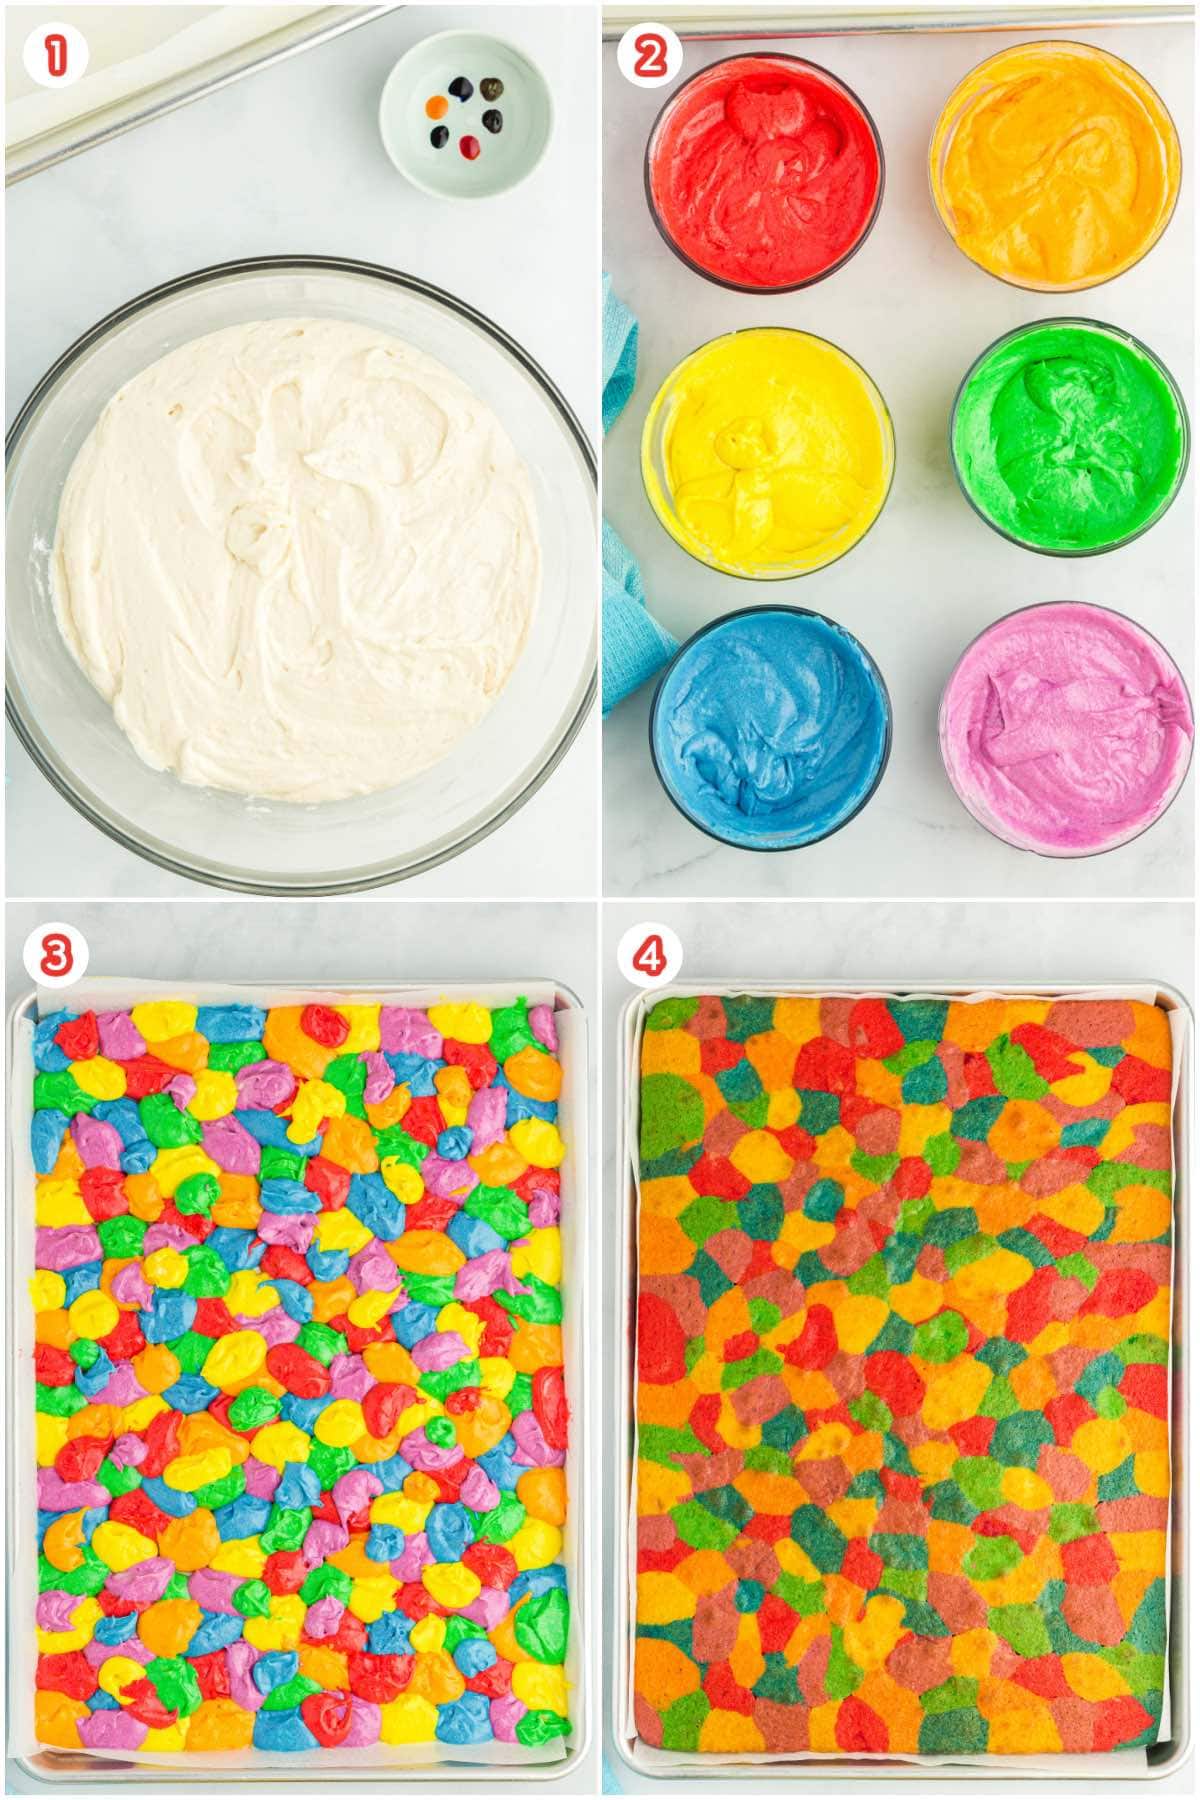
Pro Tip: Do not overmix, or your cake will bake up to a gummy-type texture. - Color The Cake Batter: Separate the cake batter equally into 6 small bowls. and stir different food coloring into each.
- Bake The Cake: Spoon different colors of cake batter around the baking sheet and bake at 350 degrees Fahrenheit for 27 to 28 minutes. Cool completely in the pan before frosting.
- Form The Frosting: Beat the confectioners’ sugar, butter, heavy cream, and vanilla until light and fluffy.
Pro Tip: Add a tablespoon of heavy cream if the frosting seems too thick. - Decorate Your Dessert: Smooth a layer of frosting over the top of the cake then decorate with a rainbow, clouds, and a blue border.
- Serve: Slice, serve, and enjoy!
How To Measure The Flour
It is important to measure the flour accurately. Too much or too little flour will affect how the cake turns out. To accurately measure the flour, either use a food scale to measure out the grams exactly or use the spoon and scoop method.
The spoon and scoop method means you put the measuring cup on the counter then use a spoon to scoop flour directly out of the bag and lightly place it into the cup. If you use the measuring cup to scoop directly from the bag, you’ll likely end up with 25% more flour than you need. This is because the flour gets packed down into the cup.
How To Decorate Your Rainbow Cake
If you want to create the same style rainbow as this cake, follow these simple steps: In separate small bowls, color about 2 tablespoons of frosting purple, 2 tablespoons blue, 3 tablespoons green, 3 tablespoons yellow, 4 tablespoons orange and 4 tablespoons red. Place the colored icings each into their own icing bags fitted with a Wilton 1A tip (large round tip).
Start with a small half circle of purple for the bottom of the rainbow. Start in the bottom half area of the cake, closer to the bottom if you want to fit writing over the rainbow, or more in the middle if you want the rainbow more centered. Then blue above the purple, green above the blue, yellow above the green, orange above the yellow, then red at the top of the rainbow. Use a Wilton 1A tip to create fluffy white clouds around both sides of the bottom of the rainbow.
If you want to blend these colors together more after they are piped, use an angled icing spatula to lightly smooth over the colors. Be careful not to smear all the colors together though.
Tips For Making The Best Rainbow Sheet Cake
- For these bright colors, I used the brand Chefmaster Liqua-gel: super red, neon brite orange, lemon yellow, leaf green, neon brite blue and neon brite purple.
- Make sure you bring the refrigerated items to room temperature before mixing to help all the ingredients to combine correctly.
- Try to use small spoonfuls of cake batter when assembling so that each cake slice will have a variety of colors once baked.
How to Store Rainbow Sheet Cake
- To Store: The cake can remain at room temperature, wrapped well in food-safe plastic wrap, for up to 3 days or in the refrigerator for up to a week.
- To Freeze: Freeze the leftovers, wrapped tightly in food-safe plastic wrap then placed into a sealed food safe container, for up to a year. Bring the cake back to room temperature before slicing and serving.
More Easy Rainbow Recipes


Other Easy Cake Recipes
Rainbow Sheet Cake
Ingredients
Cake:
- 2½ cups (350 grams) all-purpose flour
- 2 teaspoons baking powder
- 1 teaspoon baking soda
- 1 teaspoon salt
- 1 cup (227 grams) unsalted butter softened (cold butter from fridge heated for about 40 seconds in the microwave)
- 1½ cups (300 grams) granulated sugar
- 3 large eggs room temperature
- 1 tablespoon vanilla extract
- 1 cup buttermilk room temperature
- gel food coloring: red, orange, yellow, green, blue, purple
Frosting:
- 6 cups (720 grams) confectioners’ sugar
- 2 cups (454 grams) unsalted butter slightly melted (if cold from fridge, about 40 seconds in the microwave)
- 3-4 tablespoons heavy cream 35%
- 2 teaspoons vanilla extract
Instructions
- Preheat oven to 350 degrees F.
- Line one 18” x 13” sheet cake pan with parchment paper (leave parchment paper slighter higher than the sides of the pan so it’s easier to lift the cake out after). Spray lightly with non-stick cooking spray then set aside.
- In a medium bowl, whisk together flour, baking powder, baking soda and salt. Set aside.
- In a separate large bowl, beat (on high speed) together butter and granulated sugar until well combined and creamy (about two minutes). Use spatula to scrape down sides of bowl.
- Add eggs and vanilla into the butter mixture and beat on high until light and fluffy (about 1 minute).
- Beat buttermilk into the wet mixture just until combined (about 30 seconds). The mixture may look a bit curdled but it’s okay – it will all come together nicely in the end.
- Beat dry ingredients into the wet ingredients just until combined (using a spatula to scrape down sides and bottom of bowl). Do not overmix or your cake will bake up to a gummy-type texture.
- Separate the cake batter equally into 6 small bowls. This works out to be about 215 grams of cake batter per bowl.
- Color one bowl of batter red, one orange, one yellow, one green, one blue and one purple. Stir in the food coloring just until combined but try not to overmix.
- Using spoons (one spoon per color of cake batter), randomly place different colors of cake batter around the prepared baking sheet. Try to do small spoons of cake batter so each cake slice will have a variety of colors in it once baked.
- Bake in oven for 27 to 28 minutes or until toothpick inserted in middle comes out clean.
- Remove cake from oven and let cool completely in pan before frosting.
- Frosting Directions: In a large bowl, beat the confectioners’ sugar, butter, heavy cream and vanilla until light and fluffy (about 5 minutes). If the frosting seems too thick, beat in an additional tablespoon of heavy cream.
- Smooth an even layer of white frosting over the top of the cake then frost on your desired style of rainbow or other cake decorating style.
- To create the same style of rainbow as this cake: In separate small bowls, color about 2 tablespoons of frosting purple, 2 tablespoons blue, 3 tablespoons green, 3 tablespoons yellow, 4 tablespoons orange and 4 tablespoons red. Place the colored icings each into their own icing bags fitted with a Wilton 1A tip (large round tip).
- Start with a small half circle of purple for the bottom of the rainbow. Start in the bottom half area of the cake – closer to the bottom if you want to fit writing over the rainbow or more in the middle if you want the rainbow more centered. Then blue above the purple, then green above the blue, then yellow above the green, then orange above the yellow then red at the top of the rainbow. If you want to blend these colors together more after they are piped, use an angled icing spatula to lightly smooth over the colors. Be careful not to smear all the colors together though.
- Use a Wilton 1A tip to create fluffy white clouds around both sides of the bottom of the rainbow.
- Color the remainder of the frosting blue then place this in an icing bag with a Wilton 21 icing tip (open star tip) and pipe a border around the top of the cake. Add sprinkles if desired.
- The cake can remain at room temperature (wrapped well in food-safe plastic wrap) for up to 3 days. After 3 days, refrigerate or freeze the leftovers (wrapped tightly in food-safe plastic wrap then placed into a sealed food safe container). Bring the cake back to room temperature before serving.
Jenn’s Notes
- To Store: The cake can remain at room temperature, wrapped well in food-safe plastic wrap, for up to 3 days or in the refrigerator for up to a week.
- To Freeze: Freeze the leftovers, wrapped tightly in food-safe plastic wrap then placed into a sealed food safe container, for up to a year. Bring the cake back to room temperature before slicing and serving.
- It is important to measure out the flour accurately. Too much or too little flour will affect how the cake turns out. To accurately measure the flour, either use a food scale to measure out the grams exactly or use the spoon and scoop method. The spoon and scoop method means you put the measuring cup on the counter then use a spoon to scoop flour directly out of the bag and lightly place it into the cup. If you use the measuring cup to scoop directly from the bag, you’ll likely end up with 25% more flour than you actually need. This is because the flour gets packed down into the cup.
- For these bright colors, I used the brand Chefmaster Liqua-gel in the colors: super red, neon brite orange, lemon yellow, leaf green, neon brite blue and neon brite purple.
- Make sure you bring the refrigerated items to room temperature before mixing to help all the ingredients to combine together properly.
- Try to use small spoonfuls of cake batter when assembling so that each cake slice will have a variety of colors in it once baked.