This post may contain affiliate links. Please read our disclosure policy.

Our homemade Bomb Pops are a blast from the past! Inspired by the classic ice cream truck treat, these layered patriotic popsicles bring back the perfect trio of Cherry, Lime, and Blue Raspberry flavors—now in a fun, frozen pouch. Cool off and relive summer days gone by with a refreshing, kid-friendly favorite.


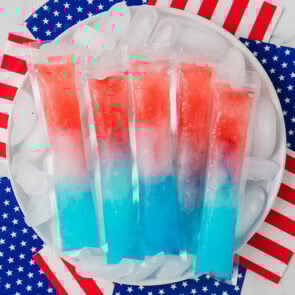
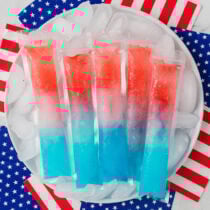
Patriotic Red, White, and Blue Popsicles
This homemade bomb pop recipe is the perfect way to showcase your American pride in a fun, festive, refreshing frozen package. Use fruit juices, sports drinks, or flavored yogurt to create the colorful layers, making them a customizable treat to beat the heat.
Because after all, the best part of the 4th of July is the food that accompanies the fireworks; that’s why you’ll love making homemade popsicles in portable pouches because you can grab one and get to the festivities fast!
Homemade popsicle recipes are great for backyard BBQs, pool parties, Memorial Day, Fourth of July, or Labor Day celebrations, and summer gatherings.
Ingredients

- Red Layer: Red Hawaiian Punch, Cherry juice, Cherry Kool-Aid, fruit punch, strawberry puree and sugar water, or a red sports drink. You pick!
- White Layer: Lemonade, Coconut milk, vanilla yogurt, limeade, white grape juice.
- Blue Layer: Blue Hawaiian Punch, Blue raspberry Kool-Aid, Blue sports drink, blueberry puree, blue raspberry juice.
See the recipe card for full information on ingredients and quantities.

How to Make Homemade Bomb Pops
- Blue Layer: Pour the blue liquid into each popsicle pouch, about ⅓ full. Freeze for 30-45 minutes, until slightly firm but not completely frozen.
- White Layer: Pour the lemonade over the frozen blue layer, filling another ⅓ of the pouch. Freeze for another 30-45 minutes.
- Red Layer: Pour the red liquid over frozen lemonade layer until filled to the top. Freeze until fully solid.
- Serve: Remove the popsicles from the disposable ice popsicle mold bags. Enjoy!

Recipe Tips
- Layer Consistency: To prevent the layers from mixing, make sure each layer is slightly frozen for 30-45 minutes before adding the next color.
- Avoid Air Bubbles: When pouring the liquids into the pouches, pour slowly to prevent air bubbles from forming in the layers.
- Easy Removal: To remove the popsicles easily from the pouches, run warm water over the outside of the pouches for a few seconds.

Variations For Bomb Pop Popsicles
- Cut The Calories: Use sugar-free juices or naturally flavored water to keep the ice pops low in sugar. You can add red or blue food coloring to create your desired hue.
- No popsicle pouch? No problem! Standard molds with popsicle sticks, small paper cups, or even silicone muffin cups make great bomb pop molds!
- Use Fresh Fruit: For the red layer, blend strawberries or watermelon, lemon juice, and sugar to taste. For the blue layer, make a blueberry mixture with blueberries, lemon juice, and sugar to taste. Add to a blender and puree until smooth.
- Make A Creamy Middle: For the white layer, mix vanilla yogurt with dairy milk, coconut milk, or almond milk. Added bonus: you’ll get a boost of protein and calcium too!
Proper Storage
Store popsicles in an airtight container or freezer-safe bag to prevent freezer burn. Enjoy within 2-3 weeks for the best taste and texture, although they will last for a few months if stored properly.

More Easy 4th of July Treats
- Red White And Blue Jello
- 4th of July Trifle
- 4th of July Rice Krispie Treats
- Red White and Blue Poke Cake
If you tried this Homemade Bomb Pops Recipe or any other recipe on my website, please leave a 🌟 star rating and let me know how it went in the 📝 comments below. Thanks for visiting!!!
Homemade Bomb Pops
Ingredients
Blue Layer
- 1 cup blue Hawaiian punch, blue Kool Aid or blue sports drink
White Layer
- 1 cup lemonade or a mix of water and white grape juice
Red Layer
- 1 cup red Hawaiian punch, cherry juice, or fruit punch
Instructions
- Blue Layer: Pour 1-2 tablespoons of blue juice into popsicle pouch, filling each about ⅓ full. Freeze for 30-45 minutes, until slightly firm but not completely frozen.1 cup blue Hawaiian punch, blue Kool Aid or blue sports drink
- White Layer: Pour 1-2 tablespoons of lemonade over the frozen blue layer, filling another ⅓ of the pouch. Freeze for another 30-45 minutes1 cup lemonade
- Red Layer: Pour 1-2 tablespoons of red juice over frozen lemonade and frozen blue juice, filling the molds to the top. Freeze for at least 4-6 hours or until fully solid.1 cup red Hawaiian punch, cherry juice, or fruit punch
- Run molds under warm water for a few seconds to easily remove the popsicles.
Jenn’s Notes
- Store popsicles in an airtight container or freezer-safe bag to prevent freezer burn. Enjoy within 2-3 weeks for the best taste and texture, although they will last for a few months if stored properly.
- Freeze each layer for 30–45 minutes before adding the next to keep colors from mixing.
- Pour slowly to avoid air bubbles.
- Run warm water over the pouch for easy removal.


Thanks for the recipe! This will be fun to make with the kids.
love this recipe…it would be easy to make sugar free..