This post may contain affiliate links. Please read our disclosure policy.
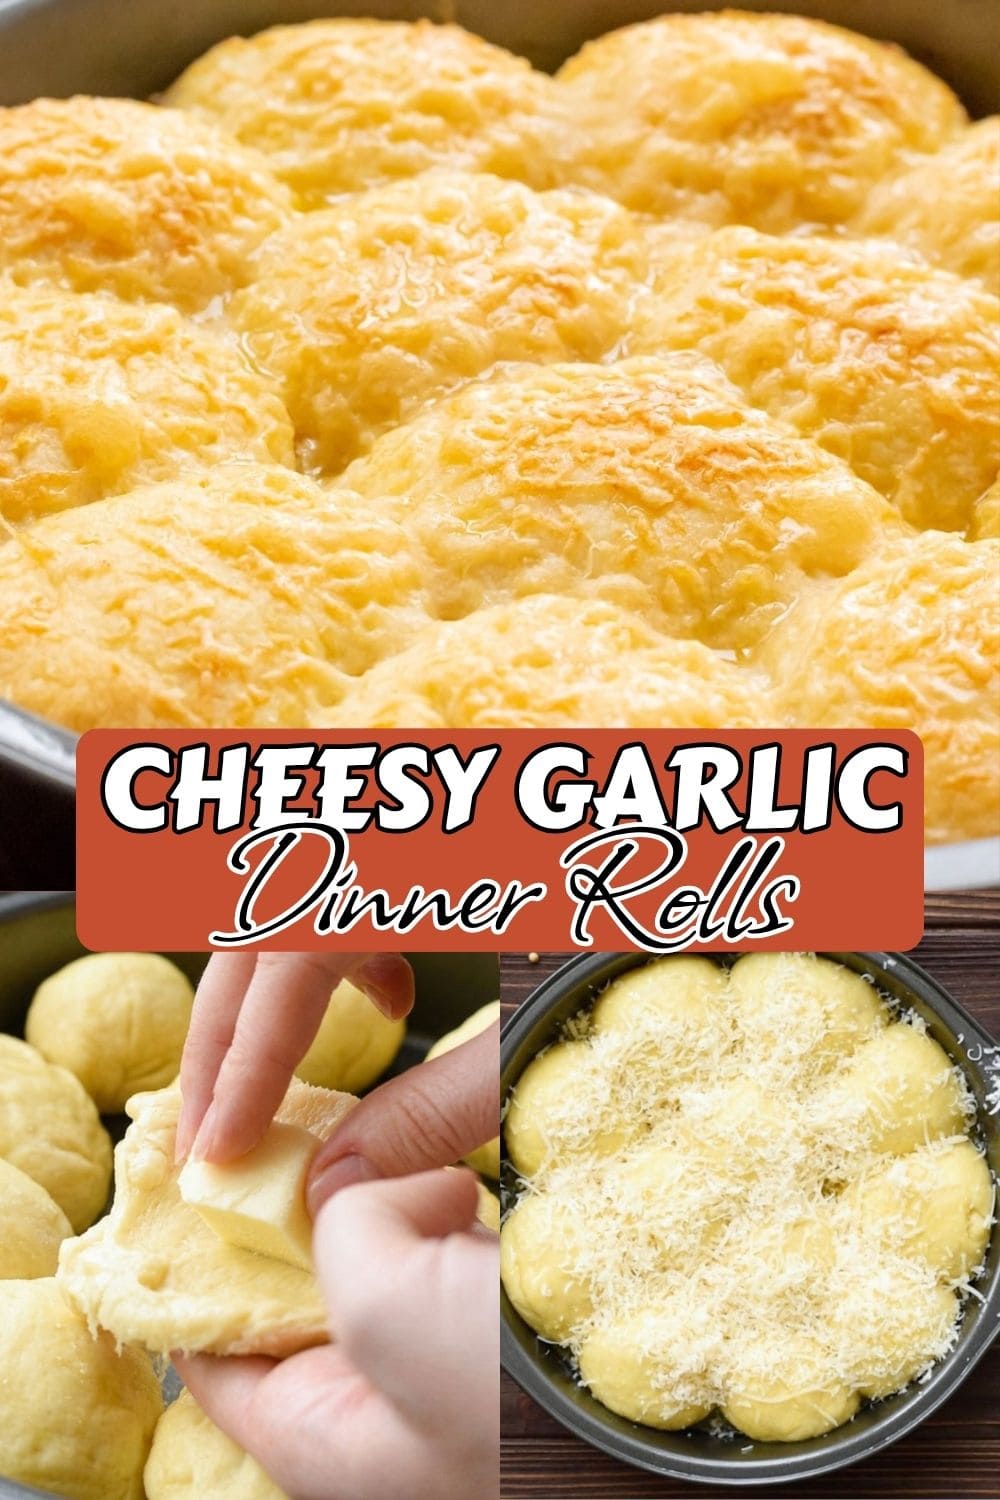
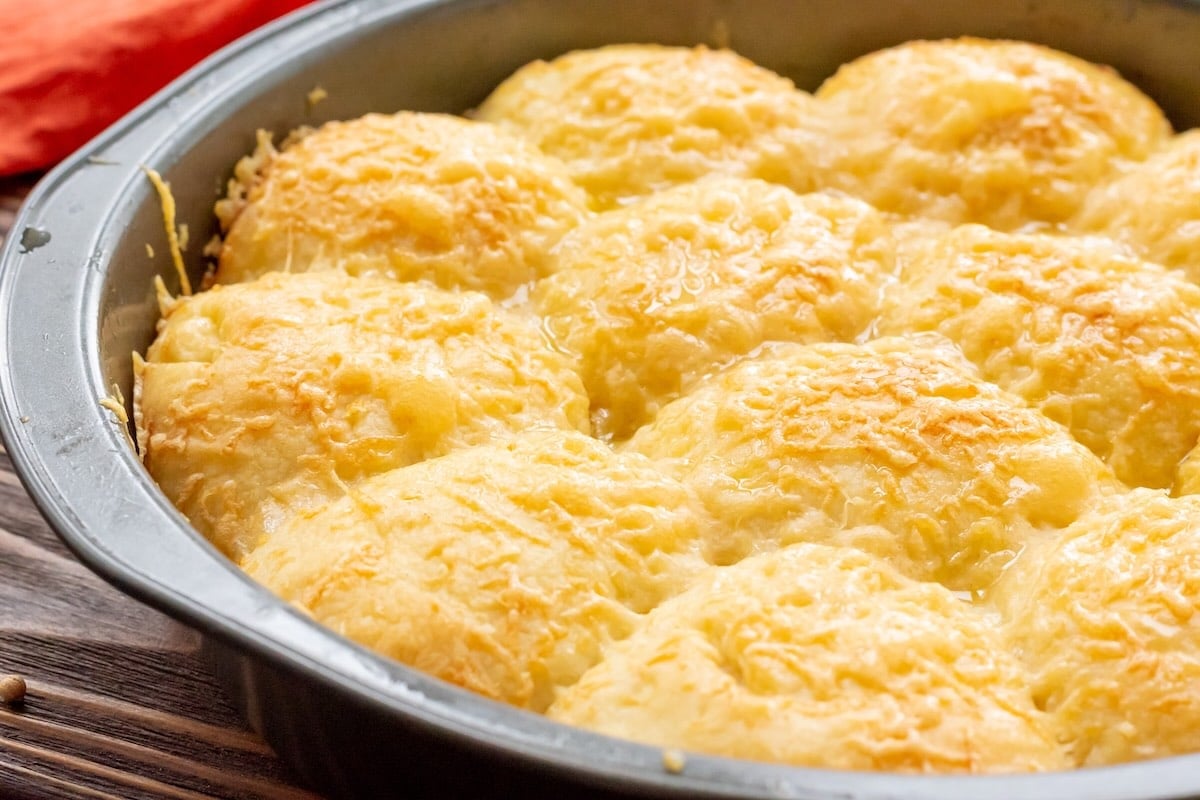
Pull one of these garlic dinner rolls apart and the mozzarella stretches in a long, cheesey pull. The parmesan crust is golden, the dough is soft, and the whole kitchen already smells like garlic bread. That is the moment you make these for.
I make these on pasta nights, for holiday dinners, and whenever game day rolls around. They always disappear fast. I use one full 8 oz block of mozzarella, and I will tell you right now that one cube always goes to quality control before the rolls are sealed.
Two things set this apart from every garlic roll recipe out there. I use frozen dinner rolls instead of homemade dough, and the slow rise produces a soft, airy texture that is hard to match without a stand mixer and two hours of your time. Every single roll also gets stuffed with a cube of mozzarella before baking, and that cheese pull is the whole point.
If garlic bread recipes are your thing, my Air Fryer Garlic Knots are on the table in about five minutes and always go fast. And if you ever want to make dinner rolls from scratch, my Homemade Yeast Rolls are worth every step.
Key Ingredients
- Frozen dinner rolls do the heavy lifting here. I use 12 rolls from a standard bag, and the slow thaw-and-rise process produces a soft, airy dough that bakes up tender every time. No yeast to activate, no kneading, no wondering if the dough came together right.
- Mozzarella block. Use a block, not the pre-shredded bag. One 8 oz block gives you enough to cut ½-inch cubes for all 12 rolls, with a little extra left over. The cube size matters: too big and the dough cannot seal around it, too small and you lose the cheese pull moment.
- Freshly grated parmesan is what creates the lightly crisp, golden edges on top. I use ⅓ cup. Pre-grated parmesan from the green can has anti-caking agents that prevent it from browning properly, so it is worth grating your own here.
- Butter is the base for the garlic butter, and it goes on twice. The before-bake brush bakes into the crust. The after-bake brush right out of the oven is what fills the kitchen with that garlic bread smell.
- Granulated garlic is what I use instead of garlic powder. The slightly coarser texture disperses evenly through the butter and gives you a stronger garlic flavor in every bite. Use the same amount if you only have garlic powder on hand.
See the recipe card for full information on ingredients and quantities.
How to Make Cheesy Garlic Dinner Rolls
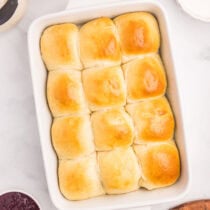
Step 1: Set up the first rise. Grease your cast-iron skillet or baking dish and arrange the 12 frozen dinner rolls inside. Cover with another skillet or pan placed on top. Let them sit at room temperature for 1 hour. Covering them traps warmth and gets the rise going evenly.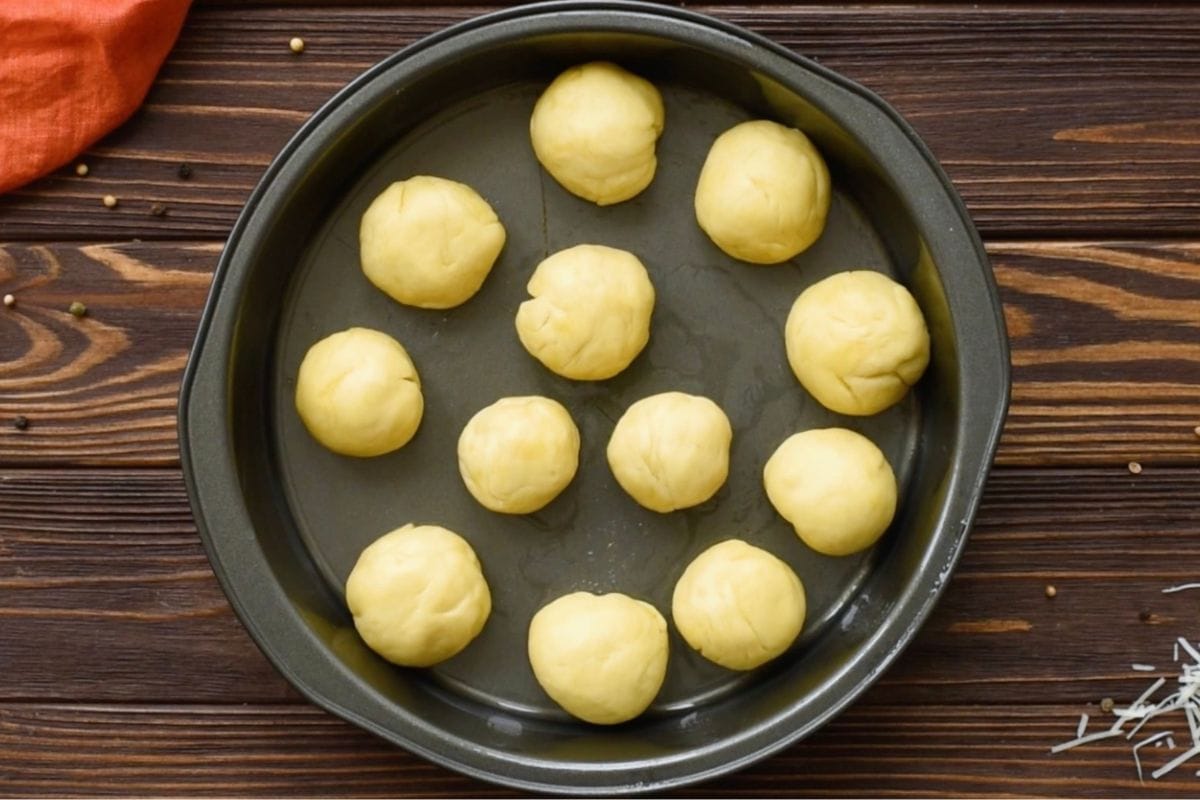
Step 2: Cut the mozzarella. While the rolls are on their first rise, cut your 8 oz mozzarella block into ½-inch cubes. You need 12 cubes total, one per roll. This is also when quality control happens, so budget for one missing cube.
Step 3: Stuff and seal each roll. This is the step that makes or breaks the recipe. Take each roll and gently stretch the dough around one mozzarella cube. Pinch all the seams closed firmly, not loosely. Place each roll back in the dish seam-side down. Any thin spots or gaps in the dough will let the cheese melt out onto the pan instead of staying inside the roll. I’ve learned this the hard way.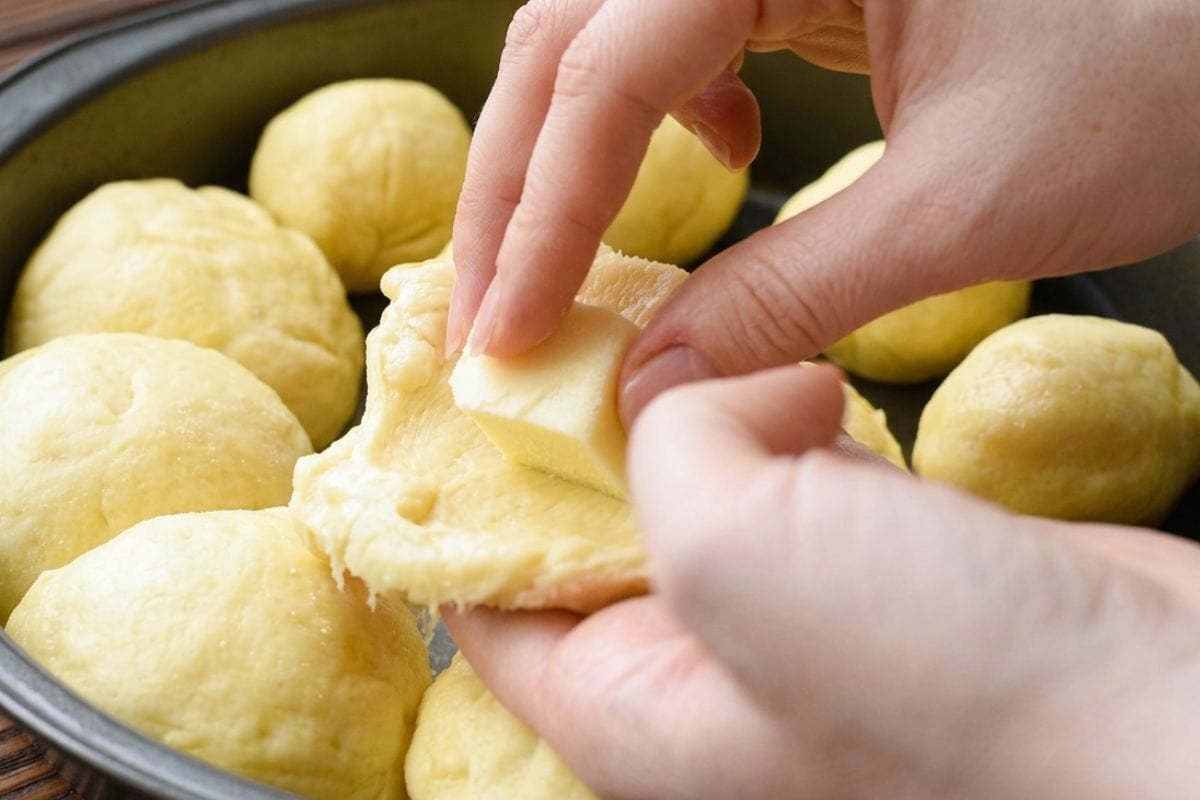
Step 4: Let them rise again. Cover the stuffed rolls and let them rise for another 2 to 3 hours. They should look noticeably puffier and feel soft when you gently press one. Do not rush this step. This is where the soft, airy texture develops, and shortcuts here lead to dense rolls.
Step 5: Mix the garlic butter and brush. Stir 1 teaspoon of granulated garlic into ½ cup of melted butter until combined. Brush half of this mixture over the tops of the rolls. Save the other half for right after baking. Keep it nearby.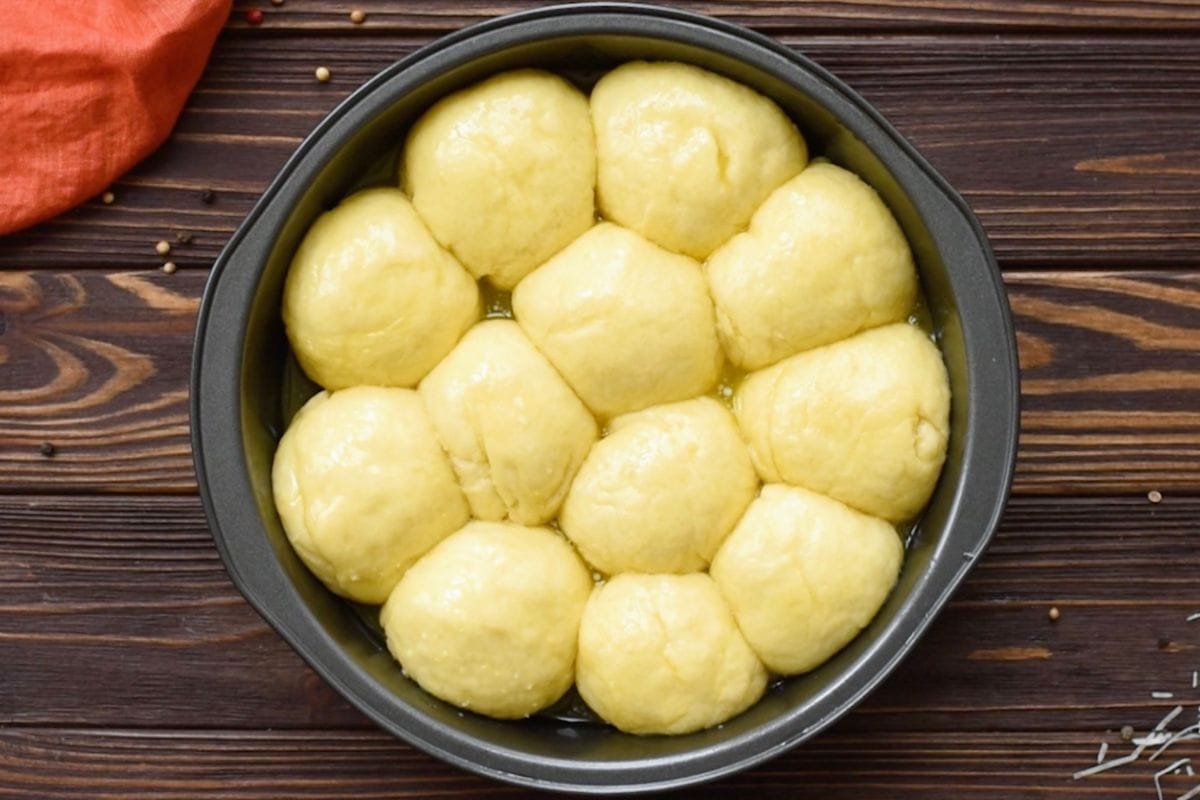
Step 6: Add the parmesan. Sprinkle ⅓ cup freshly grated parmesan evenly over the tops of the rolls. Do this right before the rolls go into the oven, not earlier.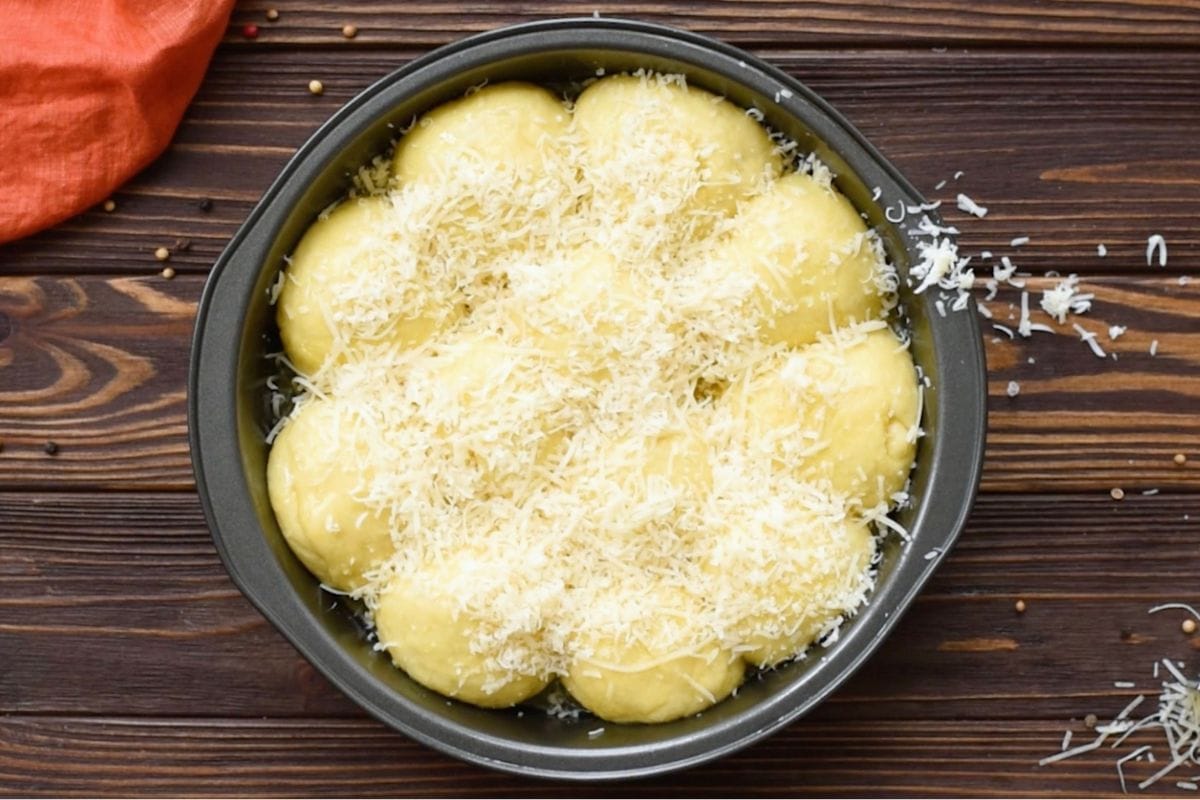
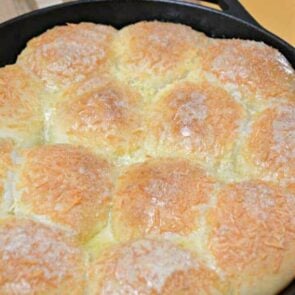
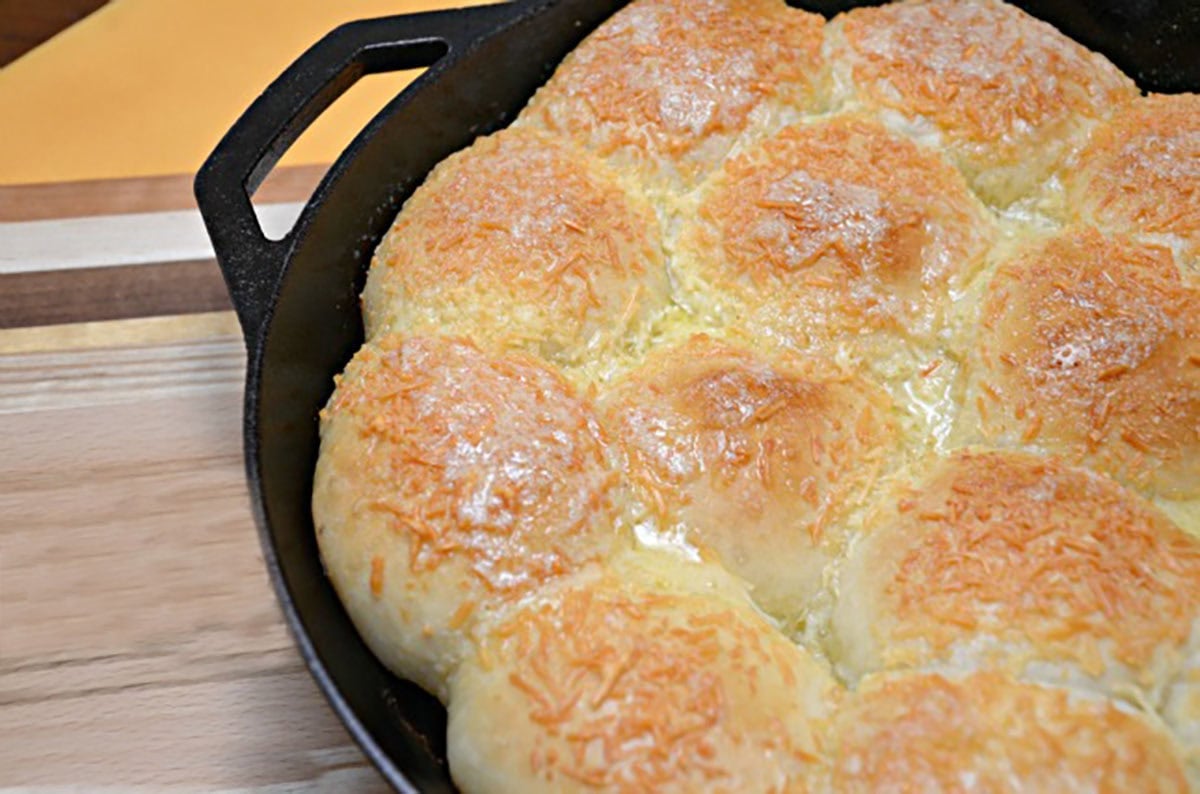
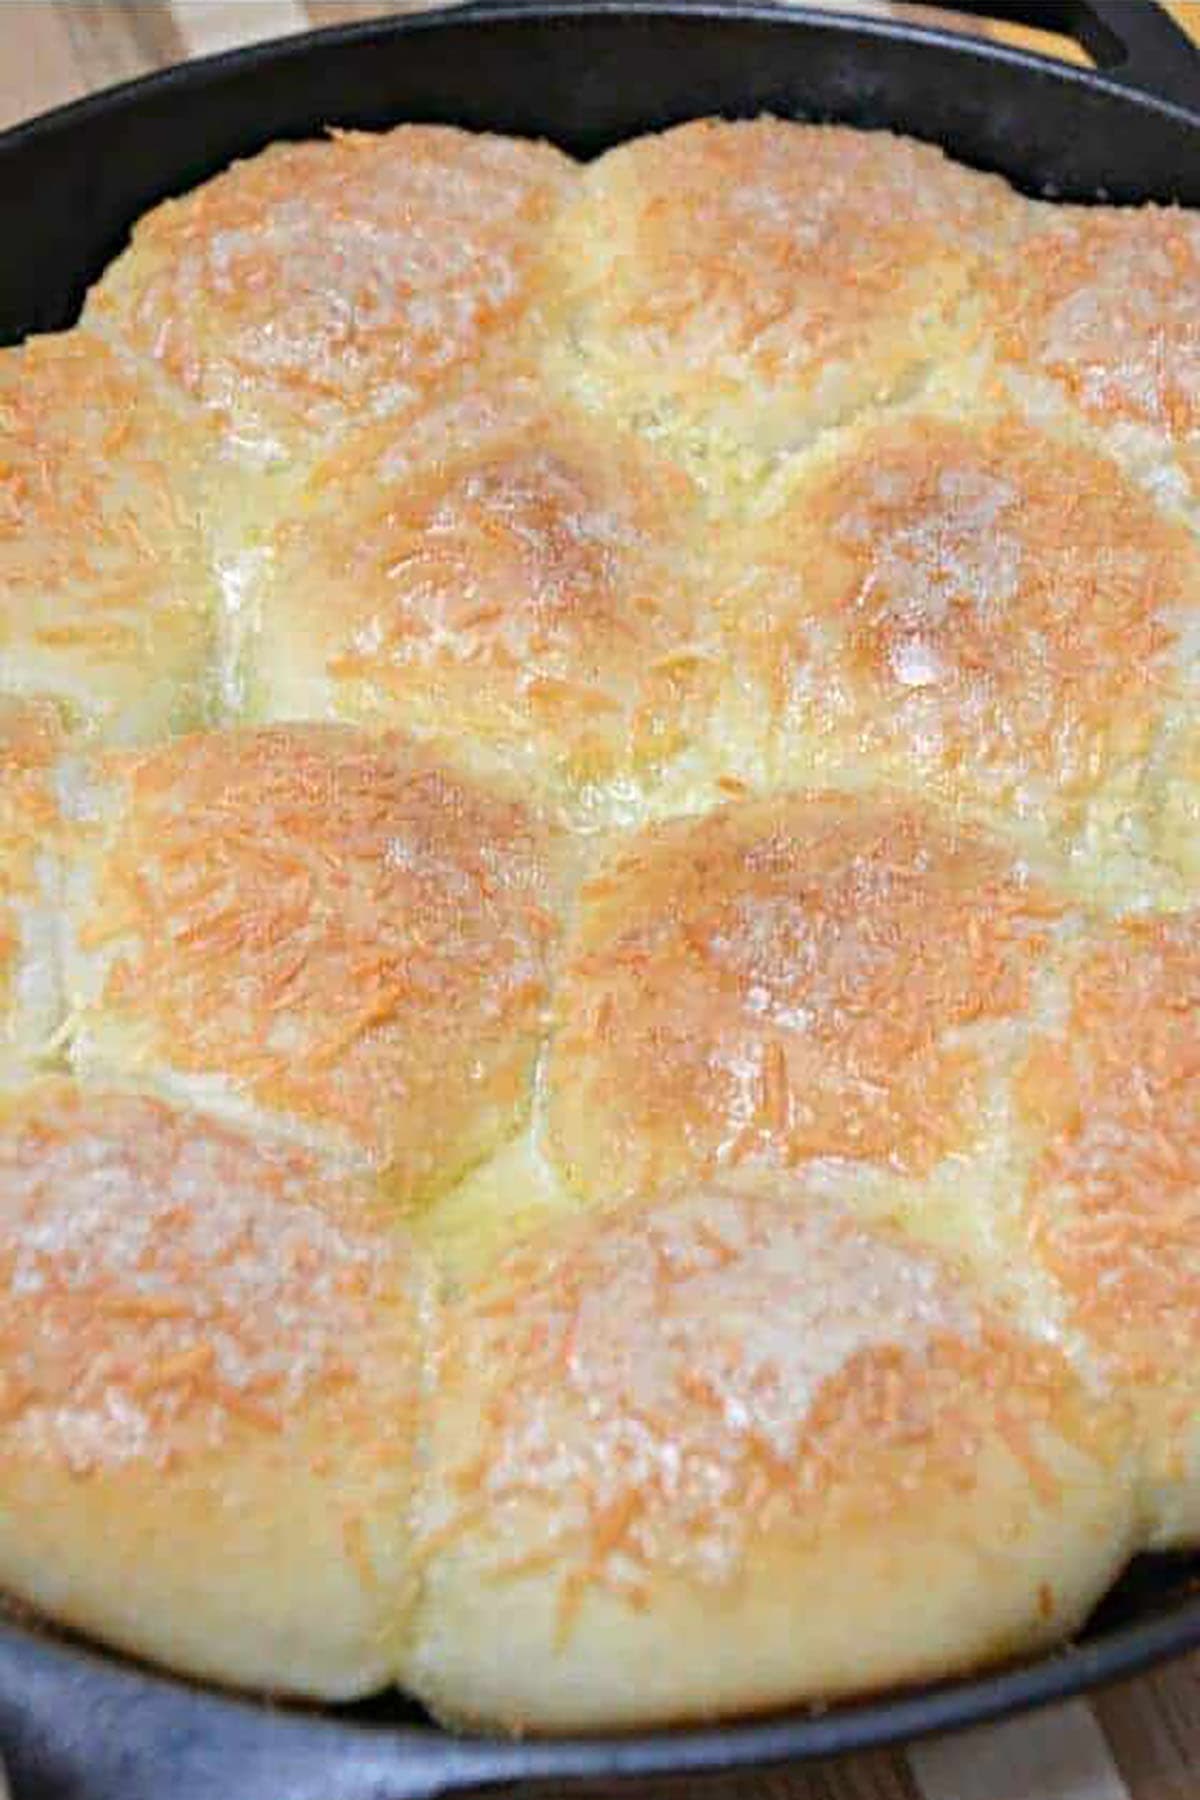
Step 7: Bake. Preheat your oven to 350°F. I usually start preheating toward the end of the second rise so it is ready when the rolls are. Bake for 20 minutes until the tops are golden brown and the parmesan is set.
Step 8: Brush with the remaining garlic butter. Pull the rolls from the oven and immediately brush the remaining garlic butter over the tops while they are still hot. The heat from the rolls helps the butter soak into the crust. Do not wait until the rolls cool down. This last brush is what gives them that glossy, garlicky finish.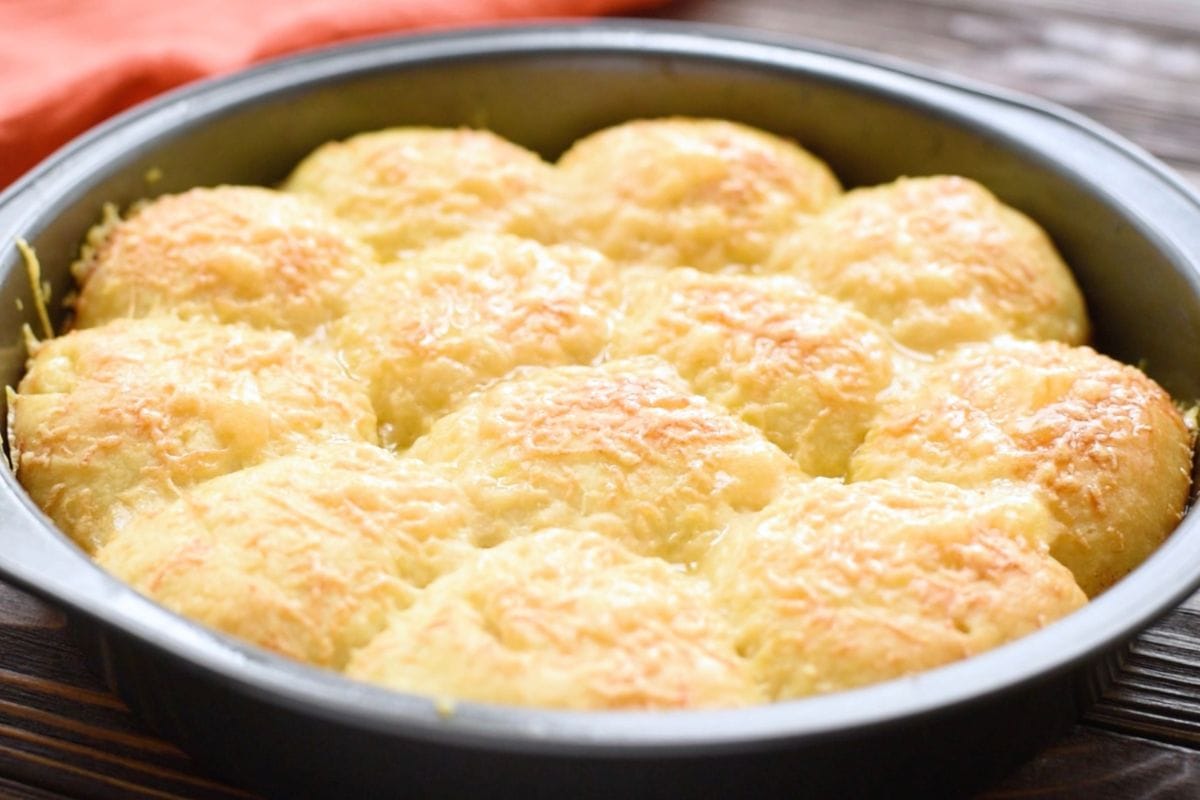
How to Store These Rolls
Cover and store at room temperature for 1 to 2 days. For longer storage, move them to an airtight container in the refrigerator where they will keep for 3 to 4 days.
To reheat, cover the rolls loosely with foil and warm them in a 300°F oven for 8 to 10 minutes. You can also microwave individual rolls for 20 to 30 seconds. Either way, the cheese re-melts and the rolls warm back up just right.
Frequently Asked Questions
The seams were not fully sealed before baking. When mozzarella heats up, it moves fast and will find any gap in the dough. The fix for next time: stretch the dough gently around the cheese cube, pinch every seam firmly closed, and place the roll seam-side down in the dish.
Yes. Stuff the rolls and place them in the dish, then cover tightly and refrigerate before the second rise. When you are ready to bake, take them out of the fridge, let them come to room temperature and finish rising (about 1 hour), then bake as directed.
These go well with any pasta dinner. Spaghetti, lasagna, or baked ziti are all good choices. They also work as an appetizer with a dish of marinara on the side for dipping.
More Easy Bread Recipes

Cheesy Garlic Dinner Rolls
Ingredients
- 12 Frozen Dinner Rolls
- 1 teaspoon granulated garlic
- ½ cup butter melted
- ⅓ cup Parmesan Cheese
- Mozzarella Cheese block cut into ½ inch pieces
Instructions
- Place frozen dinner rolls in a greased cast-iron skillet or baking dish. Set another pan on top to cover and let the dough rise at room temperature for 1 hour. Covering them traps warmth and gets the rise going evenly.12 Frozen Dinner Rolls
- While the rolls rise, cut your mozzarella block into ½-inch cubes. You need 12 cubes total, one per roll.Mozzarella Cheese block
- Stretch each roll around one mozzarella cube and pinch the seams tightly shut. Return each roll to the skillet seam-side down. Any thin spots or gaps in the dough will let the cheese melt out onto the pan instead of staying inside the roll.
- Cover the stuffed rolls and let them rise for another 2 to 3 hours until they double in size and feel soft when gently pressed. Do not rush this step. This is where the soft, airy texture develops and shortcuts here lead to dense rolls.
- Combine melted butter and granulated garlic, then brush half over the rolls. Save the other half for right after baking and keep it nearby.1 teaspoon granulated garlic, ½ cup butter
- Sprinkle ⅓ cup of Parmesan cheese evenly over the tops right before baking. Do not do this earlier.⅓ cup Parmesan Cheese
- Preheat oven to 350°F. I usually start preheating toward the end of the second rise so it is ready when the rolls are. Bake for 20 minutes until the tops are golden brown.
- Pull from the oven and brush the remaining garlic butter over the tops right away while still hot. The heat from the rolls helps the butter soak into the crust. Do not wait until the rolls cool down. That final coat is what gets you that golden, garlicky finish.
Jenn’s Notes
Tips:
- Seal every seam completely. Mozzarella melts fast, and it will find any gap you leave in the dough. Stretch the dough gently around the cheese, pinch every edge firmly closed, and set each roll seam-side down in the dish. This is the single most important step for keeping the cheese where it belongs.
- Don’t shortcut the second rise. The 2 to 3 hours is hands-off time, but it’s not negotiable. Frozen dough needs every bit of that time to develop a soft, airy texture. Rolls that don’t fully rise will bake up dense, and there’s no recovering from that once they’re in the oven.
- Grate your own parmesan. Pre-shredded parmesan contains anti-caking agents that keep it from browning and crisping up the way it should. Freshly grated makes a visible difference in both the look and the flavor of that topping.
- Brush the second round of butter while the rolls are still hot. The heat is what allows the butter to absorb into the crust. Wait until they’ve cooled down and you lose that effect entirely, so don’t wait.