
This post may contain affiliate links. Please read our disclosure policy.
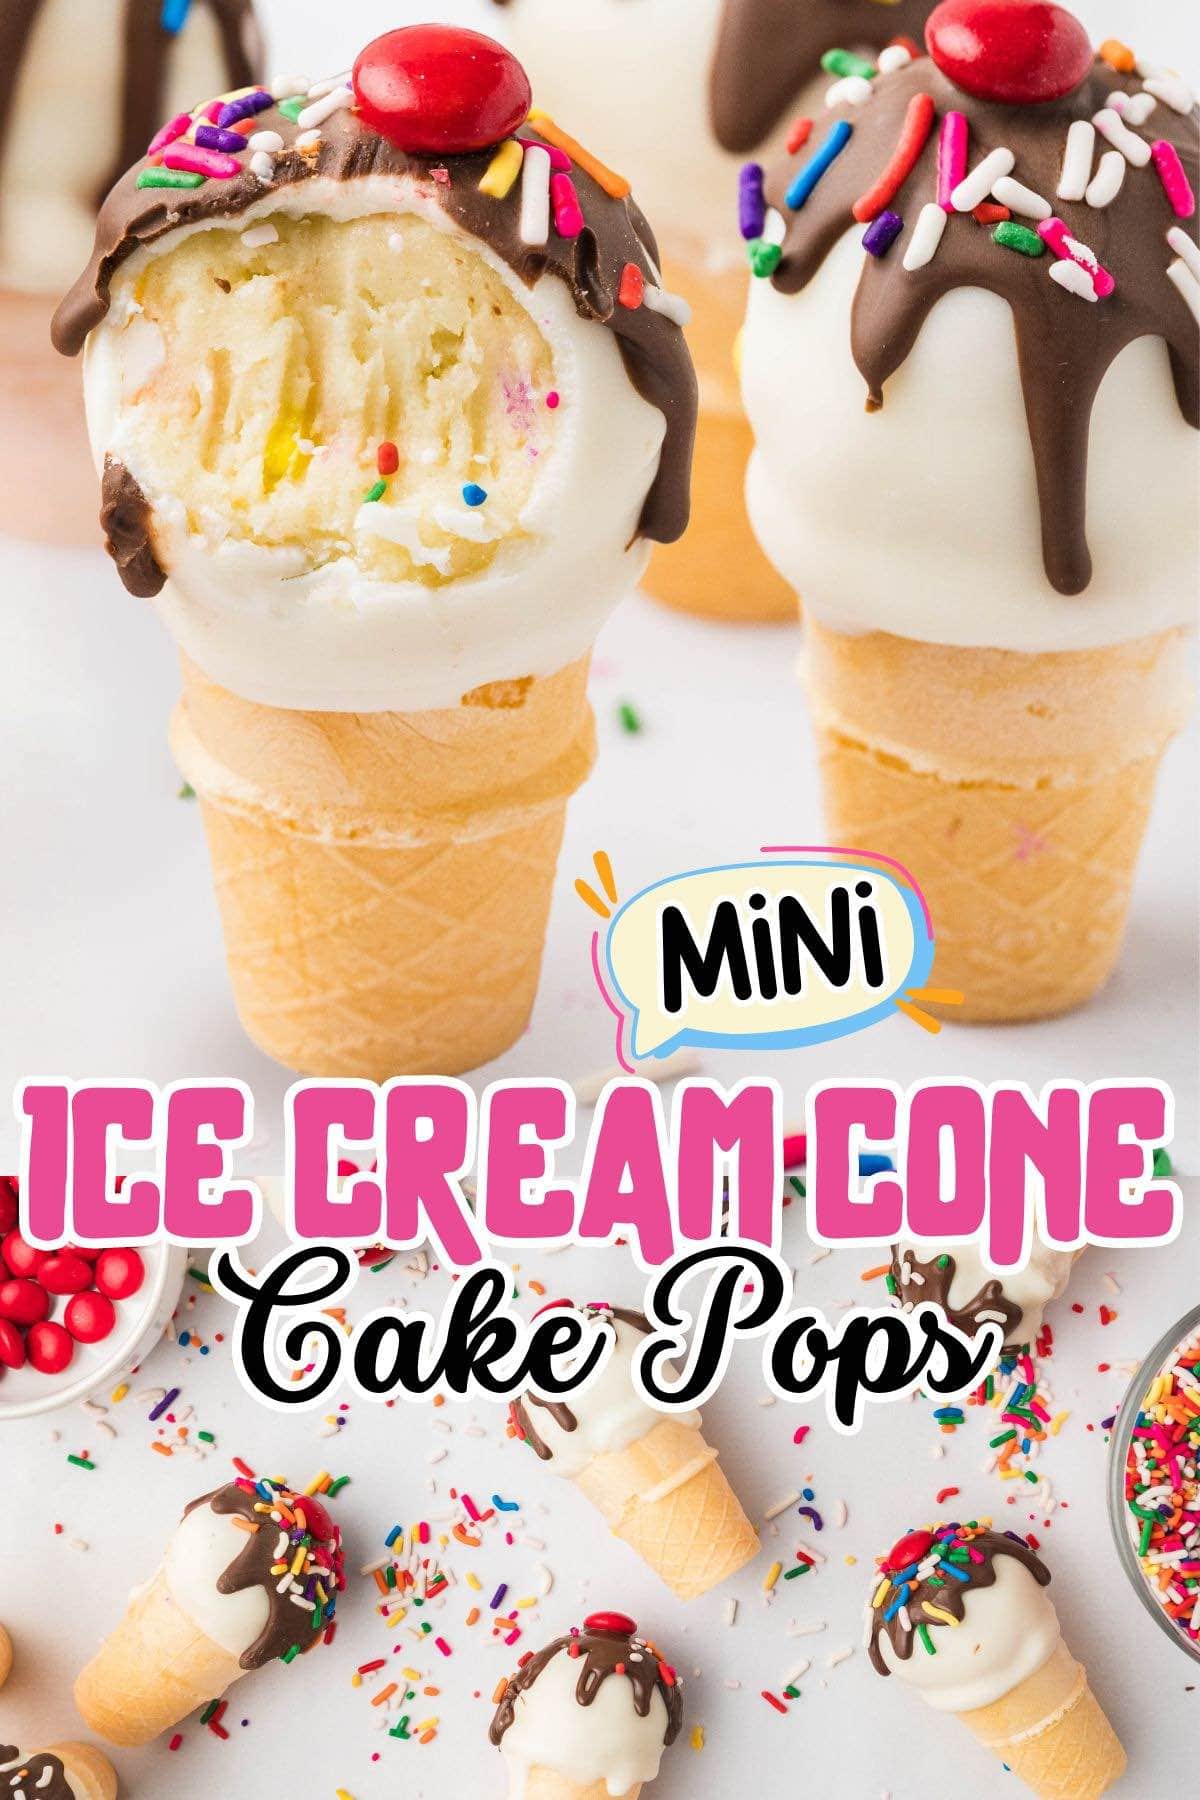
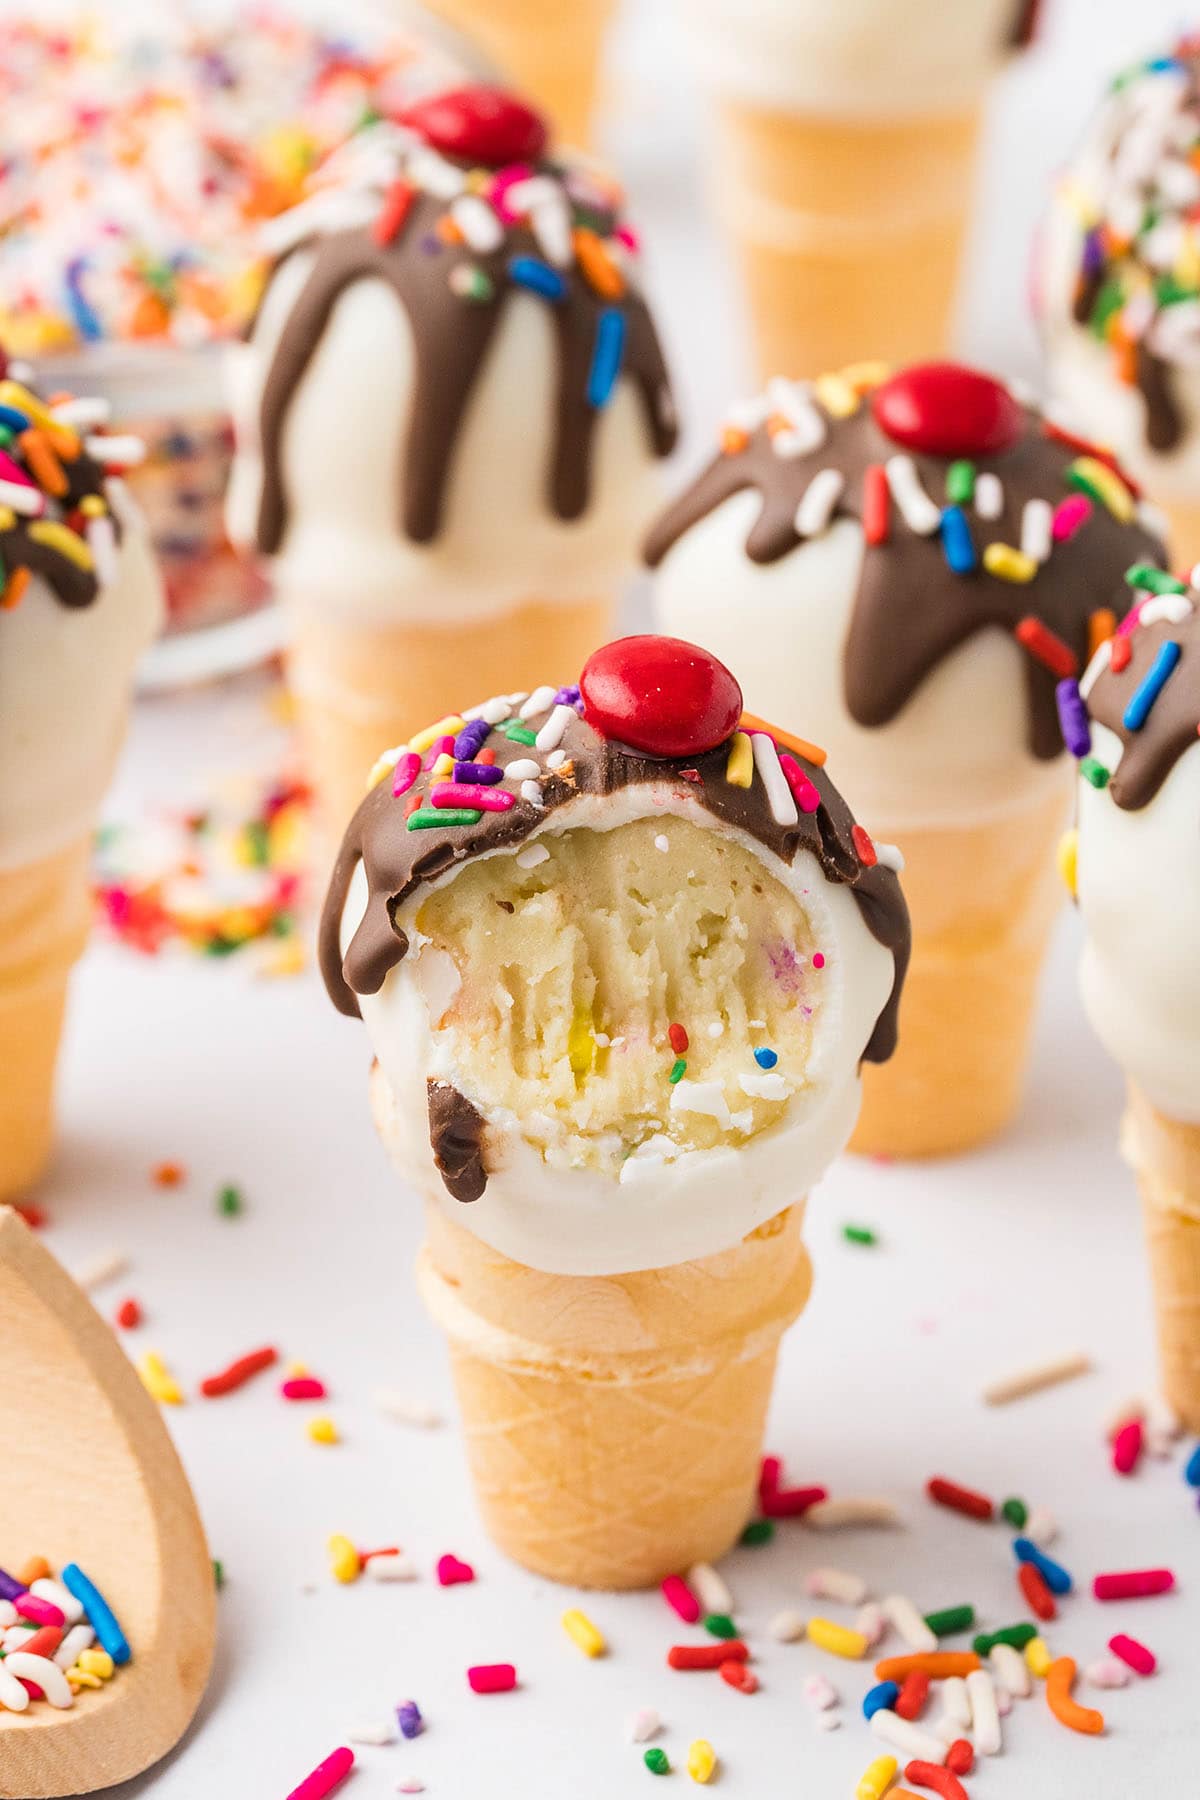
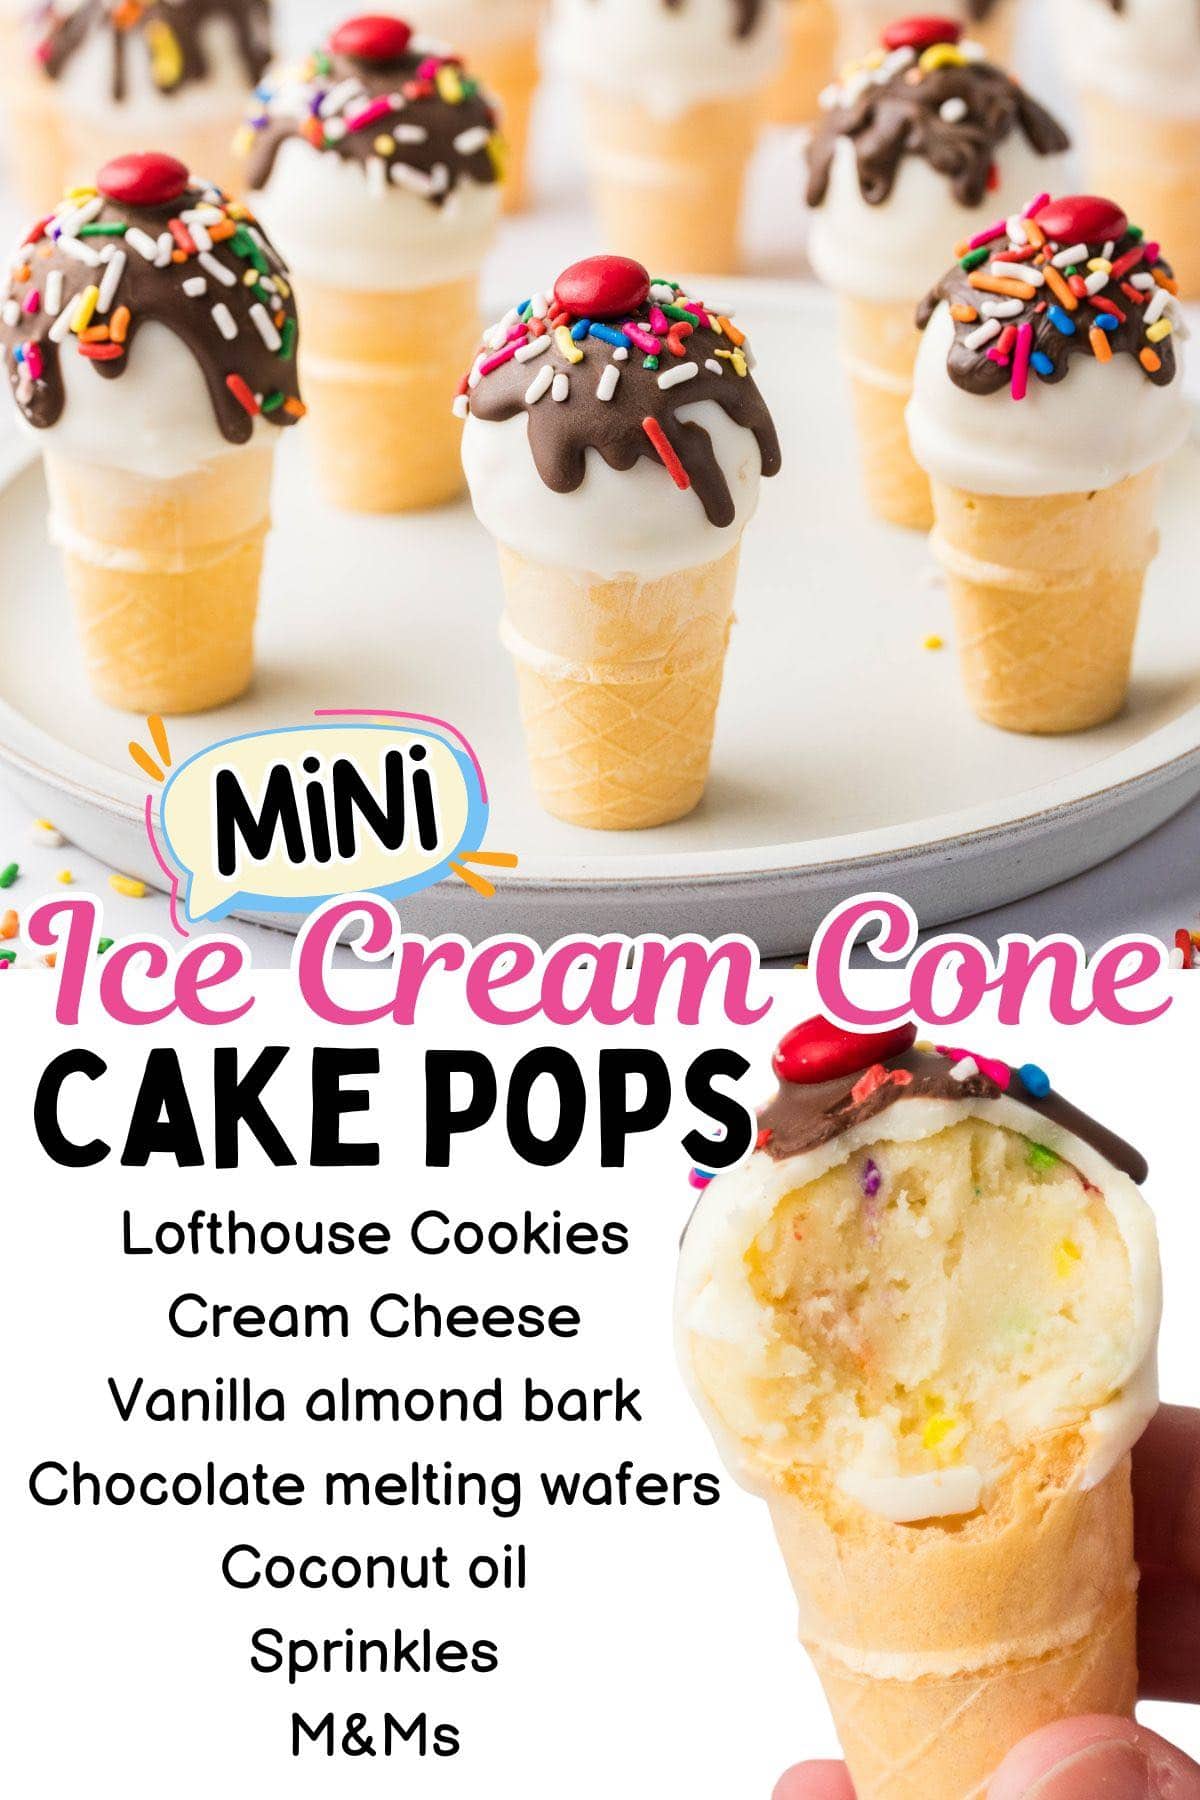
These are the cutest mini Cake Pops Ice Cream Cones! Made from Lofthouse cookies mixed with cream cheese – no cooking or cake mix needed! An adorable dough ball dipped in a candy coating and decorated with a chocolate drip, colorful sprinkles, and a signature cherry on top will have you screaming for cake pop ice cream!
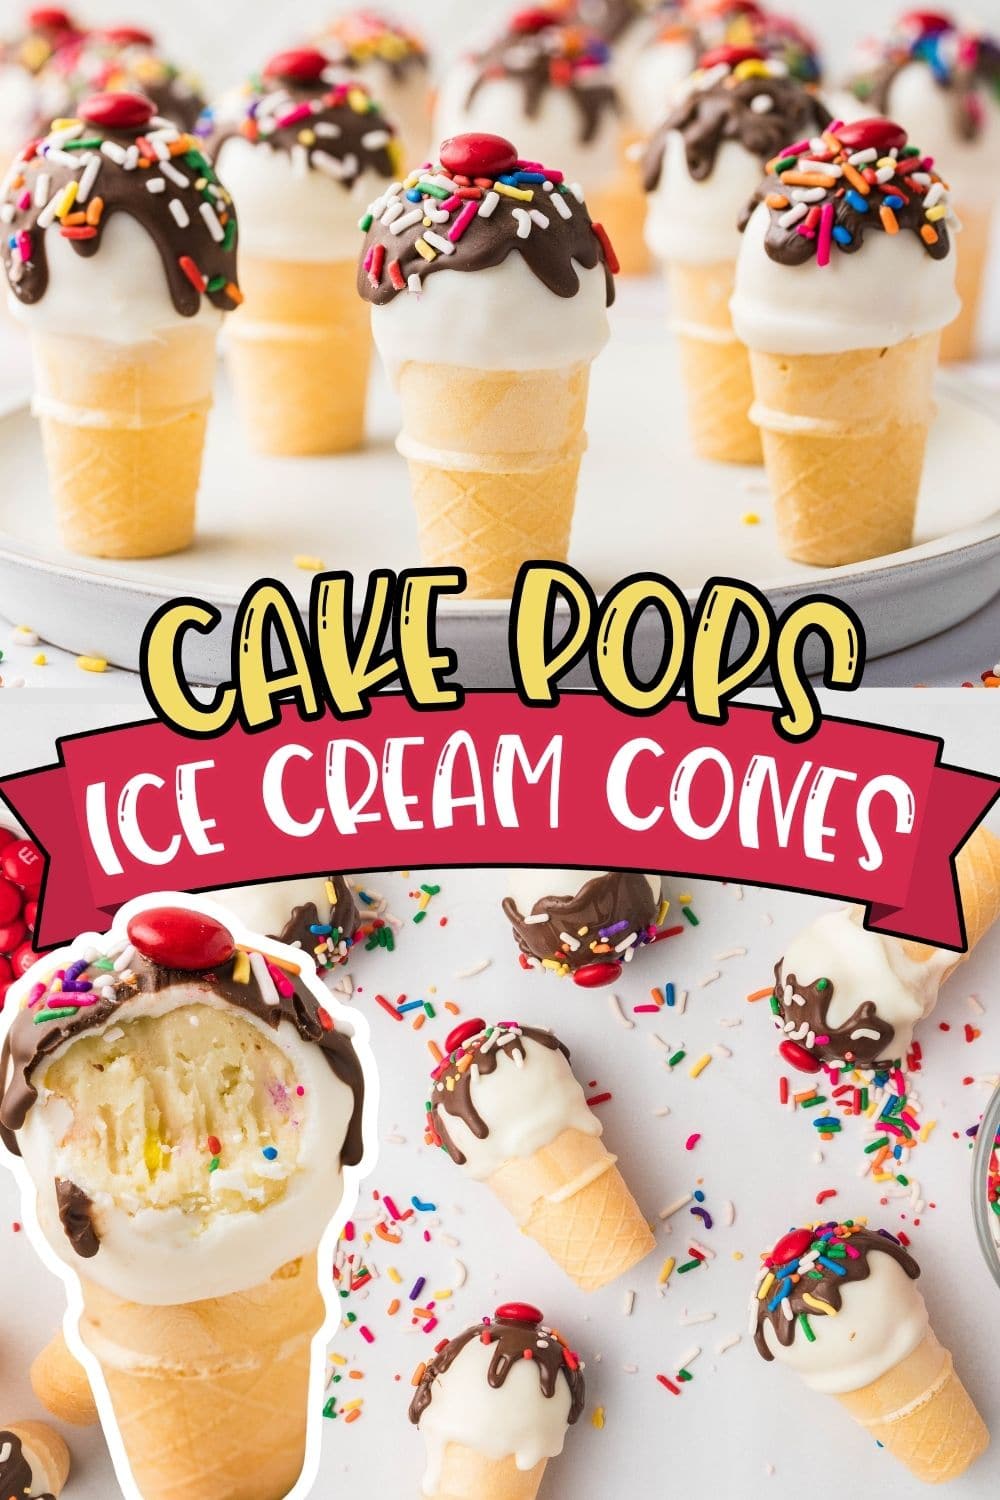
Ice Cream Cone Cake Pops
Our no bake Cake Pops Ice Cream Cones recipe could be the easiest way to create cake balls out of cookies! When soft and crumbly Lofthouse cookies are combined with creamy cubes of cream cheese, they become “scoopable” to roll and shape into dough balls.
Cover each ball in melted almond bark, set it inside an ice cream cone, and decorate your scoop with sundae toppings. It only takes 10 minutes to turn cookie dough into ice cream cake pops made to mimic melting ice cream without the melty mess!
Cake Pops Ice Cream Cones Ingredients
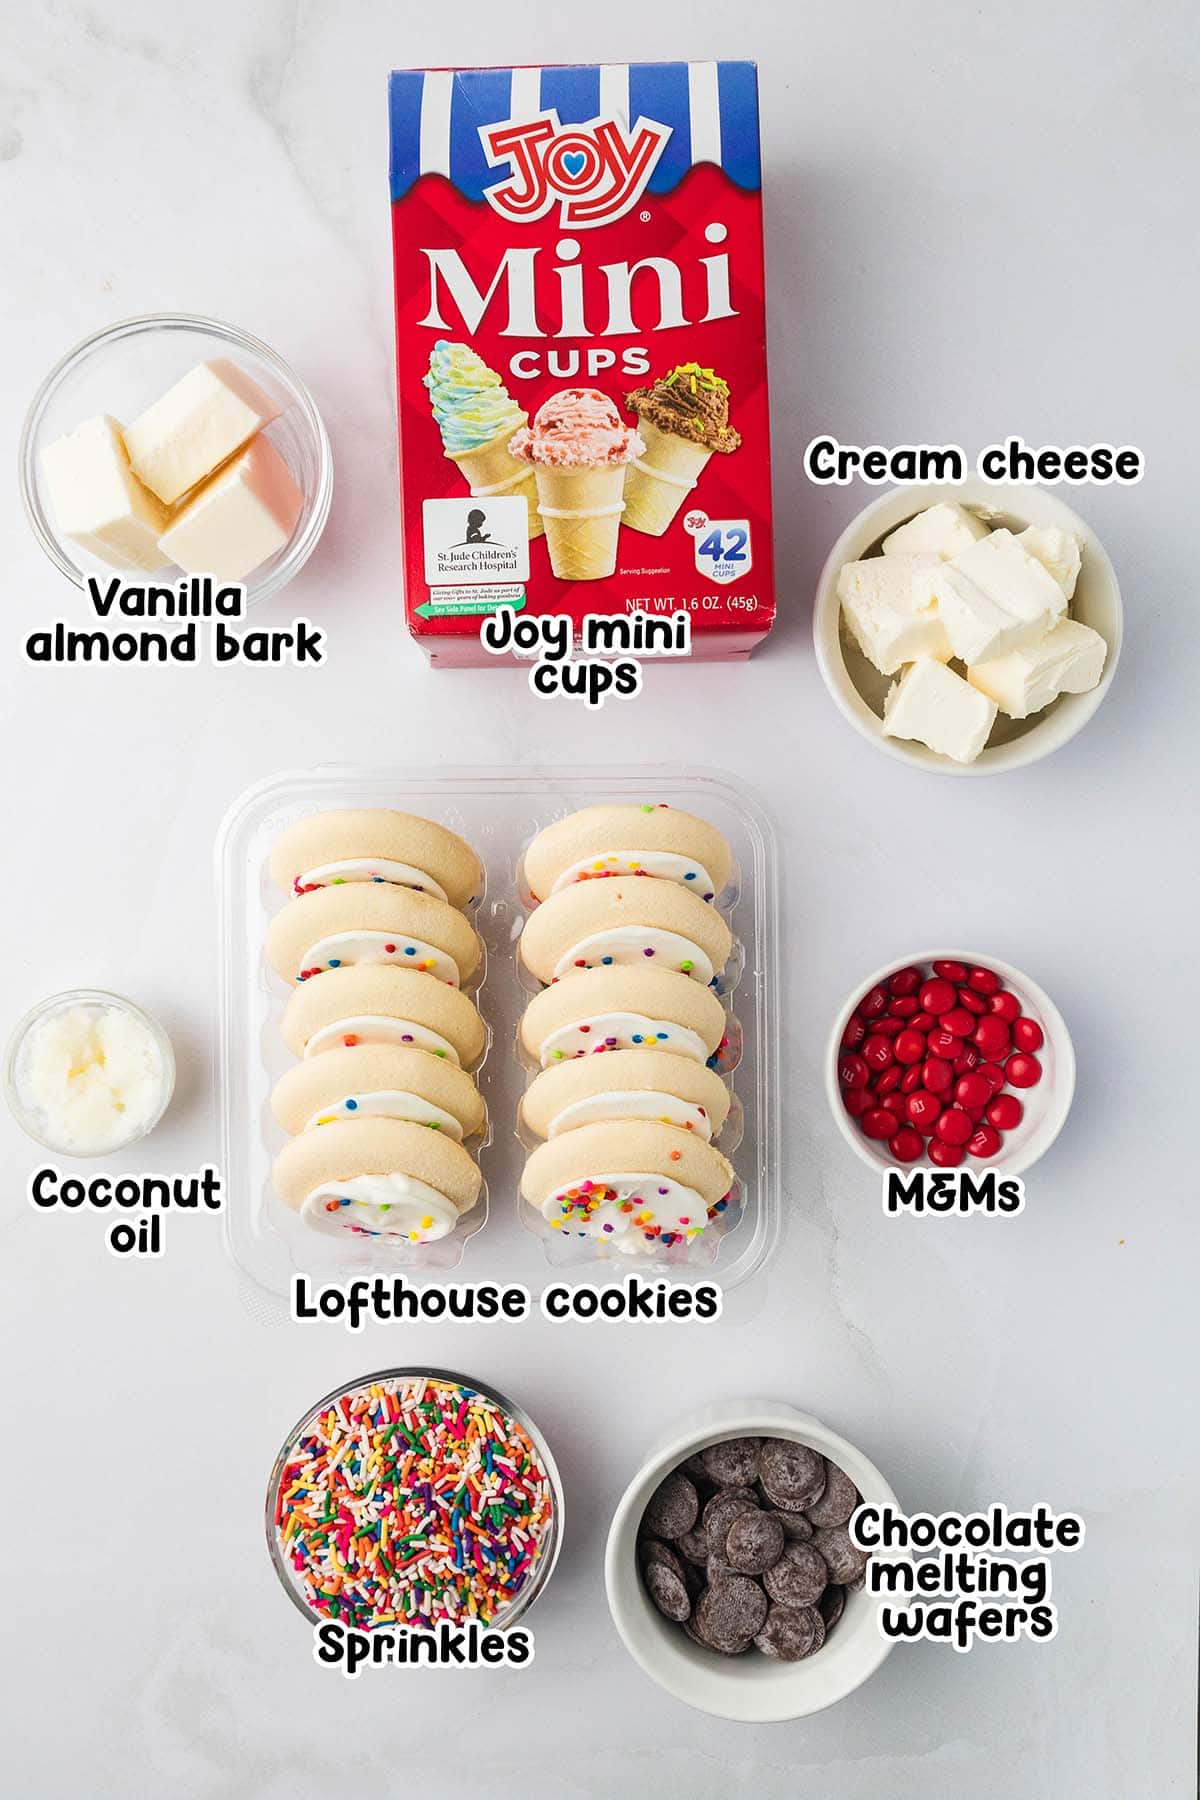
- Lofthouse cookies: I love the convenience of using store bought Lofthouse cookies. They have a sweet taste and cake-like texture that make them an easy no bake alternative to the classic cake pops make from a cake mix. However, if you prefer to bake your own base, my Copycat Lofthouse Cookies taste and look just like the real thing!
- Cream cheese: Make sure your cream cheese has softened to room temperature before mixing the cubes with the cookies.
- Vanilla almond bark: Candy melts can be used as well to coat your treats.
- Chocolate melting wafers: Chocolate chips can be used if you do not have melting chocolate.
- Mini ice cream cones
- Coconut oil: Coconut oil is used to thin both the almond bark and melting wafers for easier dipping.
- Sprinkles and M&Ms: You can use different types of small candies or fondant to create the cherry-like topping. Get creative with colorful sprinkles and have fun decorating!
See the recipe card for full information on ingredients and quantities.

How to Make Cake Pops Ice Cream Cones
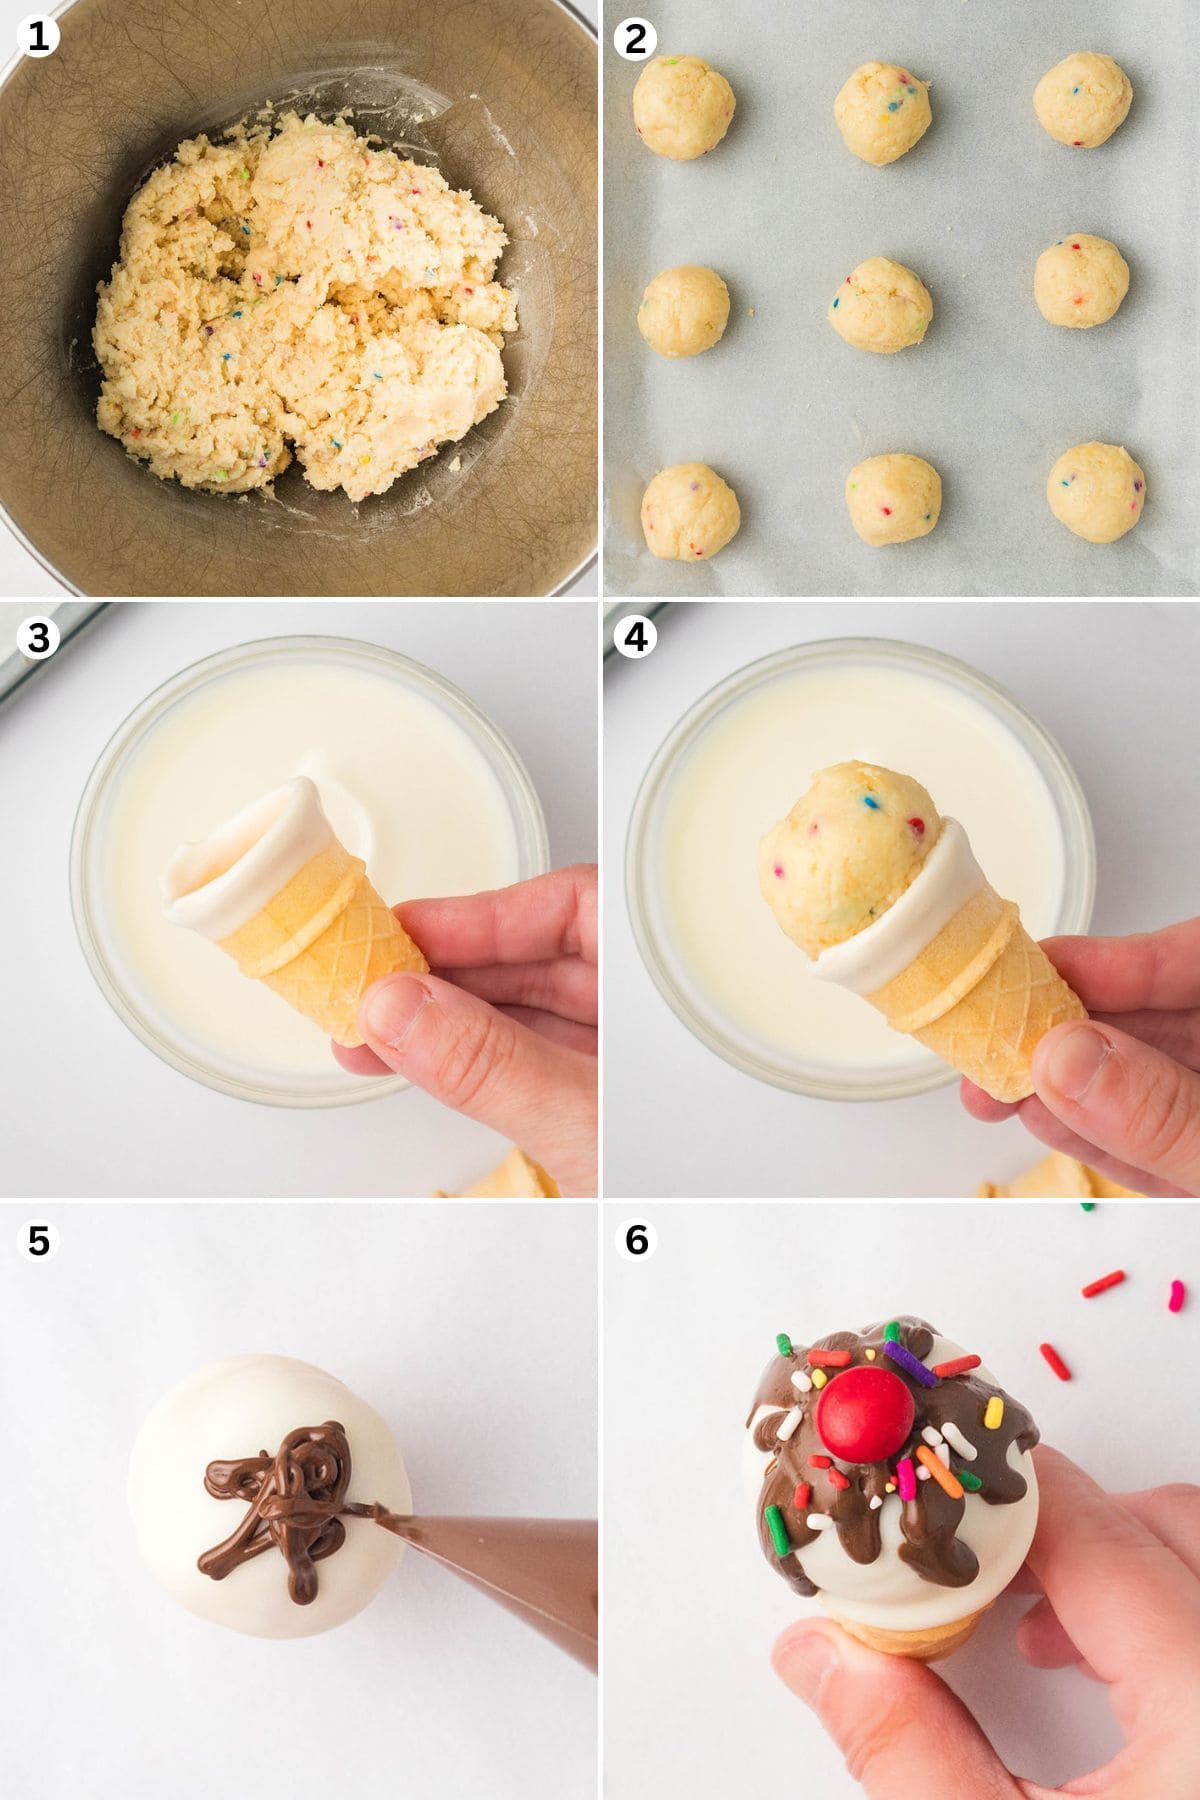
- Create The Cookie Dough: Combine the cookies with the cream cheese until well blended and a dough forms.
- Roll Round: Scoop out dough and roll into a ball. Place in the freezer for 20 minutes to set.
- Melt: Melt the almond bark according to the package instructions until smooth and creamy. Add in coconut oil to help thin the chocolate for easier dipping.
- Double Dip: Dip each cone into the melted almond bark and top with a dough ball. Once set and secure, dip the “ice cream” into the almond bark. Set aside to harden.
- Swirl On The Syrup: Microwave the chocolate in 30-second intervals until smooth. Add coconut oil to help thin the chocolate. Pipe a small swirl of melted chocolate on top of each dipped cone so it resembles chocolate syrup.
- Decorate The Desserts: Place a red M&M candy on top of the chocolate swirl and add sprinkles.
- Serve: Set completely at room temperature or in the refrigerator before serving. Enjoy!
Serving Suggestions
These are perfect for any occasion, whether it’s a party, a get-together, or just a sweet moment to savor.
Serve on a Stick: Serve your cookie dough balls on Cake Pop Sticks and display them in a foam block stand. My Birthday Cake Pops, Rainbow Cake Pops, Starbucks Cake Pops, and Grinch Cake Pops make the perfect handheld, bite-sized party treat, edible gift, or party favor.
Prepare as Popsicles: If you have popsicle molds, you can turn your cones into Cakesicles! Simply spread the melted candy melts around the inside of the Silicone cakesicle molds and insert the popsicle sticks. I have a step-by-step Cakesicle tutorial here!

Tips & Variations
- Create With Cake Crumbles: Feel free to use a store-bought cake or bake your favorite cake flavor from either a box or from scratch. Once cool, you can crumble the cake and combine it with the cream cheese. My Ice Cream Cake Pops recipe is a fun and whimsical way to turn your favorite flavored cake ball into an ice cream inspired treat.
- Create Without The Cone: Feel free to make your cake pops without the ice cream cones if you prefer. Simply place them on a tray lined with parchment paper and serve as cake balls, bites, or truffles once the chocolate has set.
- Customize Your Ice Cream Cones: You can customize your ice cream cone cake pops by using different colors of melting chocolate and sprinkles. You can also try adding other toppings such as crushed nuts, candy pieces, or coconut flakes.
Proper Storage
- To Store: Store any leftover cake pops in an airtight container in the refrigerator for up to 3-4 days. Allow them to come to room temperature before serving for the best taste and texture.
- To Make Ahead: You can make these cake pops up to a day in advance and store them in an airtight container in the refrigerator. However, for the best taste and texture, it’s recommended to serve them within a few hours of making
Frequently Asked Questions
While the coconut oil helps to thin the chocolate for smoother dipping, you can omit it if desired. However, the chocolate may be slightly thicker and may require additional stirring.
Gently tap or shake/swirl the dipped cones against the side of the bowl to remove any excess chocolate before setting them aside to harden. This helps prevent excessive dripping.

More Easy Dessert Recipes
If you tried this Cake Pops Ice Cream Cones Recipe or any other recipe on my website, please leave a 🌟 star rating and let me know how it went in the 📝 comments below. Thanks for visiting!!!

Ice Cream Cone Cake Pops
Ingredients
- 10 store-bought Lofthouse Cookies
- 6 ounces Cream Cheese softened and cubed
- 6 ounces vanilla almond bark
- 15-18 ice cream cone
- 3 ounces chocolate melting wafers
- ½ tablespoon coconut oil for vanilla almond bark
- ½ teaspoon coconut oil for chocolate melting wafers
- Sprinkles and M&Ms
Instructions
- In a mixing bowl, combine the cookie with the softened cream cheese until well blended and a dough forms.10 store-bought Lofthouse Cookies, 6 ounces Cream Cheese
- Using a cookie scoop, scoop out dough and roll into a ball, place on baking sheet lined with parchment paper. Place in the freezer for 20 minutes to set the dough.
- In the meantime, melt the vanilla almond bark or candy melts according to the package instructions until smooth and creamy. Add in a ½ tablespoon of coconut oil to help thin the almond bark for easier dipping.6 ounces vanilla almond bark, ½ tablespoon coconut oil
- Once the dough has chilled, carefully dip each cone into the melted almond bark, place the cooking dough top of the cone. Once chocolate has set and dough is secured to the ice cream cone, dip into almond bark. Gently shake off excess chocolate if necessary. Set aside for almond bark to harden.15-18 ice cream cone
- While the almond bark is setting, melt the chocolate chips or melting chocolate in a microwave-safe bowl in 30-second intervals until smooth. Add ½ tsp of coconut oil to help thin the chocolate. Transfer the melted chocolate to a small piping bag or zip-top bag with a tiny corner snipped off.3 ounces chocolate melting wafers, ½ teaspoon coconut oil
- Pipe a small swirl of melted chocolate on top of each dipped cone to resemble chocolate syrup.
- Place a red M&M candy on top of the chocolate swirl to complete the look of a cherry on top and add sprinkles.Sprinkles and M&Ms
- Allow the Mini Ice Cream Cone Cake Pops to set completely at room temperature or in the refrigerator before serving.
Jenn’s Notes
- To Store: Store any leftover cake pops in an airtight container in the refrigerator for up to 3-4 days. Allow them to come to room temperature before serving for the best taste and texture.
- To Make Ahead: You can make these cake pops up to a day in advance and store them in an airtight container in the refrigerator. However, for the best taste and texture, it’s recommended to serve them within a few hours of making
- Create With Cake Crumbles: Feel free to use a store bought cake or bake your favorite cake flavor from either a box or from scratch. Once cool, you can crumble the cake and combine it with the cream cheese. My Ice Cream Cake Pops recipe is fun and whimsical way to turn your favorite flavored cake ball into an ice cream inspired treat.
- Create Without The Cone: Feel free to make your cake pops without the ice cream cones if you prefer. Simply place them on a tray lined with parchment paper and serve as cake balls, bites, or truffles once the chocolate has set.
- Customize Your Ice Cream Cones: You can customize your ice cream cone cake pops by using different colors of melting chocolate and sprinkles. You can also try adding other toppings such as crushed nuts, candy pieces, or coconut flakes.


How cute! Thanks for sharing this recipe!