When I was in middle school, I remember going to my girlfriends house and spending hours making different variations of stained glass candy. We would try different flavors and different colors. The most fun was dropping the pan to break the candy into millions of bite sized pieces!
For this Valentine’s Day, I was determined to make an original Valentine’s candy. I have seen lots of recipes to make stained glass candy, but I couldn’t find any for heart shaped stained glass candy. Today’s snow day provided me with the perfect opportunity to experiment and see if it would work! My trusty assistant and resident baker, my 12-year old son Joey, and I were up for the task!
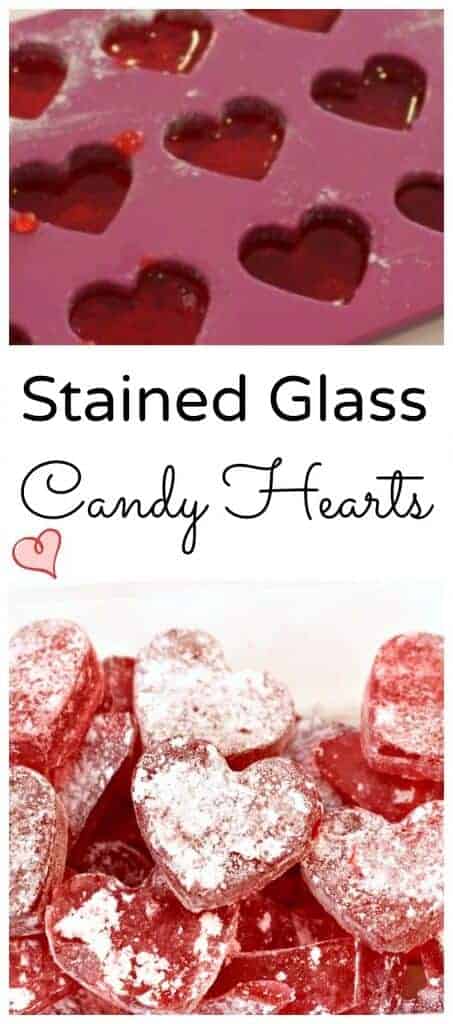
We tried to think of the best way to shape them. We could pour them out and quickly use a cookie cutter to mold them, but that seemed inefficient. Then we found a silicon heart shaped mold at Joann Fabrics. The instructions said it was oven safe up to 350 degrees – we only needed up to 300, so we were good!
The other thing you will definitely need is a candy thermometer. They have these at Bed Bath and Beyond – that’s where we got ours. Otherwise, you are ready to go! Just follow the instructions below!
How to Make Heart Shaped Stained Glass Candy

Ingredients:
- 2 cups sugar
- 2/3 cup light corn syrup
- 3/4 cup water
- 1 dram (1 teaspoon) candy flavoring
- 1/2 teaspoon food coloring
- Powdered Sugar
Instructions:
- Using a silicon mold, lightly grease the candy molds with oil or butter. Lightly dust with powdered sugar. (do not use plastic candy molds)
- Combine sugar, corn syrup and water in a 2-qt saucepan.
- Stir over medium heat until sugar dissolves.
- Bring the mixture to a boil without stirring
- When the syrup temperature reaches 260 degrees, add the color. Do not stir, the boiling will mix the color into the syrup.
- When the temperature reaches 300 degrees, remove the pan from the heat. Once the boiling stops, stir in the flavoring.
- Quickly, but carefully, pour the syrup into the molds.
- Let cool completely and pop them out.
- Put a couple of spoonfuls of powdered sugar into a plastic baggie. Place the candy into the baggie and gently shake to cover the candy with powdered sugar (this will look good, taste great and prevent the candy from sticking together.)
- Store in an airtight container.
These candies can be made with any type of silicon mold – or just in a baking pan (be sure to grease it first and sprinkle some powdered sugar on the bottom. Then it is super fun, once they are cool, to drop the pan on the floor and watch them break!)


How many molds did you use per batch?
just made these and they smell and look so good. I’ve made this candy before but just cracked it but my 10 year old daughter had to have it in a mold. Yikes I think I put to much flavor, hot flavor I did use one dram but had a bit left over not a great idea! Well at least they look pretty.
Hello. I used your recipe to make these and for some reason my candy never set, it’s still gooey. Any idea what I might have done wrong? Thanks
Did you use a candy thermometer? Did you let it get to the 300 degrees? You have to work kinda quickly once it hit the 300!
I would like cinnamon flavor what do I use?
Cecilia – just use cinnamon flavoring – I used watermelon – there are a ton of different flavor options at Michaels or Joann’s!
BTW, Jennifer, I was in on the HOA for Pinterest w/ Crystal and kelli. I am the one who also lives in MI. We’re in Grand Rapids. So nice to meet you!
That’s so funny – my sister is in Ada!! Such a small world! Thanks for coming and listening…. hopefully I gave you some info you didn’t already know!
Just pinned this Jennifer! I’ve seen this all over this week and have a new Valentines Board that these are now on :).
Adrienne – thanks so much for sharing it!! They were so easy to make and my kids LOVED them!!
I made this candy a few years ago at Christmas. I used to help my mom make it all the time when I was young. Such a great idea to make them into hearts for Valentine’s Day.
Thanks so much, Shelly! I can’t wait to try some other shapes!!
Love this idea! What a great idea to make a Valentine’s Day treat and have some fun, too! Thanks for sharing this…love it!
Thanks for the great comment, Jodee!! Glad you like it!!