This post may contain affiliate links. Please read our disclosure policy.
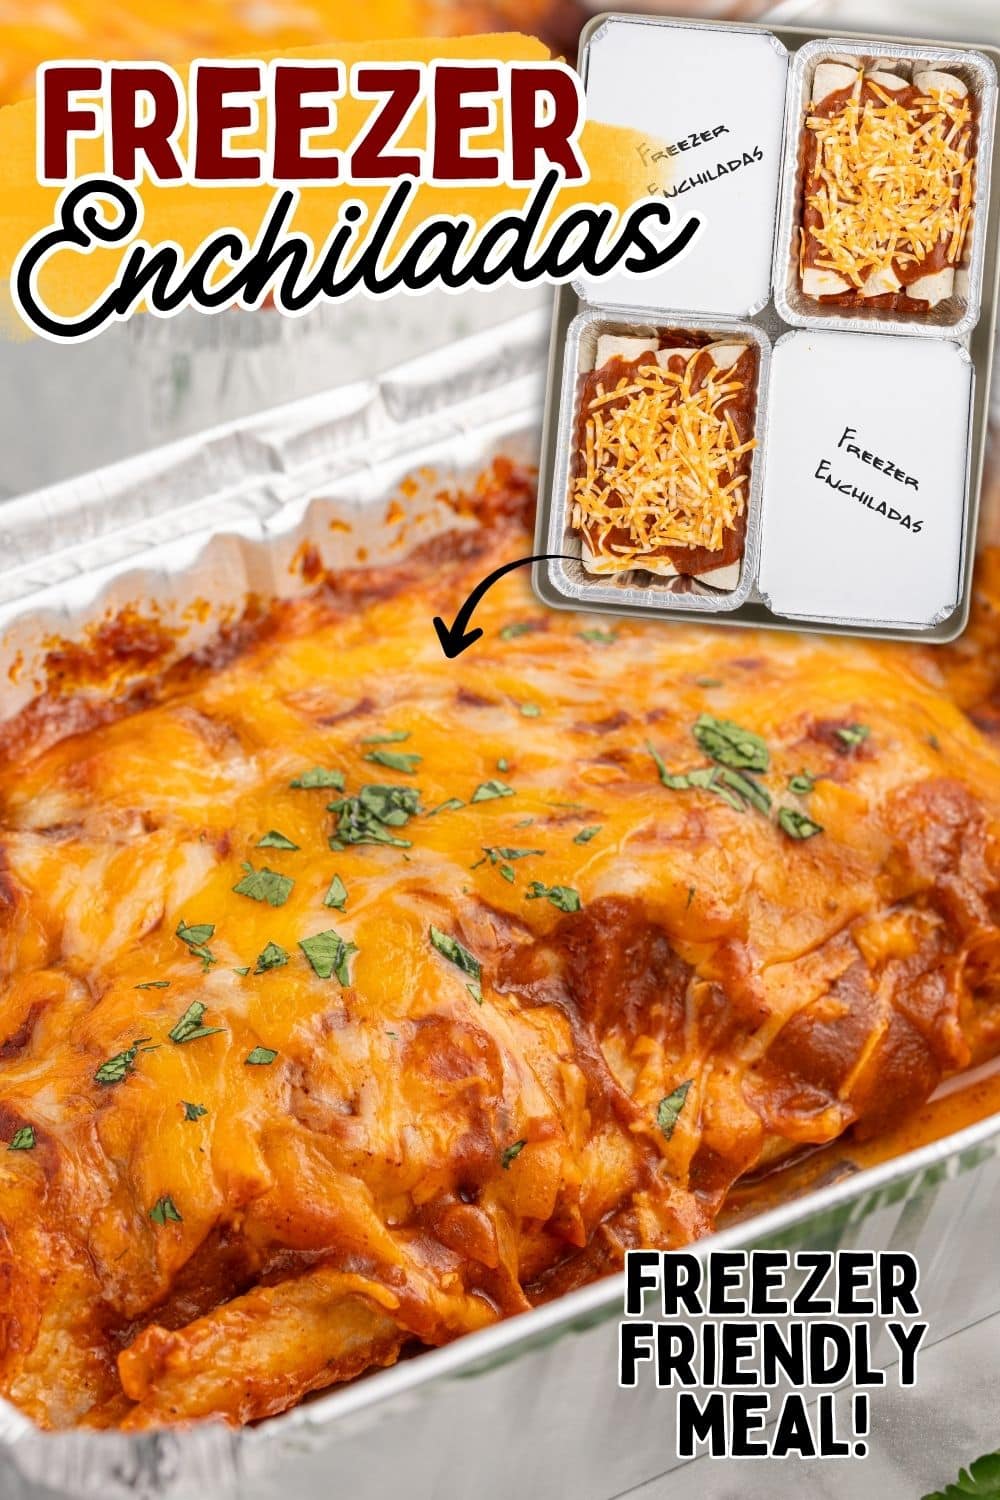
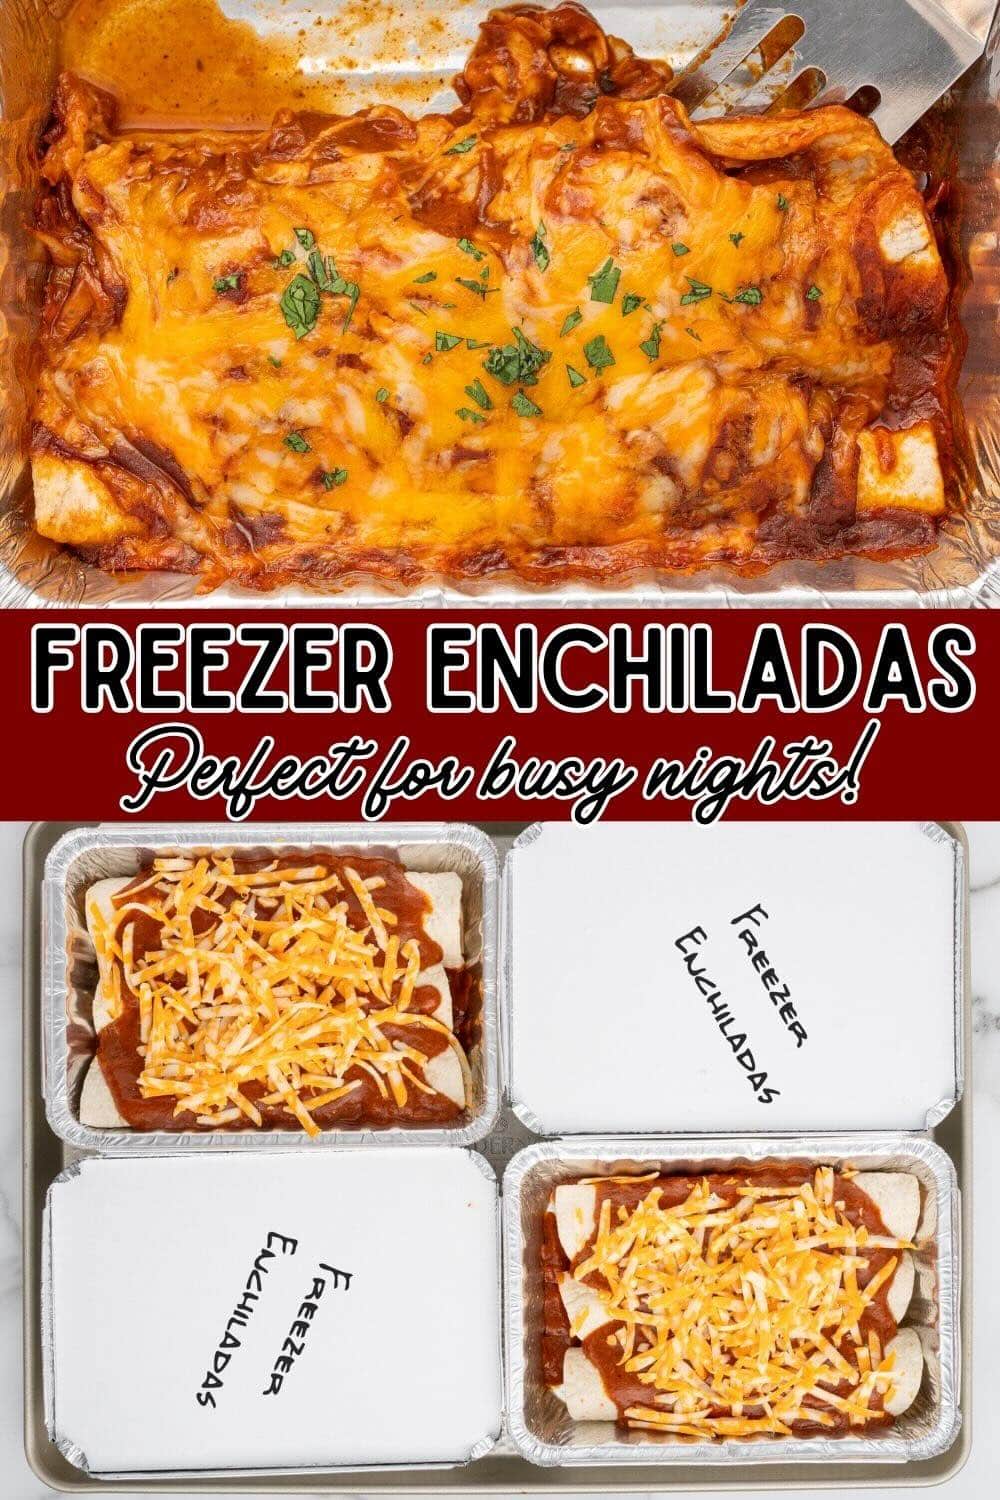
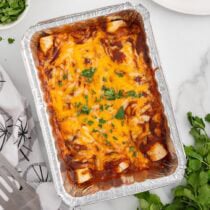
Meet my favorite frozen meal: Freezer Chicken Enchiladas. Why pre-bake when you can prep ahead and enjoy a hassle-free dinner when there’s no time to cook? Take them straight from the freezer to the oven for a total weeknight win!


Easy Chicken Enchiladas for Meal Prep
Our Freezer Chicken Enchiladas recipe turns a classic Tex-Mex meal into a freezer-friendly version. Let’s take the pressure out of dinner prep and make mealtime super simple! With just a few steps, you’ll have a batch of hearty, cheesy chicken enchiladas ready to bake in the oven whenever you need them.
Prep ahead, freeze, and enjoy a flavorful, comforting dish that’s perfect for busy days or meal planning. Freezer meals take the stress out of dinnertime and make it easier to enjoy a homemade meal without the hassle.
With our Freezer Enchiladas, you’ll always have a delicious, ready-to-go dish waiting for you in the freezer. Whether you’re feeding the family or looking for lazy enchiladas after a long day, this freezable chicken enchiladas recipe is always here for you.
Ingredients For Chicken Enchiladas
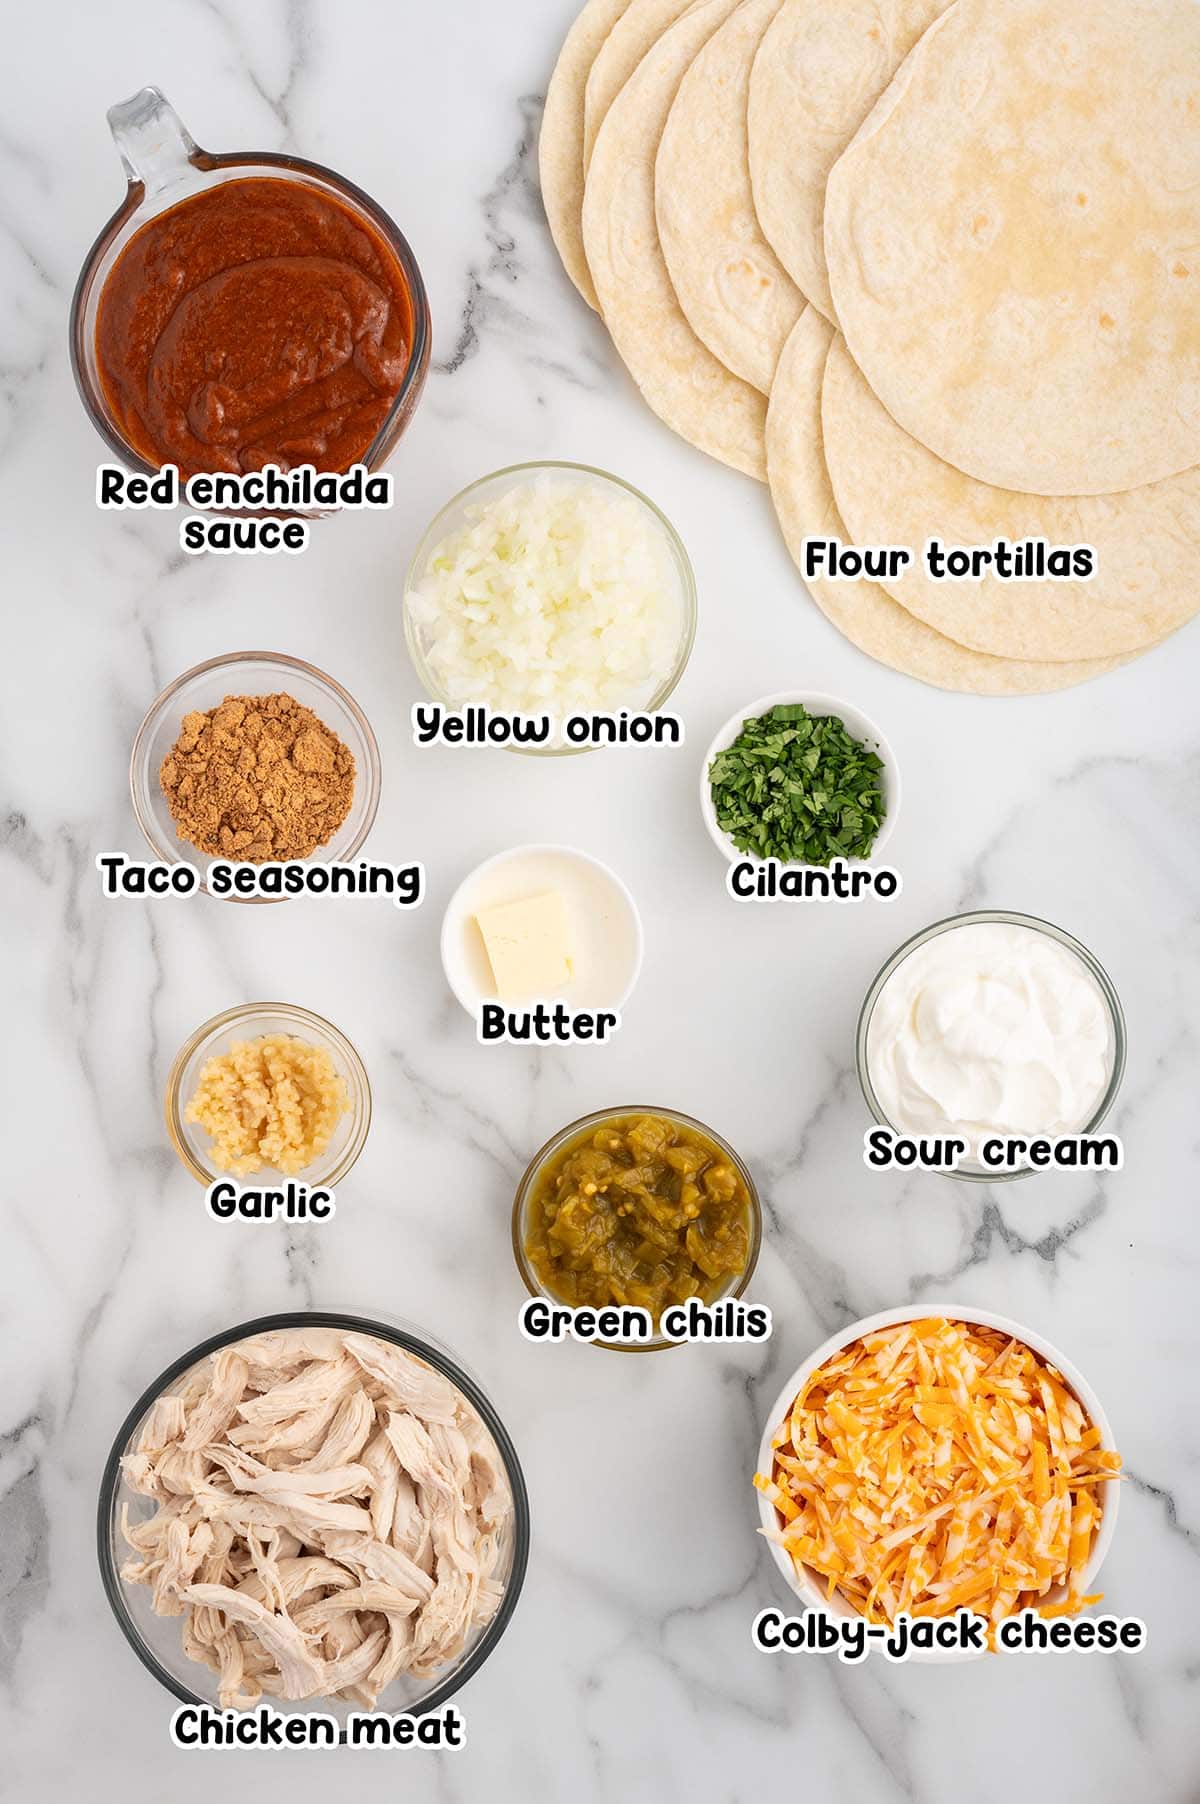
- Unsalted butter
- Sweet yellow onion
- Minced garlic
- Diced mild green chilis
- Taco seasoning: You can use a packet of store-bought taco seasoning or make your own homemade taco seasoning. Remember that one packet of taco seasoning is about 2-3 tablespoons of homemade seasoning.
- Sour cream
- Rotisserie chicken meat: I used both the white and dark meat from a 2 pound cooked and cooled rotisserie chicken for this recipe. If you do not want to use rotisserie chicken, you can cook and shred 2-3 large boneless skinless chicken breasts to yield the 3 cups shredded chicken needed.
- Colby-jack cheese: Shredded colby-jack cheese can be substituted with shredded cheddar cheese, shredded Monterey jack cheese, or a combination of any of these cheeses. I prefer to buy the blocks of cheese and shred them by hand, as I find that the shredded block cheese melts better than the bags of pre-shredded cheese.
- Flour tortillas: I used fajita-size tortillas for my filling. Corn tortillas can be used as a gluten-free option with a slightly different texture.
- Red enchilada sauce
See the recipe card for full information on ingredients and quantities.
What’s the Best Sauce for Chicken Enchiladas?
When it comes to choosing the best sauce for your chicken enchiladas, it all comes down to personal preference and the flavor profile you’re craving.
Red Enchilada Sauce
Red sauce is the classic choice for chicken enchiladas, offering a deep, rich, and slightly tangy flavor. Made from red chili peppers, garlic, and other spices, it brings a perfect balance of heat and savoriness that complements the tender chicken and gooey cheese. It’s the go-to option for many traditional enchilada recipes.
Green Enchilada Sauce
Green sauce, typically made from tomatillos, green chiles, and cilantro, has a brighter, more tangy flavor compared to red. It’s a great option if you’re looking for something zesty with a little less heat. Green enchilada sauce pairs perfectly with chicken, offering a fresh, vibrant twist on the classic.
Creamy Enchilada Sauce
For a richer, milder alternative, enchilada sauce made with sour cream or heavy cream adds a creamy texture and flavor to your dish. It’s a great choice if you crave the comforts of an enchilada without the sharp tang of the traditional red or green sauces. This option tends to be a crowd-pleaser, especially for those who prefer a less spicy dish.
Can You Freeze Enchiladas With Sauce?
You can absolutely freeze enchiladas with sauce–it comes down to whether you prioritize convenience or texture. Freezing enchiladas before adding sauce helps keep the tortillas intact, preventing them from becoming soggy during the freezing process. Although adding the sauce before baking requires an extra step, you can choose from different sauces or mix things up depending on your mood. Just make sure it fully covers the enchiladas to prevent them from drying out.
On the other hand, freezing enchiladas after adding sauce is more convenient, as everything is ready to bake once thawed. The sauce helps keep the enchiladas moist and flavorful during cooking. However, freezing with sauce can sometimes lead to soggy tortillas, as they absorb the sauce while freezing. Once frozen, you’re locked into that sauce choice, leaving no room for variation.
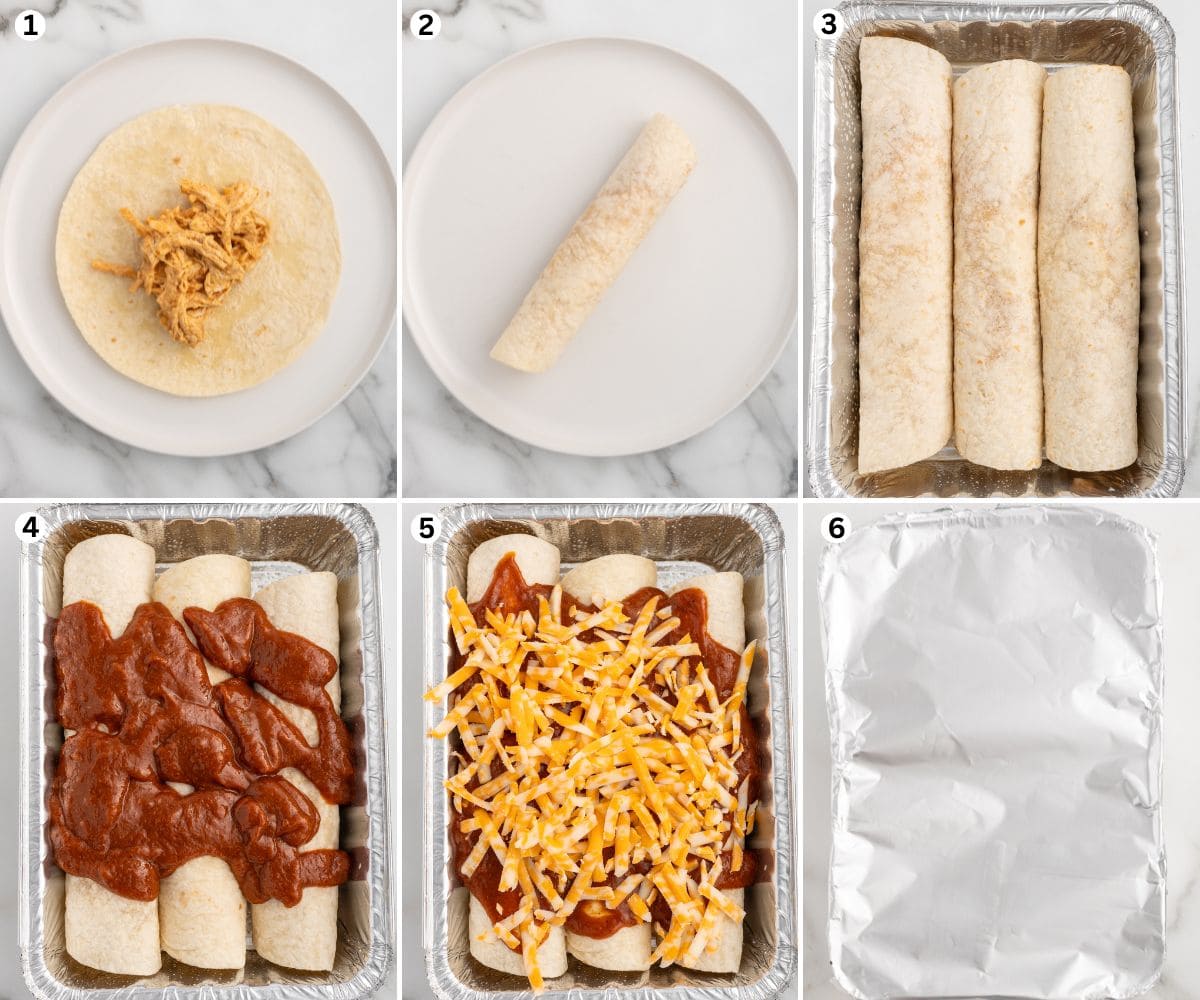
How to Make Freezer Chicken Enchiladas
- Sauté And Season The Onion: Cook the onion and garlic in butter in a medium skillet over medium-high heat until the onions are tender. Sir in the diced green chilis and taco seasoning and cook for an additional 1 minute. Turn off the heat and mix in the sour cream.
- Make The Chicken Mixture: Combine the cooked onion mixture, shredded rotisserie chicken, and cheese in a large mixing bowl.
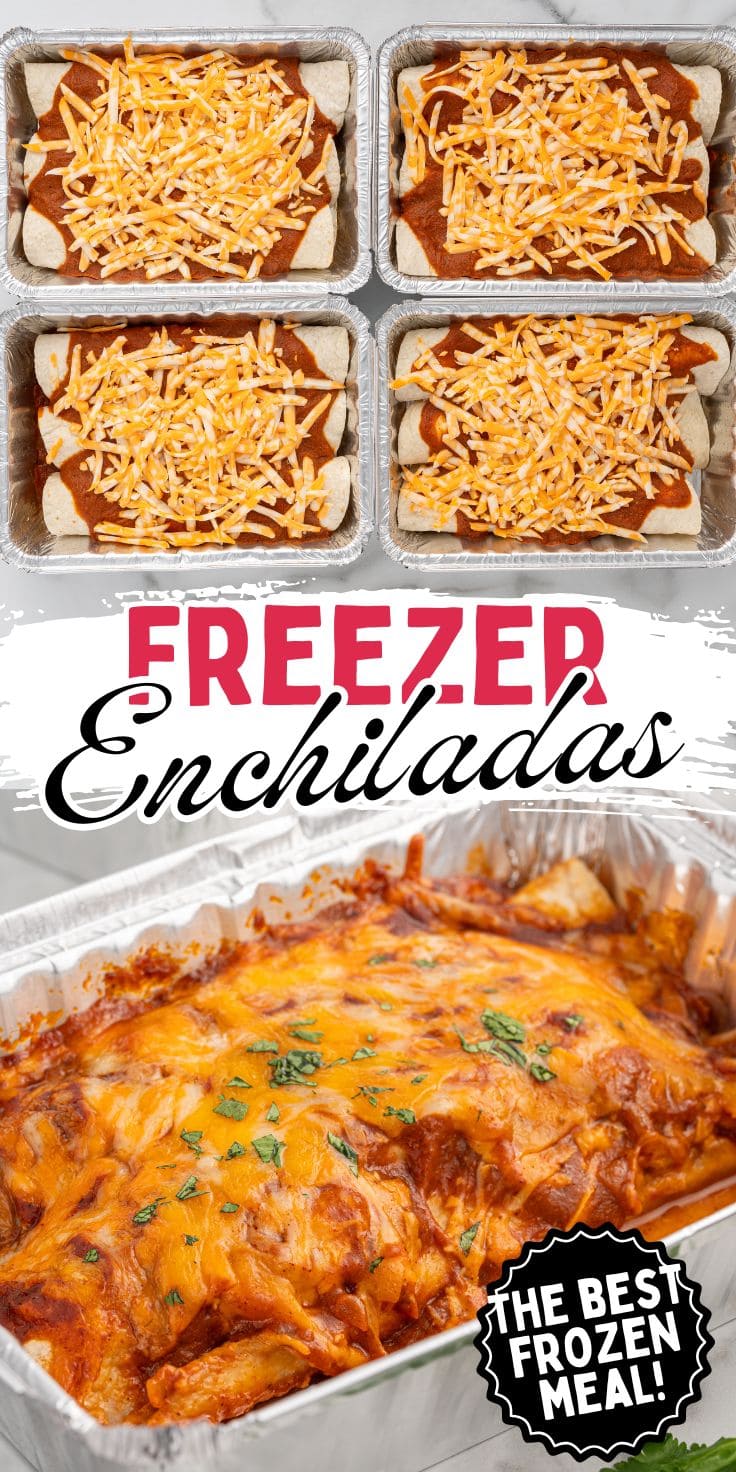
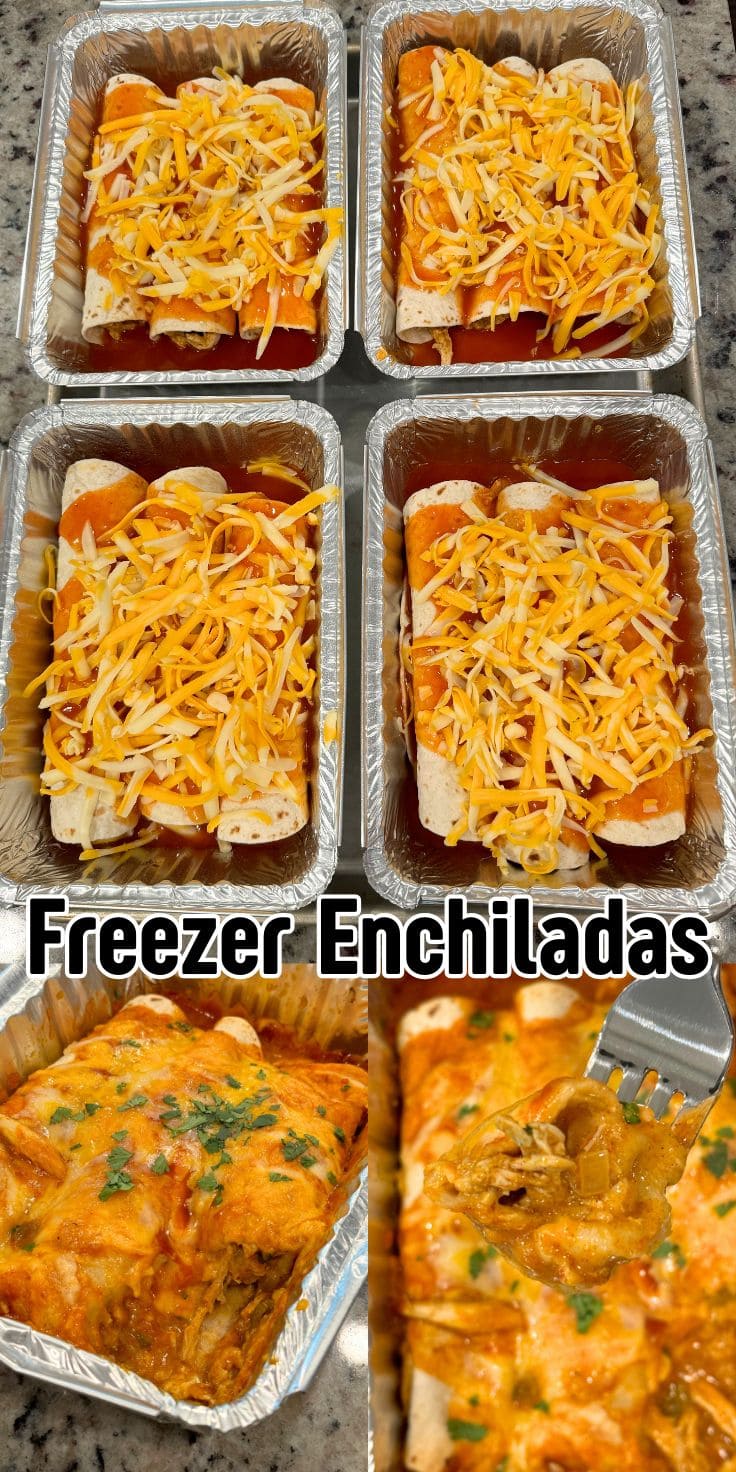
- Assemble: Place one flour tortilla onto a plate. Add chicken filling into the center and roll into an enchilada. Place the filled and rolled tortilla into one of the prepared aluminum pan, seam side down. Repeat with two more tortillas, for a total of tortillas in a single aluminum pan.
- Roll And Repeat: Repeat the assembly until all the aluminum pans are filled with three enchiladas each.
- Top The Tortillas: Pour red enchilada sauce over the tops of the enchiladas and sprinkle with shredded cheese.
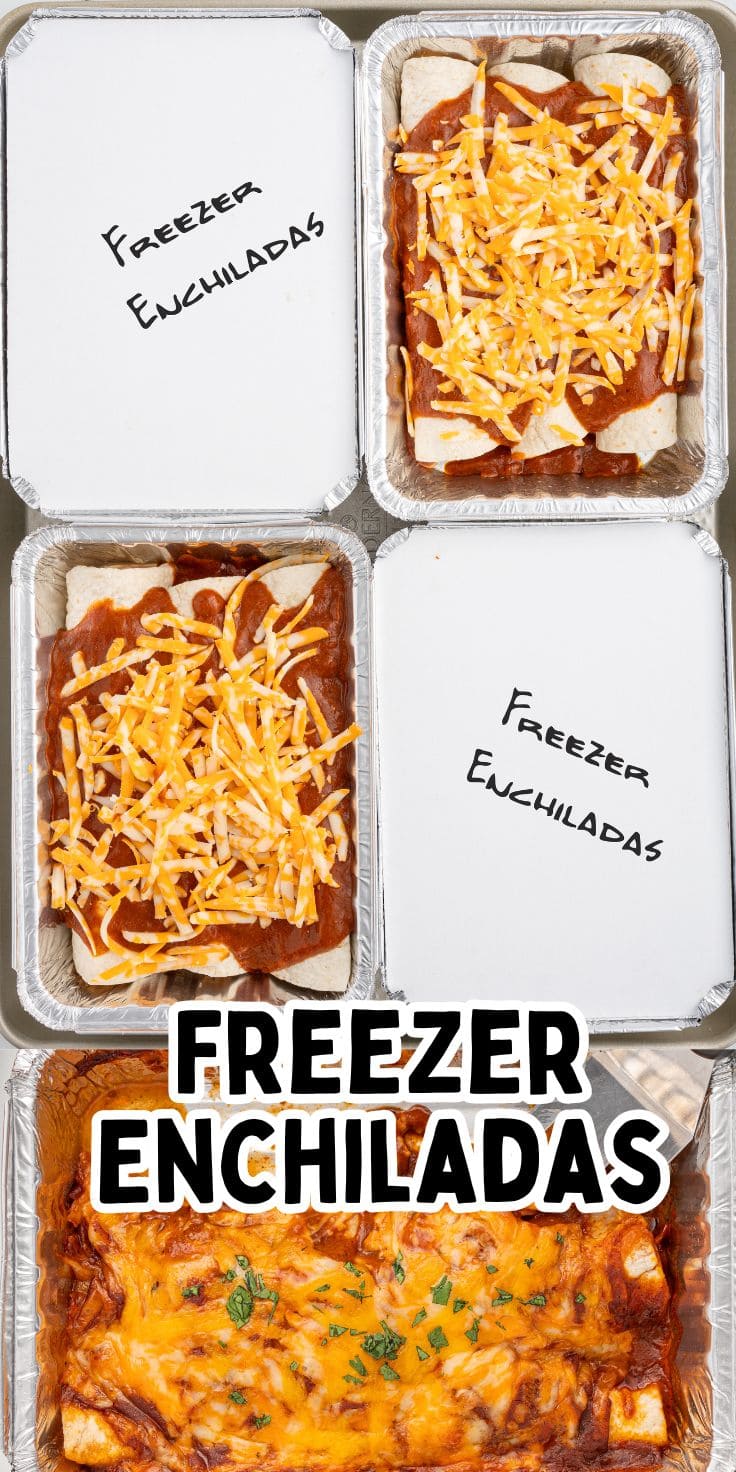
- Freeze: Cover each pan with aluminum foil and place in the freezer.
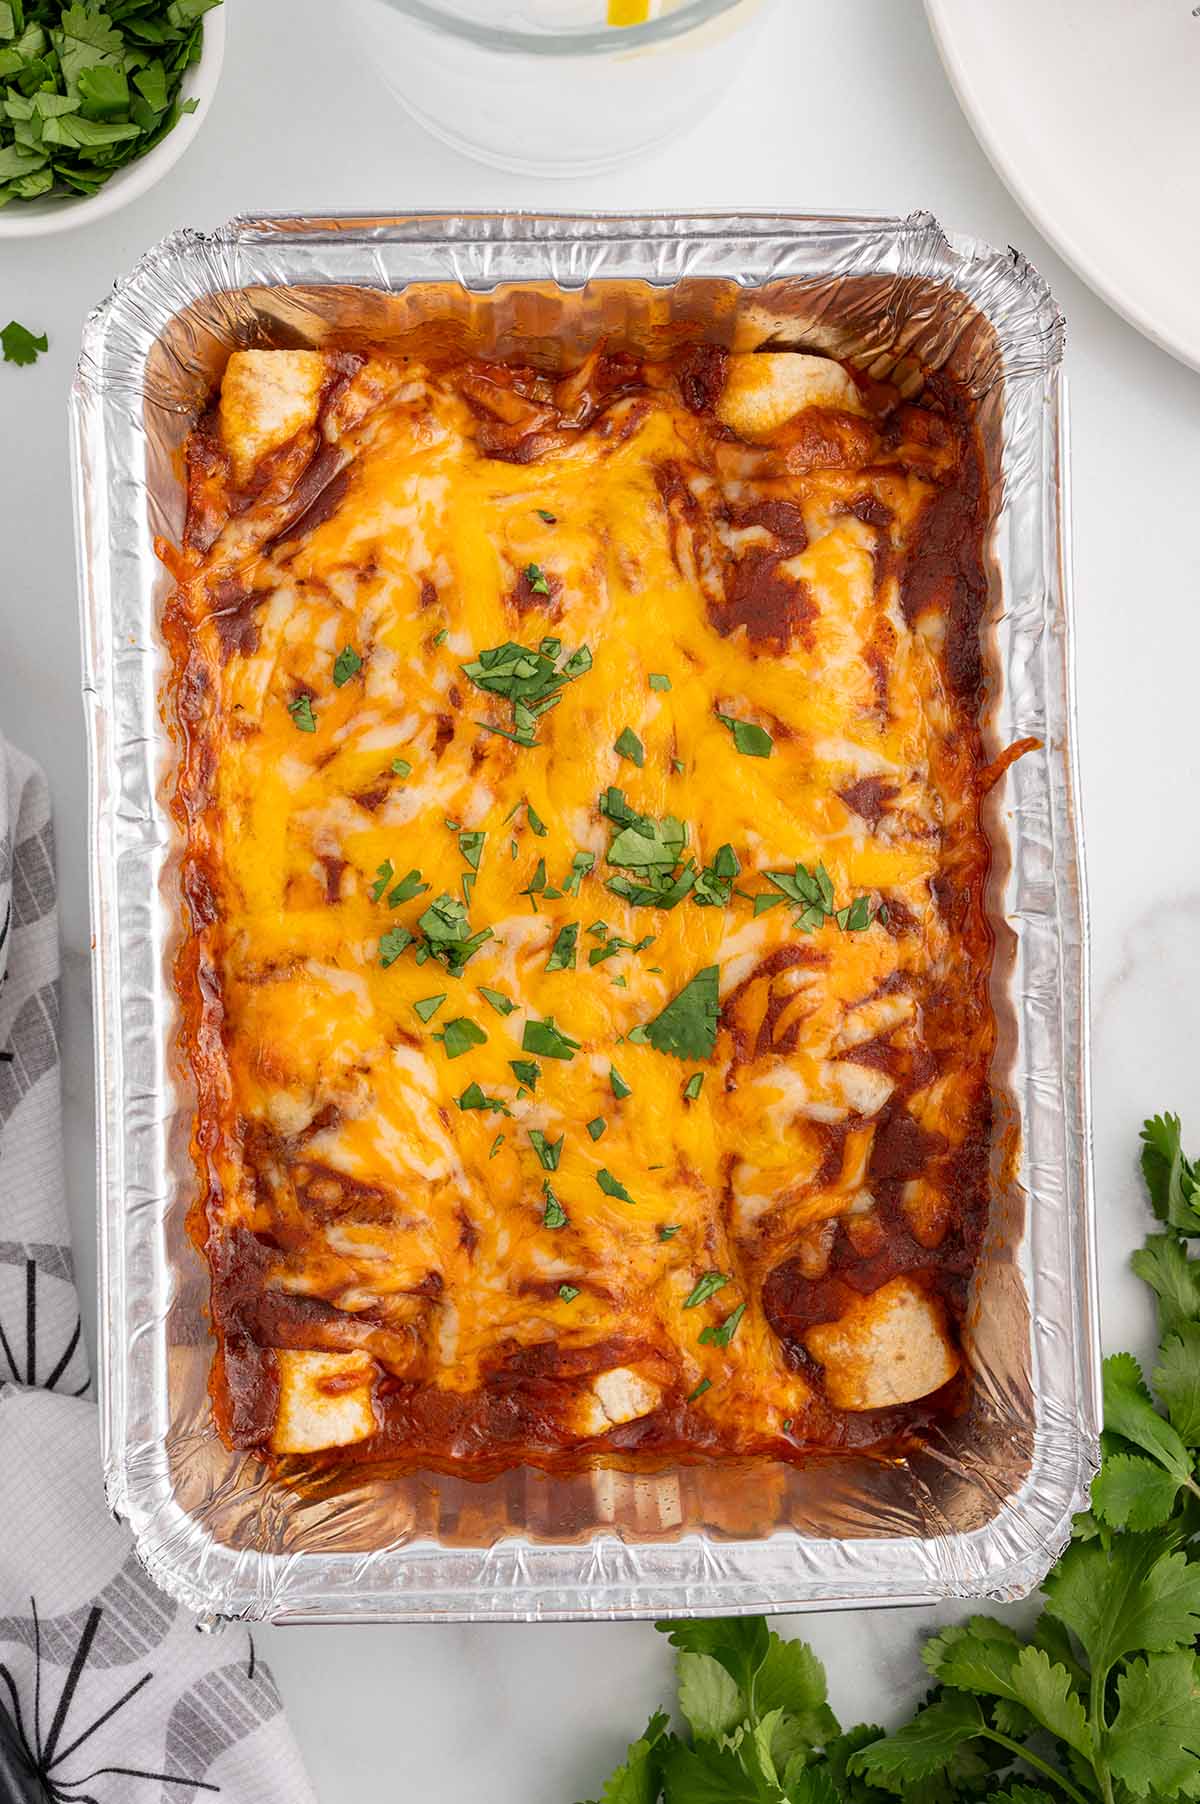
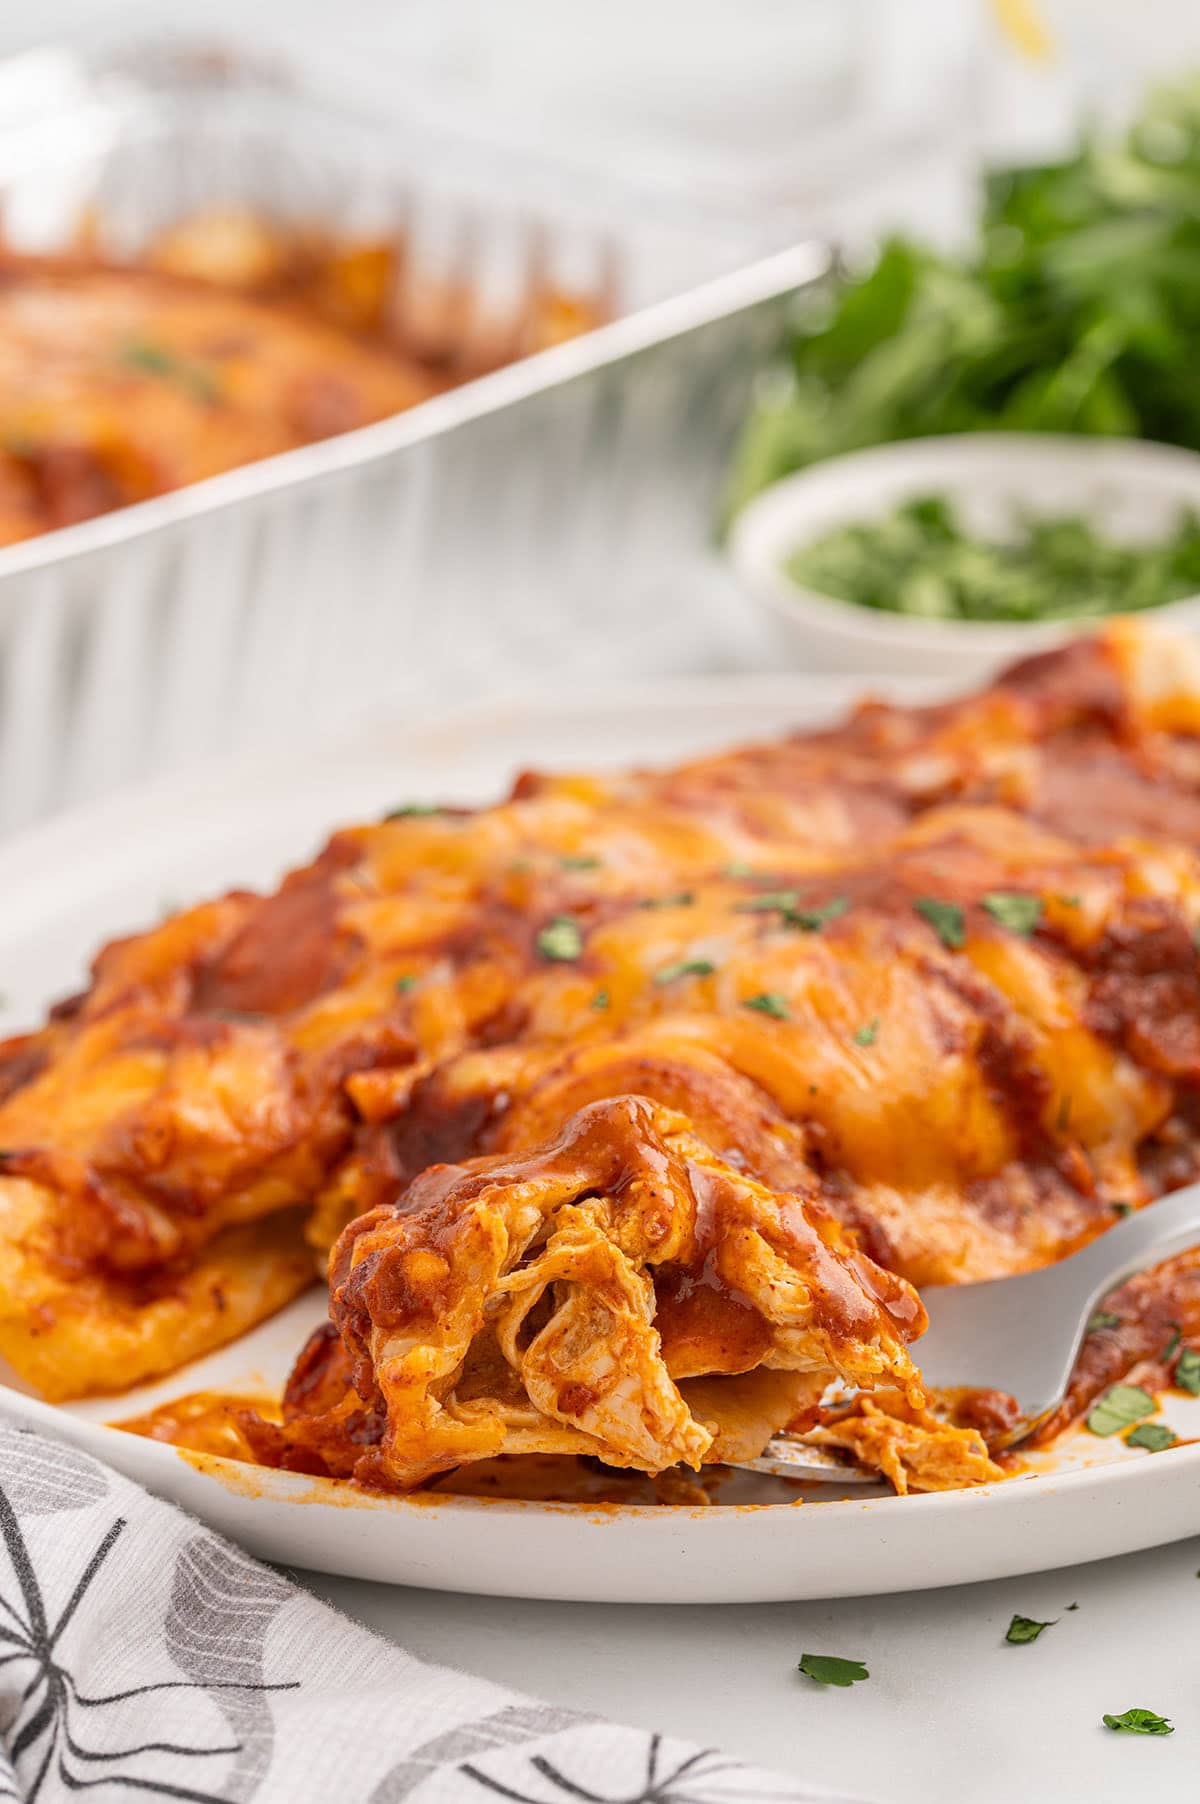
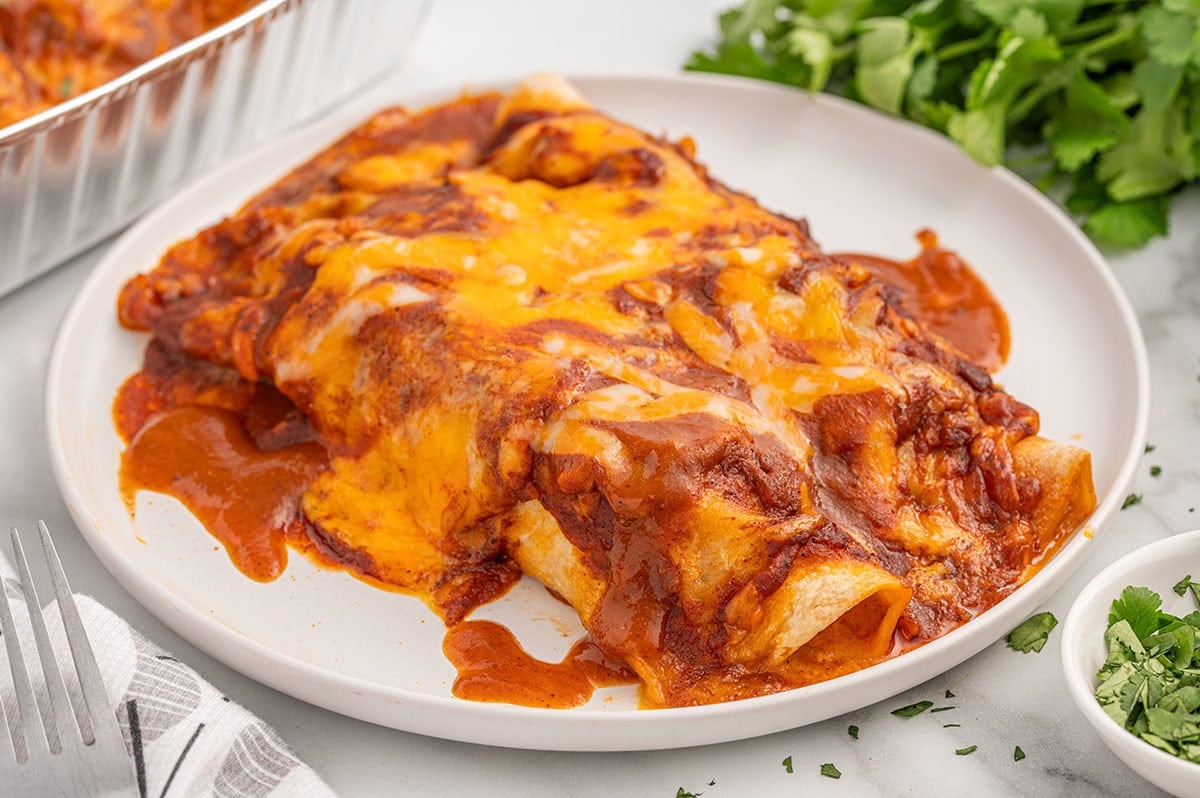
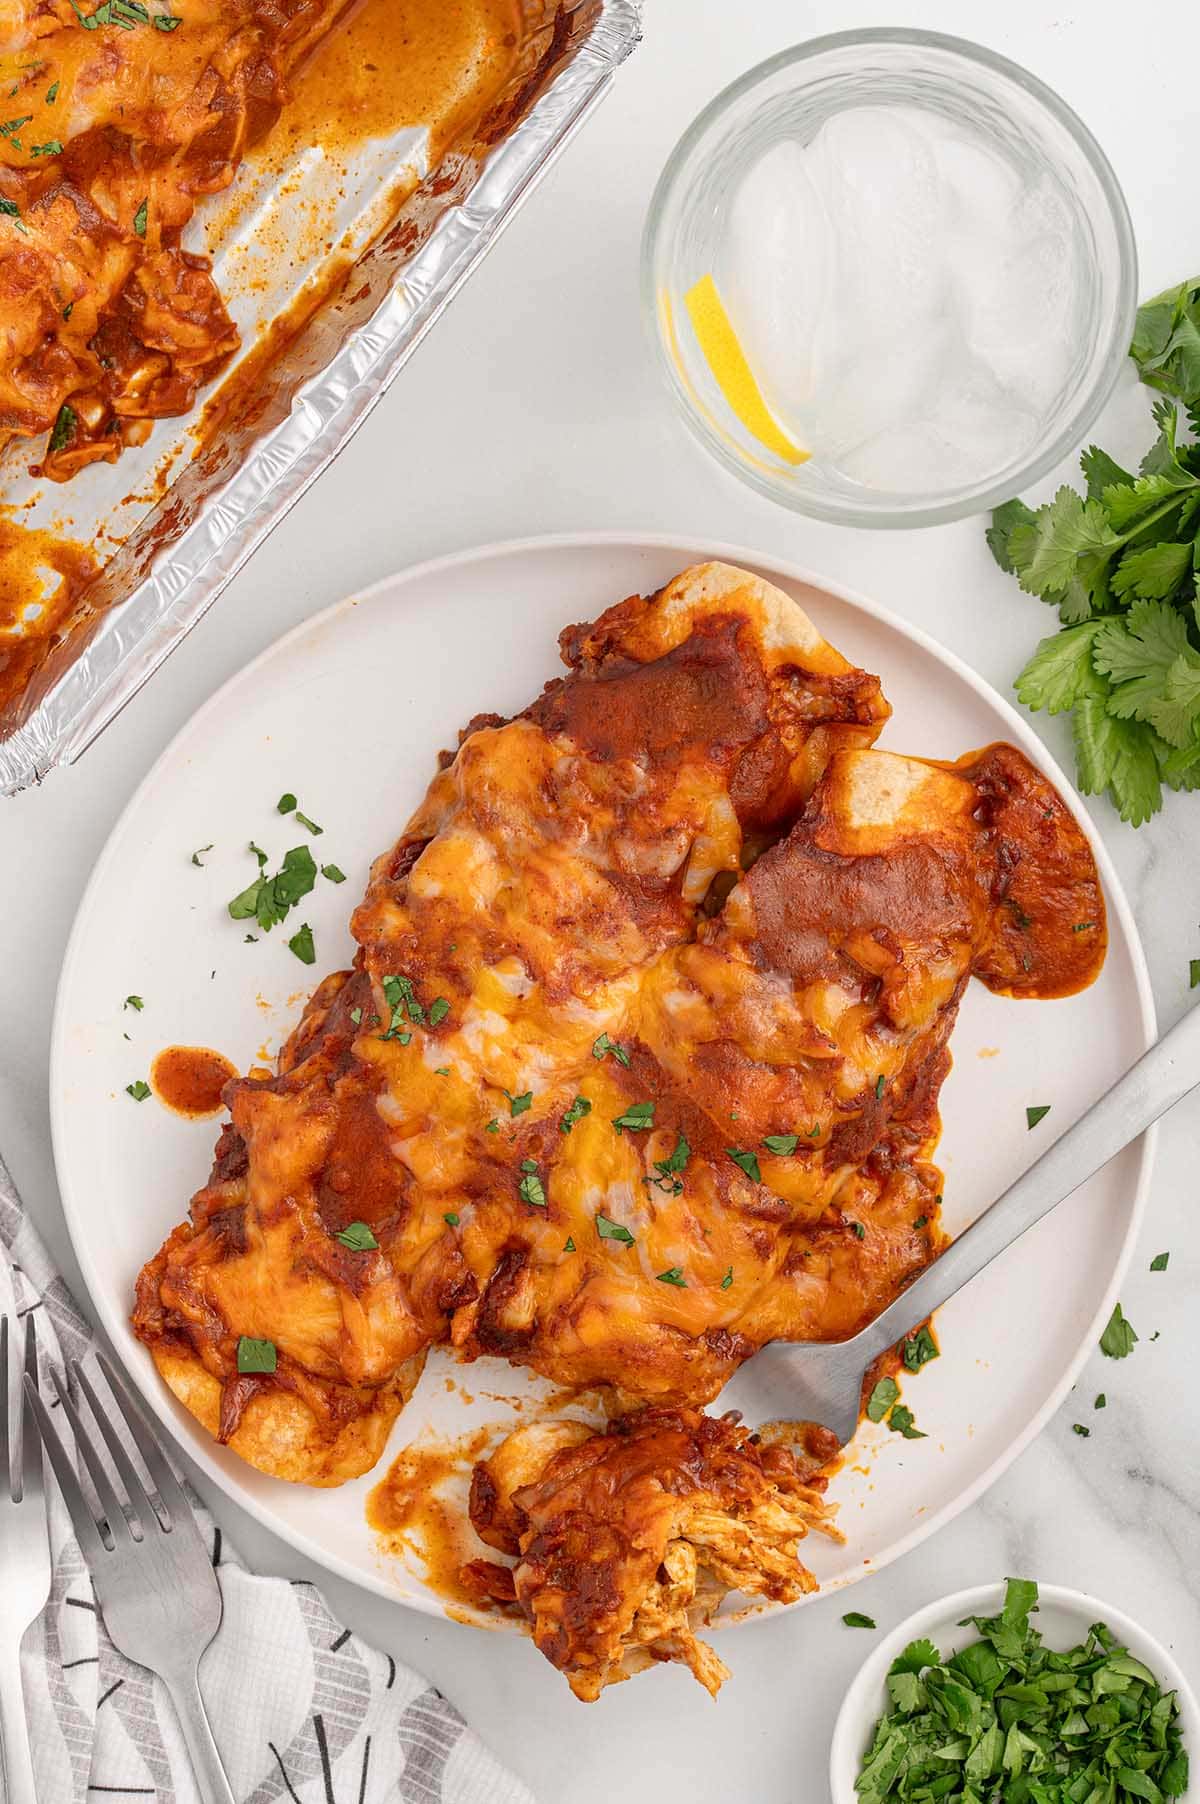
- Bake: Thaw completely in the fridge, then remove the aluminum foil, and bake uncovered at 375 degrees Fahrenheit for 25-30 minutes or until the cheese is bubbly and lightly golden.
- Serve: Garnish with fresh chopped cilantro if desired and serve warm. Enjoy!
Best Way to Freeze Chicken Enchiladas
Freezing chicken enchiladas is a great way to have a homemade meal ready to go when you don’t have time to cook. To ensure they stay fresh and delicious, follow these tips:
- Fill Before Freezing: Make sure your enchiladas are fully assembled with filling, sauce, and cheese. You can freeze them with or without sauce, but if you add sauce before freezing, ensure it’s evenly spread to cover the tortillas completely.
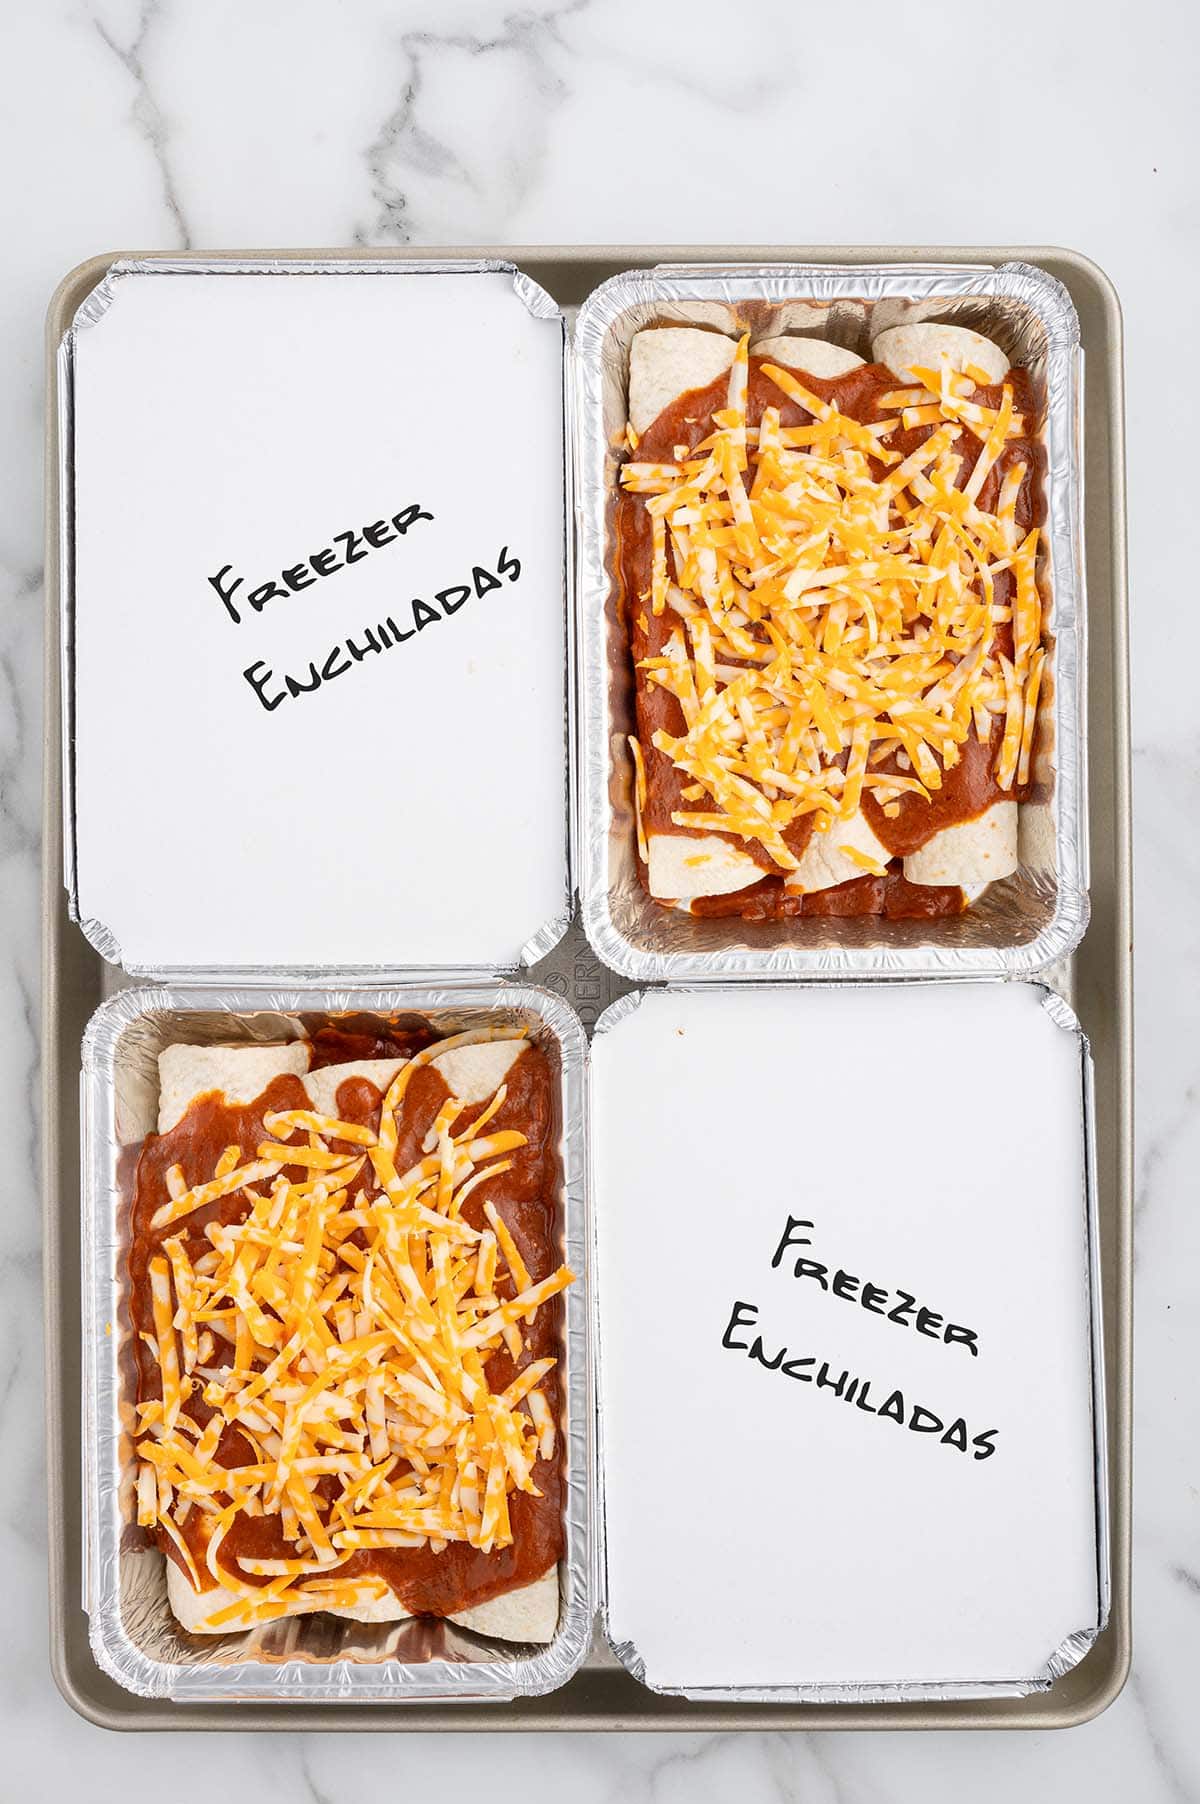
- Use Airtight Containers: Place the assembled enchiladas in aluminum foil pans or freezer-safe baking dishes. For extra protection, tightly wrap the pan with layers of plastic wrap and aluminum foil. This will prevent freezer burn and help retain flavor.
- Don’t Forget To Date: Don’t forget to label your freezer meals with the date you froze them. This will help you keep track of how long they’ve been in the freezer. Enchiladas are best used within 3 months for optimal taste and texture.
- Flash Freeze (Optional): If you’re worried about the enchiladas sticking together, you can flash freeze them first. Simply place the enchiladas on a baking sheet, uncovered, and freeze for a few hours. Then, transfer them to your airtight container for long-term storage.
Easy Sides to Serve with Chicken Enchiladas
Pairing the right sides with your freezable chicken enchiladas creates a well-rounded dinner and is a great way to balance the meal.
- Serve With A Salad: A simple salad drizzled with light dressing can offer a fresh contrast to the richness of the enchiladas.
- Cook The Classic: Spanish rice is a classic side for enchiladas and easy to make. The slight tang from tomatoes and spices complements the richness of the enchiladas.
- Add Bulk With Beans: Creamy refried beans add a satisfying texture and flavor that pairs perfectly with the spices in the enchiladas. For a lighter option, black beans add a bit of heartiness without overpowering the dish.
- Make Mexican Street Corn (Elote): Grilled corn on the cob slathered in mayo, cotija cheese, chili powder, and lime makes for a fun, flavorful side that complements the enchiladas.
- Choose Chips: Chips and guacamole or salsa provide a crunchy, cool, and creamy contrast to the spicy enchiladas. Plus they’re always a crowd favorite!
Variations For Freezer Enchiladas
- Cook It Casserole-Style: Instead of making four individual serving containers of these freezer enchiladas, you can use a single 9×13 disposable aluminum pan to make a chicken enchilada casserole dish. Place all 12 filled and rolled enchiladas in a single layer in the pan, cover tightly with a sheet of aluminum foil, and freeze for up to 2 months. Thaw and bake according to recipe instructions. You may need to add a few extra minutes of baking time for the larger-sized pan.
- Tasty Toppings: Serve your freezer chicken enchiladas with your favorite Mexican toppings, such as sour cream, diced tomatoes, sliced olives, diced avocado, sliced jalapenos, shredded lettuce, refried beans, yellow rice, and chopped fresh cilantro.
- Pick Another Protein: While I love the convenience of this rotisserie chicken enchilada, you can use ground beef, ground turkey, or pulled pork or make it meatless using a vegetarian meatless crumble.
- Bulk It Up With Beans: To add even more protein, you can bulk up the mixture with black or white beans.
- Make it Meatless: You can make a vegetarian or vegan version by using your favorite meat alternative, like crumbled tofu, beans, veggies (like sliced bell peppers, zucchini, or corn), or meatless crumbles instead of chicken. For a vegan version, make sure to use dairy-free cheese and sour cream.
How Long Do Freezer Chicken Enchiladas Last?
- In the Freezer: When stored correctly in an airtight container or wrapped tightly with plastic wrap and aluminum foil, chicken enchiladas will last up to 3 months in the freezer. After this time, they can still be safe to eat, but the quality may begin to decline.
- In the Refrigerator: If you’ve already baked your enchiladas and have leftovers, they can be stored in the refrigerator for 3 to 4 days. Make sure they’re in an airtight container to keep them fresh and avoid absorbing other odors.
- Make Ahead: These freezer enchiladas are a great make-ahead meal that can be cooked for a single serving or serve up to 4 people. If you do not wish to freeze these enchiladas for long term storage, you can make these up to 24 hours in advance and store them, tightly wrapped in plastic, in the refrigerator until ready to bake and serve.
Reheating Freezer Chicken Enchiladas Without Drying Them Out
Keep your enchiladas moist and delicious without drying them out!
- Baking in the Oven is best for even heating. Preheat to 375°F (190°C). Thaw enchiladas in the fridge overnight and bake uncovered at 375 degrees Fahrenheit for 25-30 minutes or until the cheese is bubbly and lightly golden. Freezer enchiladas can be baked from frozen; however, you will need to bake them tightly covered with a sheet of aluminum foil for 30 minutes, then uncovered for an additional 10-15 minutes or until the cheese is bubbly and lightly golden.
- Microwaving is quick and easy. Place the enchiladas on a microwave-safe plate and cover with a damp paper towel. Microwave for 2-3 minutes (thawed) or 4-5 minutes (frozen), checking for even heating.
- Air Fry for crispy edges. Preheat to 350°F (175°C). Place enchiladas in the air fryer basket and air fry for 10-15 minutes (frozen) or 5-7 minutes (thawed) for crispy, golden edges.
More Delicious Easy Enchilada Recipes
If you tried this Freezer Chicken Enchiladas Recipe or any other recipe on my website, please leave a 🌟 star rating and let me know how it went in the 📝 comments below. Thanks for visiting!!!
Freezer Chicken Enchiladas
Ingredients
- 1 tablespoon unsalted butter
- ¾ cup small diced sweet yellow onion vidalia
- 1 tablespoon minced garlic
- 4 ounce can diced mild green chilis
- 1 ounce packet taco seasoning
- ¾ cup sour cream
- 3 cups shredded rotisserie chicken meat white and dark meat from a 2 pound cooked, and cooled, rotisserie chicken
- 3 cups shredded colby-jack cheese divided, 1 cup for the chicken filling and ½ cup per pan for a total of 2 cups
- 12 (6 inch) fajita size flour tortillas
- 19 ounce can (approximately 2 cups) red enchilada sauce divided ½ cup sauce per pan
- 2 tablespoons chopped fresh cilantro optional garnish
Instructions
- Place 4 small (5×8 inch) disposable aluminum pans onto the counter and lightly spray the inside of each pan with nonstick cooking spray. Set aside.
- In a medium skillet, over medium-high heat, add the unsalted butter, diced sweet yellow onion and minced garlic. Cook for 2-3 minutes or until the onions are tender.1 tablespoon unsalted butter, ¾ cup small diced sweet yellow onion, 1 tablespoon minced garlic
- Add the diced green chilis and taco seasoning to the skillet, stirring to combine, and cook for an additional 1 minute.4 ounce can diced mild green chilis, 1 ounce packet taco seasoning
- Turn off the heat to the skillet and stir in the sour cream until all the ingredients are fully combined.¾ cup sour cream
- To a large mixing bowl, add the cooked onion mixture, shredded rotisserie chicken and 1 cup shredded colby jack cheese gently stirring to combine all the ingredients.3 cups shredded rotisserie chicken meat, 3 cups shredded colby-jack cheese
- Place a single flour tortilla onto a plate. Add ⅓ cup chicken filling into the center of the flour tortilla and carefully roll the tortilla to form the shape of an enchilada.12 (6 inch) fajita size flour tortillas
- Place the filled, and rolled, tortilla into one of the prepared aluminum pan, seam side down, and repeat with two more tortillas until you have a total of 3 filled and rolled tortillas in a single aluminum pan. Repeat steps 5 and 6 until all the aluminum pans are filled with three enchiladas each.
- Divide the red enchilada sauce evenly among the four pans of enchiladas by carefully pouring approximately ½ cup red enchilada sauce over the tops of the enchiladas in each aluminum pan.19 ounce can (approximately 2 cups) red enchilada sauce
- Divide the remaining shredded colby jack cheese evenly among the four aluminum pans by topping each pan of enchiladas with ½ cup of shredded cheese.
- Cover each of the pans of freezer enchiladas with a piece of aluminum foil tightly sealing the pans around all the edges. Place the aluminum pans of enchiladas into the freezer, in a single layer, for a minimum of 8 hours, up to overnight, to allow the enchiladas to freeze solid before stacking them for longer storage in the freezer.
- When ready to bake, remove as many aluminum pans of enchiladas as desired and place into the refrigerator to thaw completely. Once thawed, remove the aluminum foil cover from each pan.
- Preheat the oven to 375°F and bake uncovered for 25-30 minutes or until the cheese is bubbly and lightly golden. Remove from the oven and allow the enchiladas to cool for 3-5 minutes before garnishing with fresh chopped cilantro if desired and serving.2 tablespoons chopped fresh cilantro
Jenn’s Notes
- Baking in the Oven is best for even heating. Preheat to 375°F (190°C). Thaw enchiladas in the fridge overnight and bake uncovered at 375 degrees Fahrenheit for 25-30 minutes or until the cheese is bubbly and lightly golden. Freezer enchiladas can be baked from frozen however, you will need to bake them tightly covered with a sheet of aluminum foil for 30 minutes, then uncovered for an additional 10-15 minutes or until the cheese is bubbly and lightly golden.
- Microwaving is quick and easy. Place the enchiladas on a microwave-safe plate and cover with a damp paper towel. Microwave for 2-3 minutes (thawed) or 4-5 minutes (frozen), checking for even heating.
- Air Fry for crispy edges. Preheat to 350°F (175°C). Place enchiladas in the air fryer basket and air fry for 10-15 minutes (frozen) or 5-7 minutes (thawed) for crispy, golden edges.