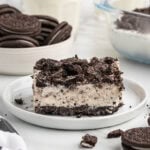
No Bake Oreo Dessert
This no bake oreo dessert has a cream cheese filling, real whipped cream, and a buttery Oreo crust. No pudding mix, no oven, and it gets even better after an overnight freeze. Made in about 15 minutes of prep.
Servings: 10
Calories: 216kcal
Ingredients
- 1 14.3 ounce package Oreo cookies crushed and divided
- ¼ cup butter melted
- 1 cup heavy whipping cream
- 1 teaspoon vanilla
- 8 ounces cream cheese softened
- 3 tablespoons sugar
- 1 14 ounce can sweetened condensed milk
Instructions
- Remove 12 Oreos from the package.1 14.3 ounce package Oreo cookies
- Crush the remaining Oreos either by placing in a Ziploc bag and using a rolling pin or placing in a food processor.
- Mix half of the crushed Oreo crumbs with the melted butter. Press into a 9x9 pan to form the crust. Place into the refrigerator while preparing the filling. Set the rest of the Oreo crumbs aside.¼ cup butter
- In a large bowl whip the heavy cream until stiff peaks form. Set aside.1 cup heavy whipping cream
- In another large bowl cream together the cream cheese and sugar. Add the vanilla and mix again.1 teaspoon vanilla, 3 tablespoons sugar, 8 ounces cream cheese
- Next add the heavy whipping cream to the cream cheese mixture folding gently with a spatula.1 cup heavy whipping cream
- Add the sweetened condensed milk and continue mixing gently until fully combined.1 14 ounce can sweetened condensed milk
- Mix in the remaining Oreo crumbs.
- Spread the mixture evenly over your cookie base.
- Crush the remaining 12 Oreos and sprinkle them on top of the filling.
- Cover with foil. Return to the freezer and chill until solid (3-4 hours, overnight is best).
- Remove from the freezer 15 minutes before serving.
Video
Notes
Storage:
Cover any leftovers tightly and keep them in the refrigerator for up to 4 days. The first two days are the sweet spot, the crust hits that perfect stage where it's slightly softened but still has some definition to it.
Need to stretch it longer? Wrap the pan tightly and freeze for up to a month, then let it thaw overnight in the refrigerator before serving.
If you're taking this to an outdoor party or serving it in warm weather, keep it in a cooler or the fridge until as close to serving time as possible. The filling softens quickly once the temperature climbs, so don't let it sit out too long.
Tips:
- Give the cream cheese plenty of time to soften. Pull it from the fridge at least 30 to 60 minutes before you're ready to start. Cold cream cheese will leave you with lumps in the filling that no amount of mixing will fix. Set it on the counter and just let it do its thing.
- Whip the cream all the way to stiff peaks. This is the step people tend to rush, and it shows. Soft peaks mean a filling that's looser than it should be. Keep the mixer going until those peaks stand straight up and hold their shape, then you're ready.
- Build in enough time, 4 hours at minimum. This dessert needs a real freeze to set up properly. Cut into it too soon and it won't hold its shape. Overnight is even better, and the texture the next morning is noticeably improved.
- Pop it back in the freezer before slicing. If the dessert has been sitting in the refrigerator and softened up, give it 10 to 15 minutes in the freezer before you cut it. A sharp knife wiped clean between each slice keeps those layers looking sharp.
- Reach for a glass baking dish. A clear pan lets the crust, filling, and topping layers show through the sides, and it looks genuinely impressive at a party without any extra effort on your part.
Nutrition
Calories: 216kcal | Carbohydrates: 5g | Protein: 2g | Fat: 21g | Saturated Fat: 13g | Cholesterol: 70mg | Sodium: 123mg | Potassium: 49mg | Sugar: 4g | Vitamin A: 796IU | Vitamin C: 1mg | Calcium: 39mg | Iron: 1mg
